
 5 Star Store
 Community Guidelines
 Newbies Corner
 Recipes
 AD search
Hello to everyone here, I've finally decided to take a break from just reading all your words of wisdom and build myself a still! I'm new to the "liquor" side of distilling as I brewed beer for a short while a few years back but never really got into it. I've read these forums for a while now as well as other sites but I would really appreciate some advice. After taking a lot into consideration I'm leaning more towards a valved reflux system but especially one that can be easily converted to a pot still. I want to be able to distill different kinds of liquor (vodka, whiskey, bourbon, rum, etc.) and flavored ones too! So long story short, would a valved reflux "modular" design model be a good starting still for me to build? The plans seem pretty clear and easy plus the fact that I can use it both ways is a bonus. I already started on this project and soldered a few of the joints but only "dry fit" the column and still head. Please give me you opinions and thank you all in advance for any input and look forward to getting my first still up and running, cheers!
I will try to post pics soon! :text-coolphotos:
Howdy!
15 posts
• Page 1 of 1
 Howdy!
![]() by Hoochrunner » Sun Mar 02, 2014 1:59 am
by Hoochrunner » Sun Mar 02, 2014 1:59 am
- Hoochrunner
- Posts: 6
- Joined: Mon Feb 24, 2014 6:34 am
- equipment: in progress of building my first, going to be a reflux/pot hybrid still
Re: Howdy!
![]() by Hoochrunner » Sun Mar 02, 2014 5:30 am
by Hoochrunner » Sun Mar 02, 2014 5:30 am
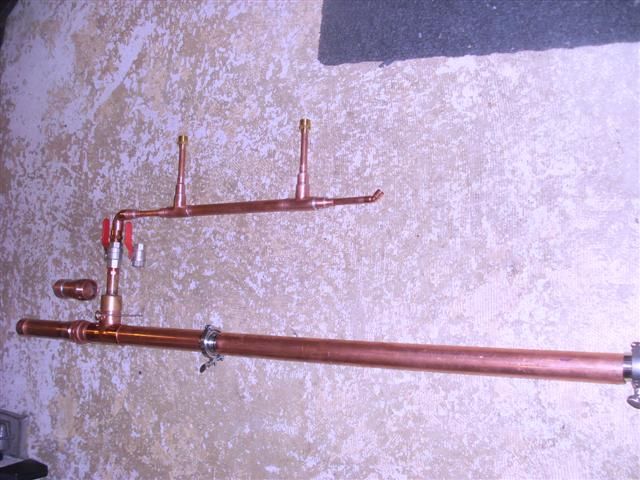
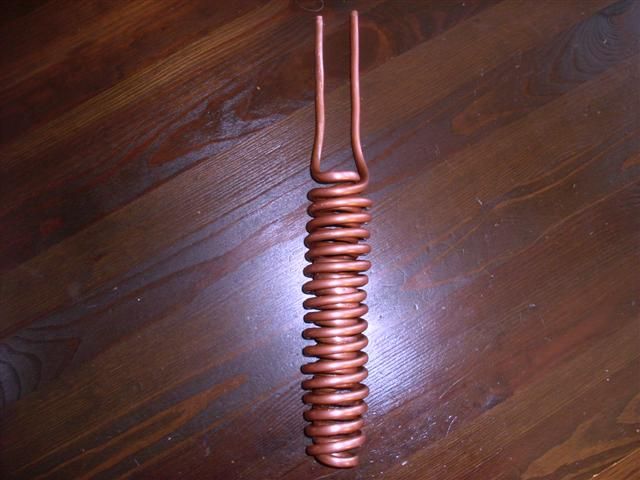
Wasn't sure on the picture posting :think: but here is what I have so far, condenser coil isn't completed yet, valve is only for picture purpose ( 1" needed) but will be situated there, originally it was on the vertical tube under the elbow near the coupler. The condenser coil tube is threaded to the column for easy replacement for the shorter still head (pictured beside) The column is 48" high but is not cut yet as it will have a tri-clamp at 36" so it can be removed to have a one foot section left below the "T" for the pot still setup. I have a 15 gallon keg which I haven't figured out what to do with yet, gas or electric? I'm eager to finish up the soldering and complete the project so any feedback (good or bad) is greatly appreciated, keep in mind I'm new to this whole process but really want to learn! :angry-banghead:


- Hoochrunner
- Posts: 6
- Joined: Mon Feb 24, 2014 6:34 am
- equipment: in progress of building my first, going to be a reflux/pot hybrid still
Re: Howdy!
![]() by Smbjk » Sun Mar 02, 2014 7:59 am
by Smbjk » Sun Mar 02, 2014 7:59 am
Looking good mate :handgestures-thumbupleft: couple of suggestions. At the top of the column make sure you have a flange and triclamp so you can inter change your 2 heads and also to ensure you have no vopor leaks. You may also want to have another flange and triclamp 40 -50cm from your take off area so that when you change to pot mode you wont have to pull out all the packing as it can be a pain in the ass.
Also make sure that when you switch to pot mode keep your valve open at all time if you leave it closed :scared-eek:
Like you concept and work mate, zac has a similar style rig think it works well for him. He might have a few ideas to give you, but he might be too busy building his bubblerr :teasing-neener:
My gues is in 6mths after your hybrid is built you'll be thinking about a bubbler :D :handgestures-thumbupleft:
- Smbjk
- Posts: 863
- Joined: Fri Dec 14, 2012 11:22 pm
- Location: Brisvegas
- equipment: 50lt keg boiler with 2"boka
3" bubbler with 4 perf plates
All grain brewery ( Small Scale ) Keg Fridge
50lt keg boiler 2x2400w elements
Control box
Building fund is depleted
Re: Howdy!
![]() by Smbjk » Sun Mar 02, 2014 8:02 am
by Smbjk » Sun Mar 02, 2014 8:02 am
Also 1more thing are your fitting brass caus brass in the vapor path is not very safe due to the contact with lead. Go a stainles ball valve just to be sure :handgestures-thumbupleft:
- Smbjk
- Posts: 863
- Joined: Fri Dec 14, 2012 11:22 pm
- Location: Brisvegas
- equipment: 50lt keg boiler with 2"boka
3" bubbler with 4 perf plates
All grain brewery ( Small Scale ) Keg Fridge
50lt keg boiler 2x2400w elements
Control box
Building fund is depleted
Re: Howdy!
![]() by Zak Griffin » Sun Mar 02, 2014 8:22 am
by Zak Griffin » Sun Mar 02, 2014 8:22 am
Mine isn't a hybrid, I've just got a Boka head and a pot head that can be changed onto the same column...
I haven't actually finished the Bok head though... Been too busy running the pot and building the bubbler haha
I haven't actually finished the Bok head though... Been too busy running the pot and building the bubbler haha
- Zak Griffin
- Lifetime Member
- Posts: 6832
- Joined: Mon Jul 15, 2013 9:34 pm
- Location: Radelaide
- equipment: "The Heart of Gold" - 4" Bubbler - finally bubbling!
"Zaphod" - 3" Pot - retired
"Agrajag" - 6" Bubbler - midlife crisis build?
Re: Howdy!
![]() by Crankyyankee » Sun Mar 02, 2014 11:21 am
by Crankyyankee » Sun Mar 02, 2014 11:21 am
Go electric not gas. Safety first. There is alot of information here about electric heating elements in kegs. With a controller you cant beat it. Gas plus vapour equals disaster.
- Crankyyankee
- Posts: 11
- Joined: Sat Nov 23, 2013 10:37 am
- equipment: T500, several different pot heads with 16 gallon keg.
Re: Howdy!
![]() by Hoochrunner » Mon Mar 03, 2014 12:48 am
by Hoochrunner » Mon Mar 03, 2014 12:48 am
Smbjk wrote:Looking good mate :handgestures-thumbupleft: couple of suggestions. At the top of the column make sure you have a flange and triclamp so you can inter change your 2 heads and also to ensure you have no vopor leaks. You may also want to have another flange and triclamp 40 -50cm from your take off area so that when you change to pot mode you wont have to pull out all the packing as it can be a pain in the ass.
Also make sure that when you switch to pot mode keep your valve open at all time if you leave it closed :scared-eek:
Like you concept and work mate, zac has a similar style rig think it works well for him. He might have a few ideas to give you, but he might be too busy building his bubblerr :teasing-neener:
My gues is in 6mths after your hybrid is built you'll be thinking about a bubbler :D :handgestures-thumbupleft:
Thanks Smbjk,appreciate the advice :handgestures-thumbupleft: as for the column head its a threaded fitting on both to interchange which I already had so I used them (prefer flange & clamp though) and there will be a flange 12" below the "T" to remove the lower section with the packing, I just haven't cut the pipe off yet. As for the valve I will be picking up a stainless one but just put that one there as an example for the picture. Only thing left is regarding the thermostat, where is the best placement and is it better to have a fitting screwed in place? Thanks!
- Hoochrunner
- Posts: 6
- Joined: Mon Feb 24, 2014 6:34 am
- equipment: in progress of building my first, going to be a reflux/pot hybrid still
Re: Howdy!
![]() by Gas on » Mon Mar 03, 2014 12:54 am
by Gas on » Mon Mar 03, 2014 12:54 am
G'day hoochrunner :handgestures-thumbupleft:
my advice is keep ya fingers outa the tails mate coz fuc it smelly stuff :handgestures-thumbupleft: :handgestures-thumbupleft:
my advice is keep ya fingers outa the tails mate coz fuc it smelly stuff :handgestures-thumbupleft: :handgestures-thumbupleft:
- Gas on
- Posts: 356
- Joined: Sun Jun 19, 2011 11:51 pm
- Location: perth sor
- equipment: baked beans & rum
arfa 5 star bubbler
Re: Howdy!
![]() by Hoochrunner » Sun Mar 23, 2014 8:06 am
by Hoochrunner » Sun Mar 23, 2014 8:06 am
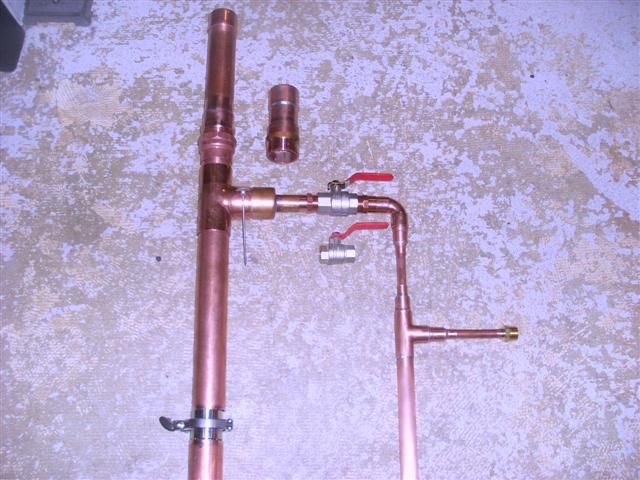
Well I made some good progress and am soon ready to get 'er all together! :handgestures-thumbupleft: I've made a few changes since these pics (used the larger valve & added a piece to the liebig) and will hopefully get some new pics posted shortly.


- Hoochrunner
- Posts: 6
- Joined: Mon Feb 24, 2014 6:34 am
- equipment: in progress of building my first, going to be a reflux/pot hybrid still
Re: Howdy!
![]() by 7evan » Sun Mar 23, 2014 7:56 pm
by 7evan » Sun Mar 23, 2014 7:56 pm
Looks great mate!
Very much like mine, but modular!
Awesome idea
Very much like mine, but modular!
Awesome idea
- 7evan
- Posts: 220
- Joined: Wed May 08, 2013 10:41 am
- Location: Sunny SE QLD
- equipment: FSD/COPPER handmade crossbred bubbler!
Itailian Spiral Burner with HP Reg
Re: Howdy!
![]() by Smbjk » Sun Mar 23, 2014 9:28 pm
by Smbjk » Sun Mar 23, 2014 9:28 pm
Nice mate. Looking good :handgestures-thumbupleft: condenser looks great. Not long now by the looks of it, hope you got some washes on
- Smbjk
- Posts: 863
- Joined: Fri Dec 14, 2012 11:22 pm
- Location: Brisvegas
- equipment: 50lt keg boiler with 2"boka
3" bubbler with 4 perf plates
All grain brewery ( Small Scale ) Keg Fridge
50lt keg boiler 2x2400w elements
Control box
Building fund is depleted
Re: Howdy!
![]() by Hoochrunner » Mon Mar 24, 2014 2:27 am
by Hoochrunner » Mon Mar 24, 2014 2:27 am
Thanks for your imput guys :handgestures-thumbupleft: appreciate the kind words! Did some more soldering today and am at the point of drilling into the take off "T" for the thermometer port.... could I get your opinion before I drill into this? :think:
Thanks again
Thanks again
- Hoochrunner
- Posts: 6
- Joined: Mon Feb 24, 2014 6:34 am
- equipment: in progress of building my first, going to be a reflux/pot hybrid still
Re: Howdy!
![]() by 7evan » Mon Mar 24, 2014 6:36 pm
by 7evan » Mon Mar 24, 2014 6:36 pm
Hoochrunner wrote:Thanks for your imput guys :handgestures-thumbupleft: appreciate the kind words! Did some more soldering today and am at the point of drilling into the take off "T" for the thermometer port.... could I get your opinion before I drill into this? :think:
Thanks again
I used some of the 6mm as a sleave for the thermo.
Solder it on then just thread tape the thermo at the top but mine was digital and I could read it vertically. Are you attached to that one?
- 7evan
- Posts: 220
- Joined: Wed May 08, 2013 10:41 am
- Location: Sunny SE QLD
- equipment: FSD/COPPER handmade crossbred bubbler!
Itailian Spiral Burner with HP Reg
Re: Howdy!
![]() by Hoochrunner » Tue Mar 25, 2014 9:53 am
by Hoochrunner » Tue Mar 25, 2014 9:53 am
I was going to do that with a short piece of tubing, attached to what?
- Hoochrunner
- Posts: 6
- Joined: Mon Feb 24, 2014 6:34 am
- equipment: in progress of building my first, going to be a reflux/pot hybrid still
Re: Howdy!
![]() by 7evan » Sun Mar 30, 2014 2:02 pm
by 7evan » Sun Mar 30, 2014 2:02 pm
Hoochrunner wrote:I was going to do that with a short piece of tubing, attached to what?
Put it where you have what I assume is the dial thermo in the pic. That way it won't have distillate dripping over it. Just vapour. :handgestures-thumbupleft:
You do not have the required permissions to view the files attached to this post.
- 7evan
- Posts: 220
- Joined: Wed May 08, 2013 10:41 am
- Location: Sunny SE QLD
- equipment: FSD/COPPER handmade crossbred bubbler!
Itailian Spiral Burner with HP Reg
15 posts
• Page 1 of 1
Who is online
Users browsing this forum: No registered users and 41 guests