Page 1 of 2
Centre downcomer design "Help"

Posted:
Sat Jan 21, 2012 6:45 pmby Modernity
I am working on a 4" design using 3 sets of 3 plates, so 9 plates all up in a 1800mm column with 250mm dephlegmator. I want to stack the plates in from the bottom and have the bottom set of plates sitting or fixed to the bottom flanged end cap and the next set of plate stacked above and so on.
You will have to imagine the 4" column in the drawing
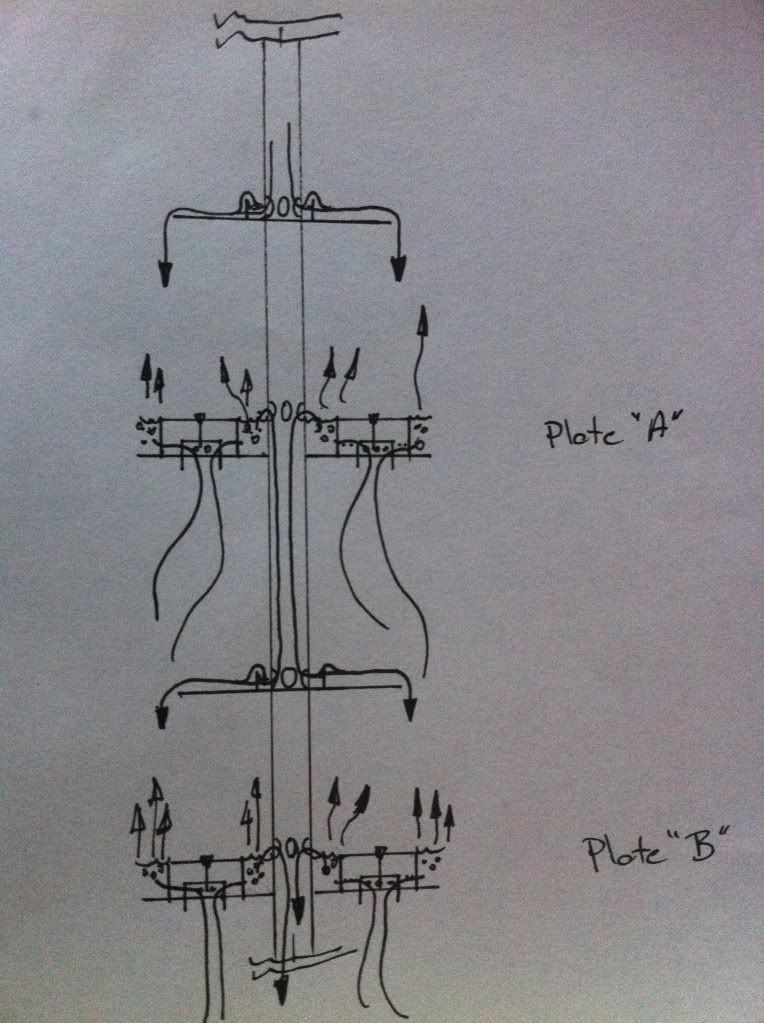
This is not my idea. I don't remember where I saw it, sorry in advance for the lack of credit to who ever I stole the idea off.
I plan to use (6-8) 1/2" & 1" end caps for the bubble caps per plate. The outer cap screwed to the inner cap like the AC are.
What size holes and how many should I use on the out caps?
I thought I would solder the 1/2" cap to the plate.
I was thinking a 3/4" downcomer would do the job?
The downcomer liquid would exit on a 3" plate to rain over the bubble caps. There is a weir at the tube exit.
What have I forgotten?
Ideas?
Re: Centre downcomer design "Help"
Posted:
Sat Jan 21, 2012 8:05 pmby Kimbo
Hi Mod,
what are you using to block the 3/4" centre down comer at each 3" plate?
Re: Centre downcomer design "Help"
Posted:
Sat Jan 21, 2012 8:50 pmby Modernity
The downcomer is cut and soldered at the spreader plate between bubble plate "A" and bubble plate "B" . The exit holes are drilled to create a weir.
Re: Centre downcomer design "Help"
Posted:
Sat Jan 21, 2012 10:39 pmby MacStill
You only need 100mm for your reflux condenser, the more volume you have in it the slower it is to respond to adjustments ;-)
That plate tree looks complicated, a simple downcomer and cup is easy to fabricate and works great......
Dont over complicate things, it wont make it work any better 8-)
Re: Centre downcomer design "Help"
Posted:
Sun Jan 22, 2012 8:17 amby Modernity
Mr McStill.
I was thinking four 3/4" tubes
What size would you recommend for the tubes in a 100mm dephlegmator?
Because of the ceiling height I am planning a side takeoff and inlet on the column.
How much space should I leave above the dephleg?
I was thinking to leave 50-75mm head room before the side takeoff.
Re: Centre downcomer design "Help"
Posted:
Sun Jan 22, 2012 5:10 pmby stubbydrainer
G'day Mod
your diagram confuses me a little, :? :?
I only see 2 sets of 2 plates ( 1x rain plate & 1x bubble cap plate ), I can see where the "downcomer" extends further up & down, so are you intending to duplicate whats in the complete drawing 3 times or ya just run outta paper and you are going to have a plate "C" . but I just don't get the 3 x 3 = 9 plates from your drawing....
Re: Centre downcomer design "Help"
Posted:
Sun Jan 22, 2012 6:46 pmby Modernity
Stubby,
you are right. I should have drawn A, B & C as one set of three. The rain plate is there so the downcomer is not emptying straight into the weir overflow.
Re: Centre downcomer design "Help"
Posted:
Mon Jan 23, 2012 12:42 pmby Airhill
Might have been this one, two replies and 700 views, don't think anyone was interested :smile:
http://www.artisan-distiller.net/phpBB3 ... mer#p78074
Re: Centre downcomer design "Help"
Posted:
Mon Jan 23, 2012 2:37 pmby MacStill
Modernity wrote:Mr McStill.
I was thinking four 3/4" tubes
What size would you recommend for the tubes in a 100mm dephlegmator?
3/4 tubes is what I'm using with good results, for both the down comers and the reflux condenser ;-)
Re: Centre downcomer design "Help"
Posted:
Mon Jan 23, 2012 3:38 pmby Modernity
with six 1 inch bubble caps per tray do you think 12 X 1mm x 5mm slots will be enough?
Area of 4" disc 78.5m2
Slots: 66 X 1mm X 5mm = 33cm2 and the holes in the plates will be 6 X 1/2" holes = 29cm2 (is this right or have I missed something)
Re: Centre downcomer design "Help"
Posted:
Mon Jan 23, 2012 5:10 pmby Modernity
Airhill,
cheers for finding that link. I wasn't too keen on the way it was drawn ether.
It dawned on me if the plates were made-up in sets of three then they could be stacked without the need for bolts. I also saw that the mixing of the downcomer liquid and raising vapour would be even around the tray.
Re: Centre downcomer design "Help"
Posted:
Mon Jan 23, 2012 6:11 pmby SBB
Just wondering what you intend makeing with this still? once its up and running.
SBB
Re: Centre downcomer design "Help"
Posted:
Mon Jan 23, 2012 6:43 pmby Cane Toad
Been thinking the same thing myself :angry-banghead: is it equivalent to a 9 plater or a 3 plater,looks overly complicated to me....but I'm still fkn learnin :handgestures-thumbupleft:
Re: Centre downcomer design "Help"
Posted:
Mon Jan 23, 2012 8:33 pmby stubbydrainer
this thing has been playing on my mind a bit, :ugeek:
I have been kickin' a stone around the carpark, thinking that inserting stainless steel cup type welsh plugs inside the " downcomer tube" spaced at the required intervals, which would allow for the " downcomer tube" to remain in one piece, thus resulting in an reduced alignment issues when it comes the time to stuff it into the 4", I don't know if the welsh plugs would be available in the correct size but the watch glass type are relatively easy to resize
then its a simple matter of glueing the stuff on the outside and drill'n a few holes :laughing-rolling:
IMHO I think it would be a right royal bastard of a thing to line up a swag of cut bits :?
Re: Centre downcomer design "Help"
Posted:
Mon Jan 23, 2012 9:33 pmby Modernity
The lining up will be the easy bit with a nice straight jig. Silver soldering is my thing.
Once I have the jig made for the first set of 3 and the second and third sets should be a snap compared to setting up the first. If they are square and true then the second and third sets should be a slide in from the bottom on top the first set of 3.
Making the bubble caps is the big job as I see it. :angry-banghead:
What I want to make is gin, really good gin with option to make a whiskey.
I was given two 1800mm lengths of 100mm copper and I am not planning to cut the column down just for the hell of it. :handgestures-thumbdown:
The changeable plates will give me the flexibility to play with the product at will. I want to be able to try less plates or scrubbers or both, hence the 3 sets of 3.
Side inlet and side outlet to clear the 2480mm ceiling.(I will post photos as soon as i get started)
Re: Centre downcomer design "Help"
Posted:
Sat Mar 03, 2012 1:53 pmby Modernity
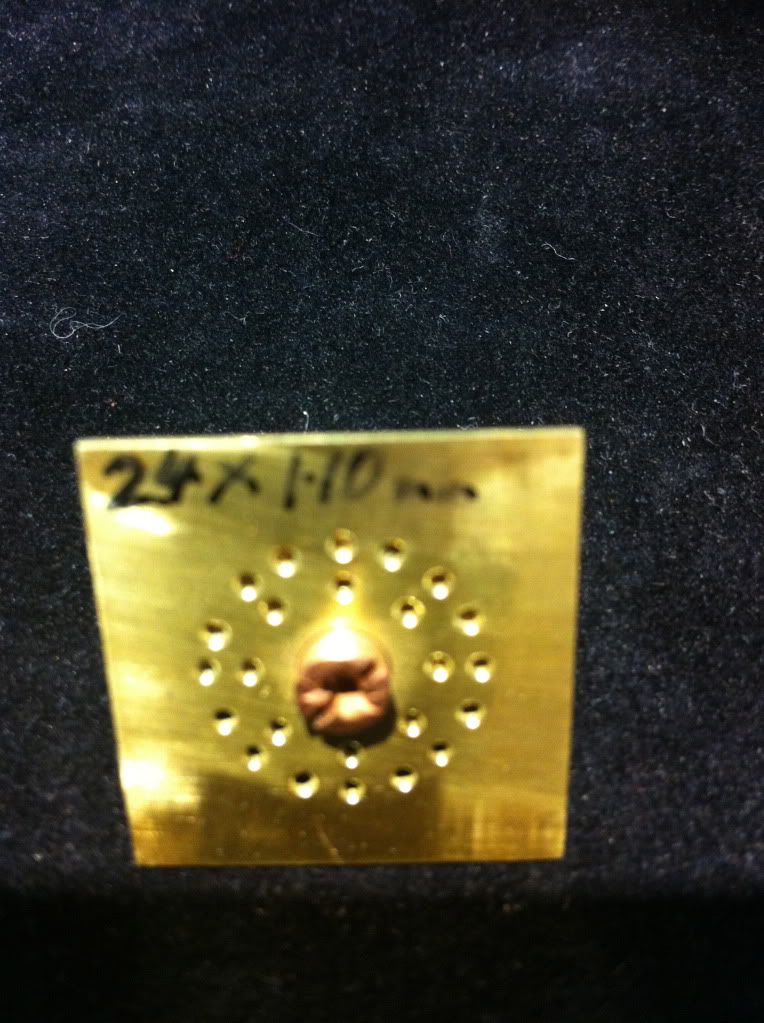
I have been working on a poppet valve design for use on 4" water cut plates.
The pictures are of 1mm plate with 24 x 1.1mm holes. 8 & 16 holes in two rows.
The poppet is a pure copper tap washer with the rubber seat removed.
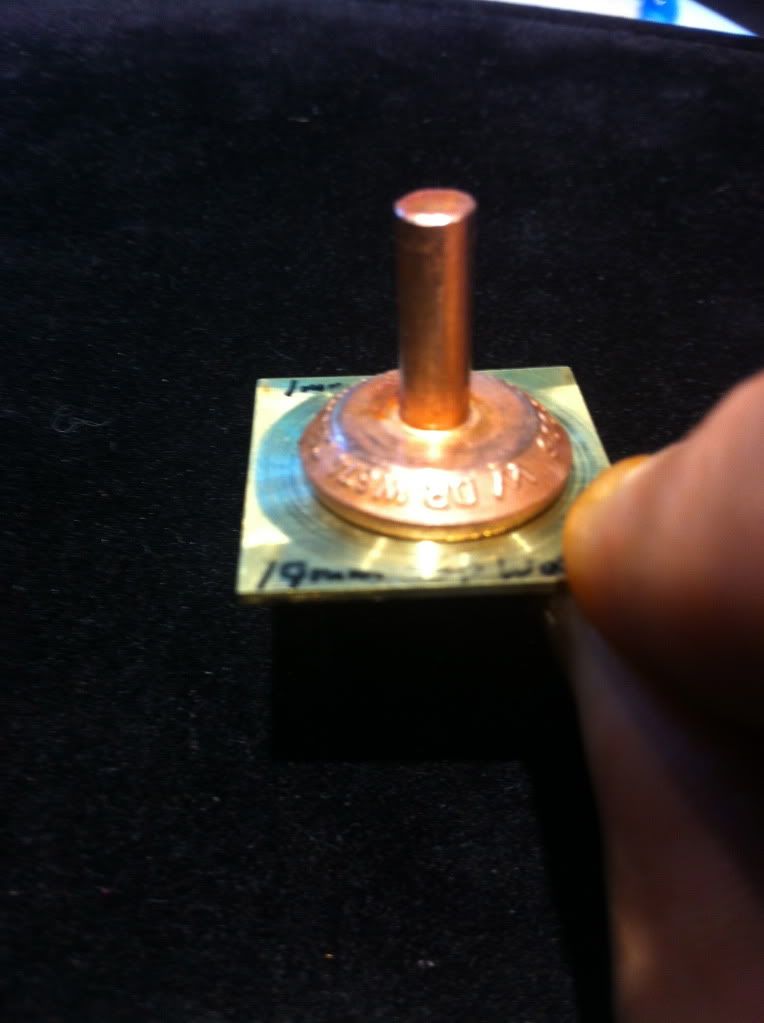
Advice on how many poppets I should aim for on each 4" plate would be kindly accepted. :handgestures-thumbupleft:


Re: Centre downcomer design "Help"
Posted:
Sat Mar 03, 2012 2:10 pmby R-sole
Are you sure that the tap washers aren't brass?
I might try and bust one and see. :smile:
Fukin good idea if so, so long as they ain't too heavy, and assuming you are getting them for nothing.
Re: Centre downcomer design "Help"
Posted:
Sat Mar 03, 2012 2:25 pmby Modernity
5Star,
Washer (as pictured) is copper BUT the piece of plate I had to hand was brass for the purpose of the mock up (only). I am yet to get a supply of used tap washers but the plumber must sell them for scrap by the ton. I need to work out how many per plate. I am thinking 12-18, any ideas?
I figure the weight issue will be over come by getting the hole size and number of holes right. There is room for a lot more holes under the 19mm washer. Also the washer can be lightened by removing the long stem with a bolt cutter.
Re: Centre downcomer design "Help"
Posted:
Sat Mar 03, 2012 4:21 pmby R-sole
Yes, i can see the plate is brass and washers certainly look like copper. So does tap shafts and i've machined those to make lures, but i reckon they're some kind of bronze alloy. Same with the washers.
Re: Centre downcomer design "Help"
Posted:
Sat Mar 03, 2012 4:47 pmby Modernity
The manufacturer refers to them having a copper body on the Fix-A-Tap website:
Delaware Tap Valve - Tap Valves :: Fix-A-Tap Plumbing Supplies ...
www.fixatap.com.au › FIX-A-TAP › Tap Valves
Has a hardwearing washer and copper body for excellent durability. It does not split, shrink, or tear and it is guaranteed for a decade.
When I filed the stem it felt like copper to me.