
 5 Star Store
 Community Guidelines
 Newbies Corner
 Recipes
 AD search
What sort of sight glasses do you intend using and how are you mounting them???.........I had no trouble soft soldering mine on.........but did have trouble where the product off take was hard soldered to the top of the column.....the column warped a bit at that point and needed a bit of fiddling to get it back into shape.
If you check out the photos of my build you will see how I mounted mine. Not saying its the right way ,or the only way......just that it worked for me with a minimum of fuss.
Mod's Build Log
89 posts
• Page 3 of 5 • 1, 2, 3, 4, 5
Re: Mod's Build Log
![]() by SBB » Tue Mar 20, 2012 2:56 pm
by SBB » Tue Mar 20, 2012 2:56 pm
- SBB
- Lifetime Member
- Posts: 2451
- Joined: Mon Mar 21, 2011 8:12 pm
- Location: Northern NSW
- equipment: (The Pelican) a 2 inch pot / stripper on 25L electric boiler interchangable with T500 reflux still...... 2 1/2 inch pot still on 50L keg (gas burner).....
3 inch Boka (half share with Draino),...... 4 inch 4 plate perforated plate Bubbler
Re: Mod's Build Log
![]() by Modernity » Tue Mar 20, 2012 5:52 pm
by Modernity » Tue Mar 20, 2012 5:52 pm
SBB wrote:What sort of sight glasses do you intend using and how are you mounting them?
I am going to sand them a 4" drum to be a good fit, then soft solder them on before cutting the holes. I will pilot hole them all first to give me a line up. After soldering, a stepped drill bit should get the holes pretty close, then emery wrapped around a stick to finish them nice and neat.
The inlet and outlet to the column will be side mounted in the same manner. I was going to slip fit the 1" connecting pipe with a hole clamp.
I now i am way ahead of my real world. I am very budget driven on the this and have kept the spent to less the $50 to date. Mind you I have sold my sole on the swap scene.
- Modernity
- Posts: 183
- Joined: Sun Nov 27, 2011 2:34 pm
- Location: Southern Highlands, NSW
- equipment: I am currently refurbishing a 150 ltr mush tun.
Currently building a 150 ltr oil heated pot still, with 8" copper column.
Re: Mod's Build Log
![]() by emptyglass » Tue Mar 20, 2012 10:28 pm
by emptyglass » Tue Mar 20, 2012 10:28 pm
Modernity wrote:This all hinges on keeping the column round when i solder the sight glasses on. :think: :think: This need to keep the round and true means I plan to soft solder all of the remanding joins where ever I can.
I hard soldered mine. I was anticipating the same problem.
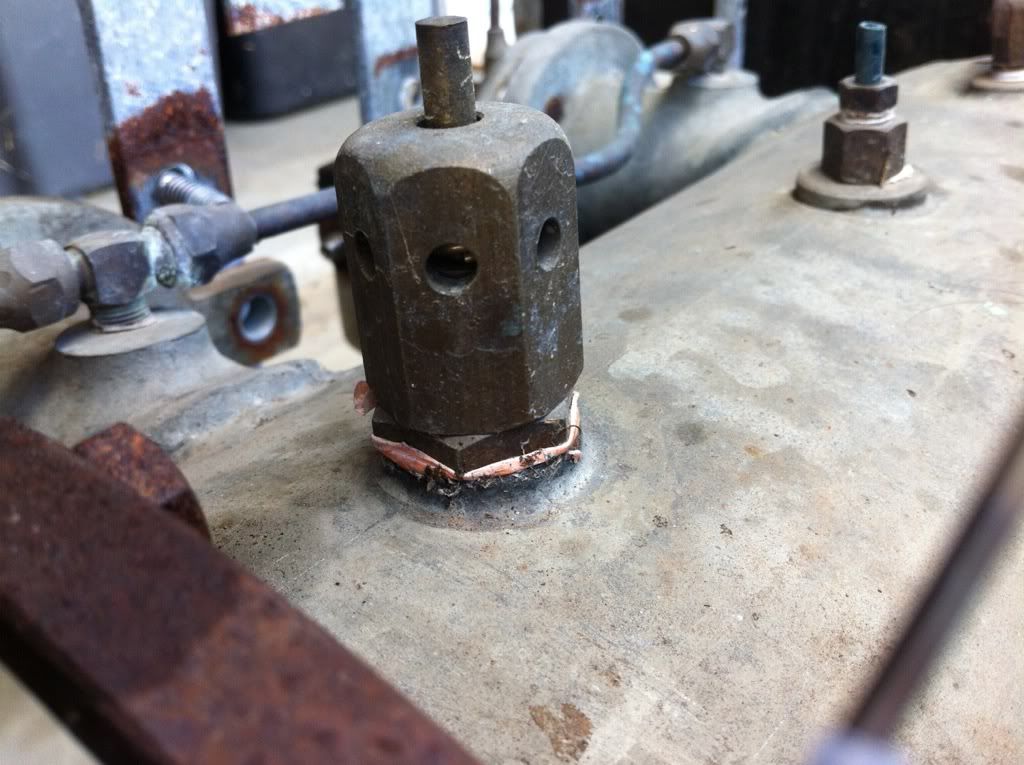
I made this and pushed it through after all the hot work (sightglass' and thermo port) and forming (easyflange) was done.
Fixed things up a treat. It's OD is machined to the same ID as the tube and the OD of the plates (98.2mm for type B tube). My plate tree pulls in and out no worries, and stays put during runs with no stops. Seals well. I have made the end bit for members on HD, they have fasioned their own stick.
Also great for forming easy flanges, re-sizing the necked portion to the original tube diameter.
You do not have the required permissions to view the files attached to this post.
- emptyglass
Re: Mod's Build Log
![]() by SBB » Wed Mar 21, 2012 8:31 am
by SBB » Wed Mar 21, 2012 8:31 am
Mod to be honest i was dreading trying to solder those sight glass mounts on to my still, mainly because of past experience of trying to get enough heat out of a map gas gun to solder 4 inch pipe. It ended up being much much easier than I thought, getting the flame in the right spot at the right time and at the right angle in relation to the job helps heaps. Or maybe I had just learned a bit more about soldering by that stage of the build.
Some where around here is a program for making templates to fit different sized pipe to other pipe...........I cant find it though......maybe someone else can. I found it very usefull for shaping my sight glass mounts.
Here ya go :D
http://www.harderwoods.com/pipetemplate.php
Some where around here is a program for making templates to fit different sized pipe to other pipe...........I cant find it though......maybe someone else can. I found it very usefull for shaping my sight glass mounts.
Here ya go :D
http://www.harderwoods.com/pipetemplate.php
Last edited by SBB on Wed Mar 21, 2012 9:01 am, edited 1 time in total.
- SBB
- Lifetime Member
- Posts: 2451
- Joined: Mon Mar 21, 2011 8:12 pm
- Location: Northern NSW
- equipment: (The Pelican) a 2 inch pot / stripper on 25L electric boiler interchangable with T500 reflux still...... 2 1/2 inch pot still on 50L keg (gas burner).....
3 inch Boka (half share with Draino),...... 4 inch 4 plate perforated plate Bubbler
Re: Mod's Build Log
![]() by MacStill » Wed Mar 21, 2012 8:40 am
by MacStill » Wed Mar 21, 2012 8:40 am
I rarely braze anything, I dont like it at all and I find it's just overkill, makes a mess & is a bitch to clean up.
Soft solder not being strong enough is just a myth, I've shown a couple of members here an easy flange clamped to a keg and swung it around trying to break it numerous times....
You "can" soft solder 4" with a $20 butane torch from Bunnings ;-)
Soft solder not being strong enough is just a myth, I've shown a couple of members here an easy flange clamped to a keg and swung it around trying to break it numerous times....
You "can" soft solder 4" with a $20 butane torch from Bunnings ;-)
- MacStill
- Lifetime Member
- Posts: 16835
- Joined: Fri Mar 18, 2011 1:40 pm
- Location: Wide Bay QLD
- equipment: Anything I choose :P
Re: Mod's Build Log
![]() by SBB » Wed Mar 21, 2012 9:00 am
by SBB » Wed Mar 21, 2012 9:00 am
TYVM Mac...........where the hell is that thing hiding???? can we put it somewhere easy to find????
- SBB
- Lifetime Member
- Posts: 2451
- Joined: Mon Mar 21, 2011 8:12 pm
- Location: Northern NSW
- equipment: (The Pelican) a 2 inch pot / stripper on 25L electric boiler interchangable with T500 reflux still...... 2 1/2 inch pot still on 50L keg (gas burner).....
3 inch Boka (half share with Draino),...... 4 inch 4 plate perforated plate Bubbler
Re: Mod's Build Log
![]() by MacStill » Wed Mar 21, 2012 9:27 am
by MacStill » Wed Mar 21, 2012 9:27 am
SBB wrote:TYVM Mac...........where the hell is that thing hiding???? can we put it somewhere easy to find????
Feel free to post something in the workbench with the link included :handgestures-thumbupleft:
- MacStill
- Lifetime Member
- Posts: 16835
- Joined: Fri Mar 18, 2011 1:40 pm
- Location: Wide Bay QLD
- equipment: Anything I choose :P
Re: Mod's Build Log
![]() by Modernity » Wed Mar 21, 2012 9:34 am
by Modernity » Wed Mar 21, 2012 9:34 am
Plate design based on 19mm copper delaware tap washers re proposed as poppet valves. I see the upside to be they self regulate the vapour flow by opening when there is sufficient pressure to lift the valve body for gas to pass and close and seal when there is not. As soon as the first value opens the back pressure will drop until it builds to open the second valve and so on and so on. The weight of the valves can be varied by cutting the stems down, this would let the valves open in order, one valve per side opening first, second , third etc..
I think with having the plates water cut, the concept could be is fast to build and cheap. IF IT WORKS :think:

Wier designed to guide liquid flow over minimum of five valves per plate with no zero flow areas or liquid by pass zones
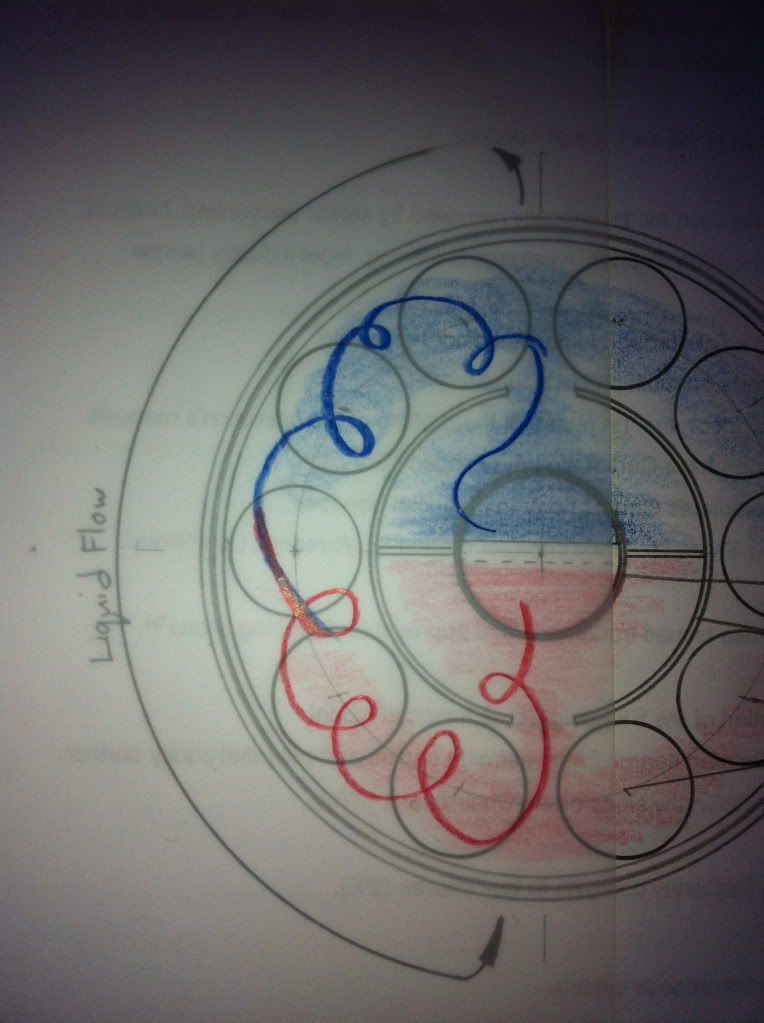
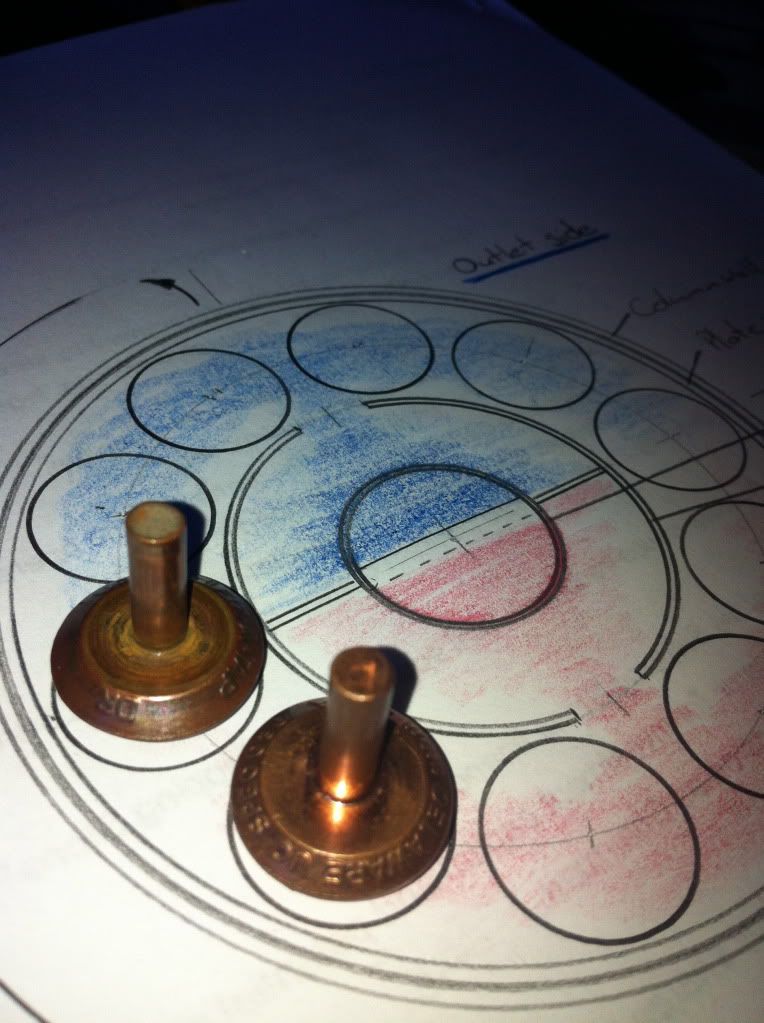
10 Valves per plate

24 holes per valve

240 holes per plate
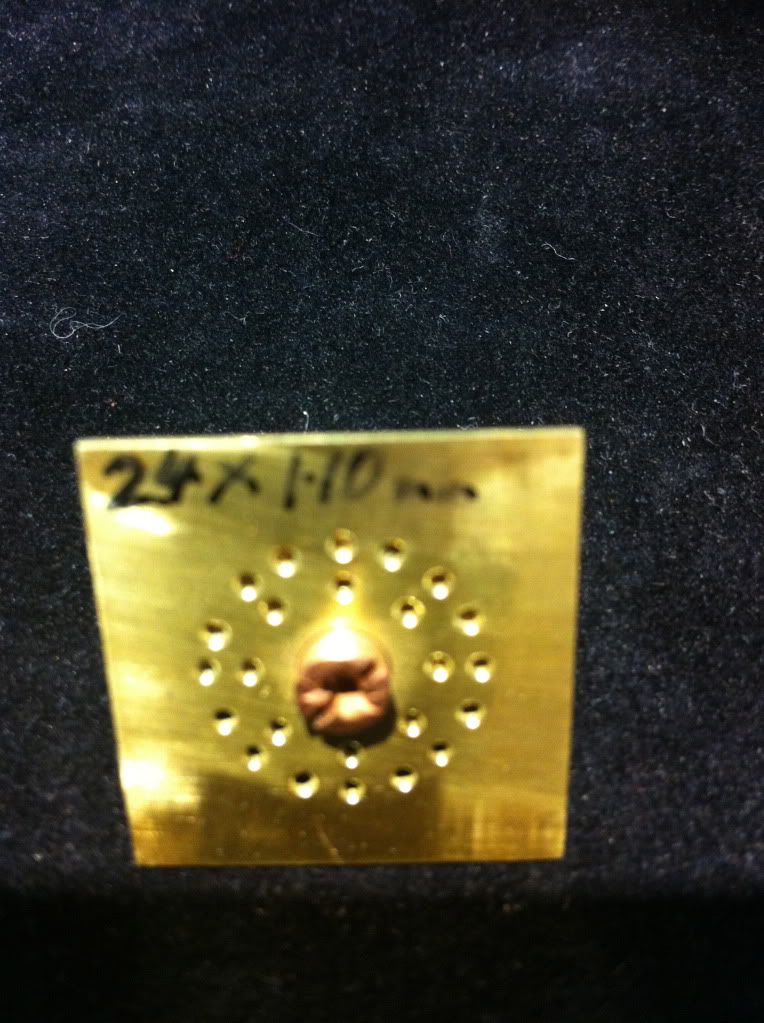
this demo has 24 X 1.10mm holes. I don't think 1.1mm hole give me enough surface opening area on the plate. Any ideas out there folks?
Now I have got to go to work in the city for a few days before my wife has a fit about all this :crying-blue: . back Saturday :angry-banghead:
I think with having the plates water cut, the concept could be is fast to build and cheap. IF IT WORKS :think:
Wier designed to guide liquid flow over minimum of five valves per plate with no zero flow areas or liquid by pass zones
10 Valves per plate
24 holes per valve
240 holes per plate
this demo has 24 X 1.10mm holes. I don't think 1.1mm hole give me enough surface opening area on the plate. Any ideas out there folks?
Now I have got to go to work in the city for a few days before my wife has a fit about all this :crying-blue: . back Saturday :angry-banghead:
- Modernity
- Posts: 183
- Joined: Sun Nov 27, 2011 2:34 pm
- Location: Southern Highlands, NSW
- equipment: I am currently refurbishing a 150 ltr mush tun.
Currently building a 150 ltr oil heated pot still, with 8" copper column.
Re: Mod's Build Log
![]() by MacStill » Mon Mar 26, 2012 9:14 pm
by MacStill » Mon Mar 26, 2012 9:14 pm
5 days and no progress report :roll:
C'mon get out in shed will ya :D
C'mon get out in shed will ya :D
- MacStill
- Lifetime Member
- Posts: 16835
- Joined: Fri Mar 18, 2011 1:40 pm
- Location: Wide Bay QLD
- equipment: Anything I choose :P
Re: Mod's Build Log
![]() by Modernity » Tue Mar 27, 2012 8:27 pm
by Modernity » Tue Mar 27, 2012 8:27 pm
piss off :crying-blue: :teasing-neener: I am having issues alright. :angry-banghead:
I am not happy with 90 copper poppet valves rattling all day while I am distilling. I don't know what to do so I am having a think about it
I am not happy with 90 copper poppet valves rattling all day while I am distilling. I don't know what to do so I am having a think about it
- Modernity
- Posts: 183
- Joined: Sun Nov 27, 2011 2:34 pm
- Location: Southern Highlands, NSW
- equipment: I am currently refurbishing a 150 ltr mush tun.
Currently building a 150 ltr oil heated pot still, with 8" copper column.
Re: Mod's Build Log
![]() by stubbydrainer » Tue Mar 27, 2012 8:31 pm
by stubbydrainer » Tue Mar 27, 2012 8:31 pm
Mod
the solution is easy , DRINK and earplugs :laughing-rolling: :laughing-rolling:
the solution is easy , DRINK and earplugs :laughing-rolling: :laughing-rolling:
- stubbydrainer
- Posts: 728
- Joined: Sun Aug 28, 2011 9:42 pm
- Location: Northern Rivers, NSW
- equipment: 4" perf. plate bubbler,2 1/2" pot with a triple wall liebig,
Small 8L pot for experiments & Gin, 6Kw 80ltr electric boiler , P.I.D/PWM controller
1/2 share with SBB in a 3" boka,
Re: Mod's Build Log
![]() by Modernity » Wed Mar 28, 2012 6:56 pm
by Modernity » Wed Mar 28, 2012 6:56 pm
I went off to see the man with the scrap espresso boilers today. I have a order in for two big buggers out of three group machines. Photos when they arrive at the end of the week.
- Modernity
- Posts: 183
- Joined: Sun Nov 27, 2011 2:34 pm
- Location: Southern Highlands, NSW
- equipment: I am currently refurbishing a 150 ltr mush tun.
Currently building a 150 ltr oil heated pot still, with 8" copper column.
- MacStill
- Lifetime Member
- Posts: 16835
- Joined: Fri Mar 18, 2011 1:40 pm
- Location: Wide Bay QLD
- equipment: Anything I choose :P
Re: Mod's Build Log
![]() by Modernity » Sun May 13, 2012 7:49 pm
by Modernity » Sun May 13, 2012 7:49 pm
Yes I hear you, Mc Wobbly Tits (BTW: a good girl would stick them in a bra for safe keeping :laughing-rolling: ).
The Espresso boiler arrived yesterday. I will post some pics of what I am starting with. :dance: :dance: :dance:
I have been a bit lost on the downcomer design. I am not happy with my centre design, so I have been thinking (out loud) about external downcomer designs. :think: :think: :think:
The Espresso boiler arrived yesterday. I will post some pics of what I am starting with. :dance: :dance: :dance:
I have been a bit lost on the downcomer design. I am not happy with my centre design, so I have been thinking (out loud) about external downcomer designs. :think: :think: :think:
- Modernity
- Posts: 183
- Joined: Sun Nov 27, 2011 2:34 pm
- Location: Southern Highlands, NSW
- equipment: I am currently refurbishing a 150 ltr mush tun.
Currently building a 150 ltr oil heated pot still, with 8" copper column.
Re: Mod's Build Log
![]() by Modernity » Mon May 14, 2012 1:29 pm
by Modernity » Mon May 14, 2012 1:29 pm
Ok Wobbly, here is your update with photos....
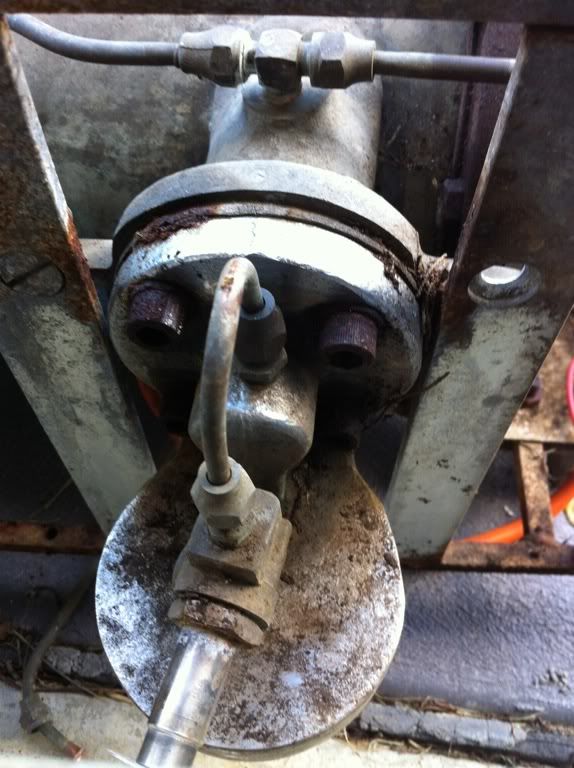
Espresso machine stripped with the copper boiler ready to be removed as soon as I get the group head mounts off
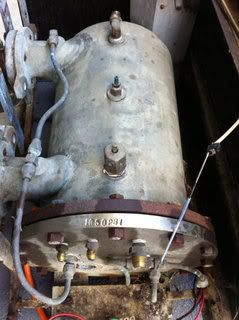
Business end of the boiler with it's numerous outlets.
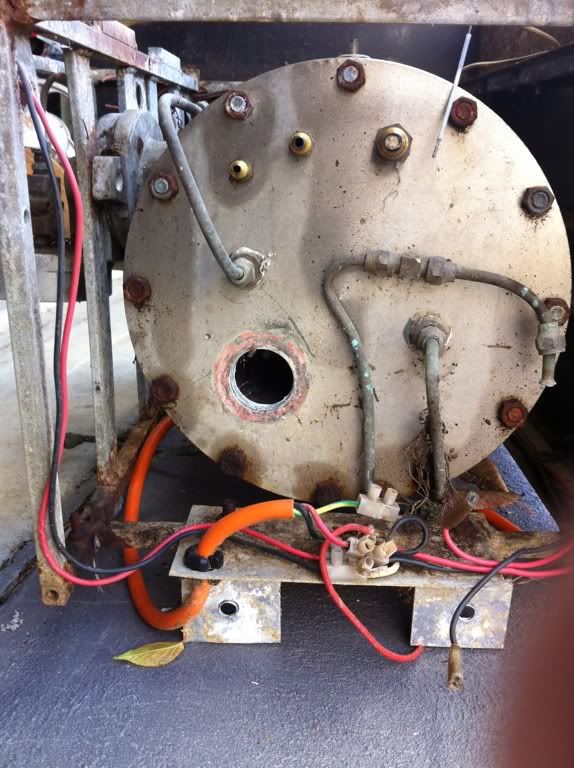
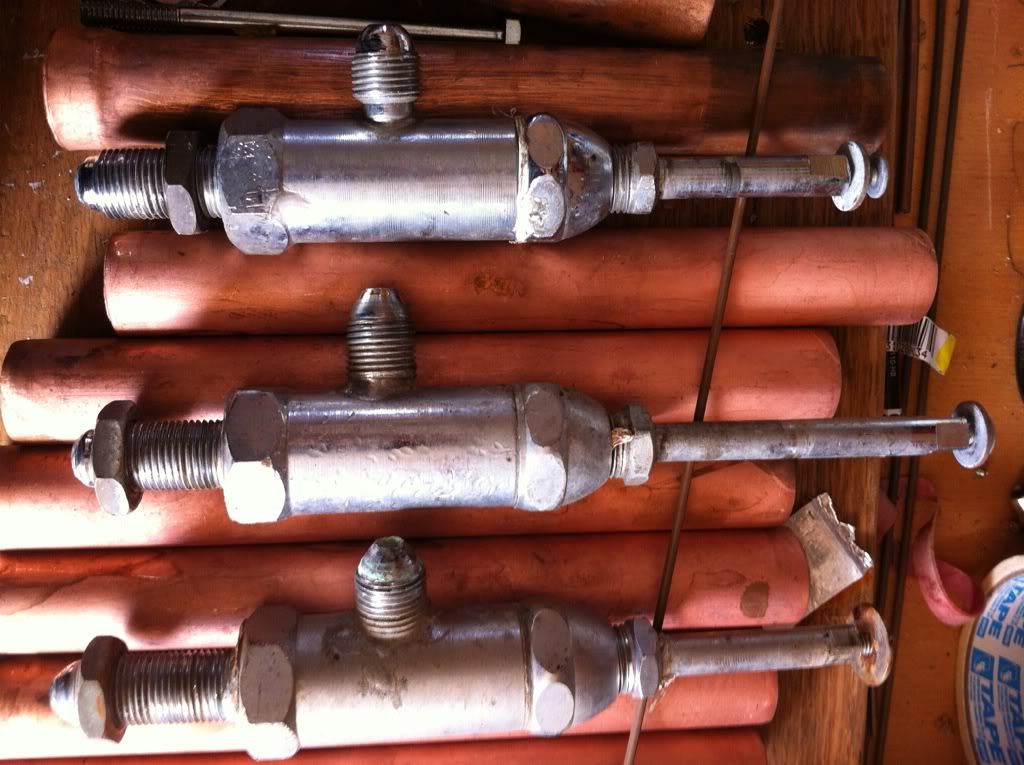
Removed steam and hot water valves
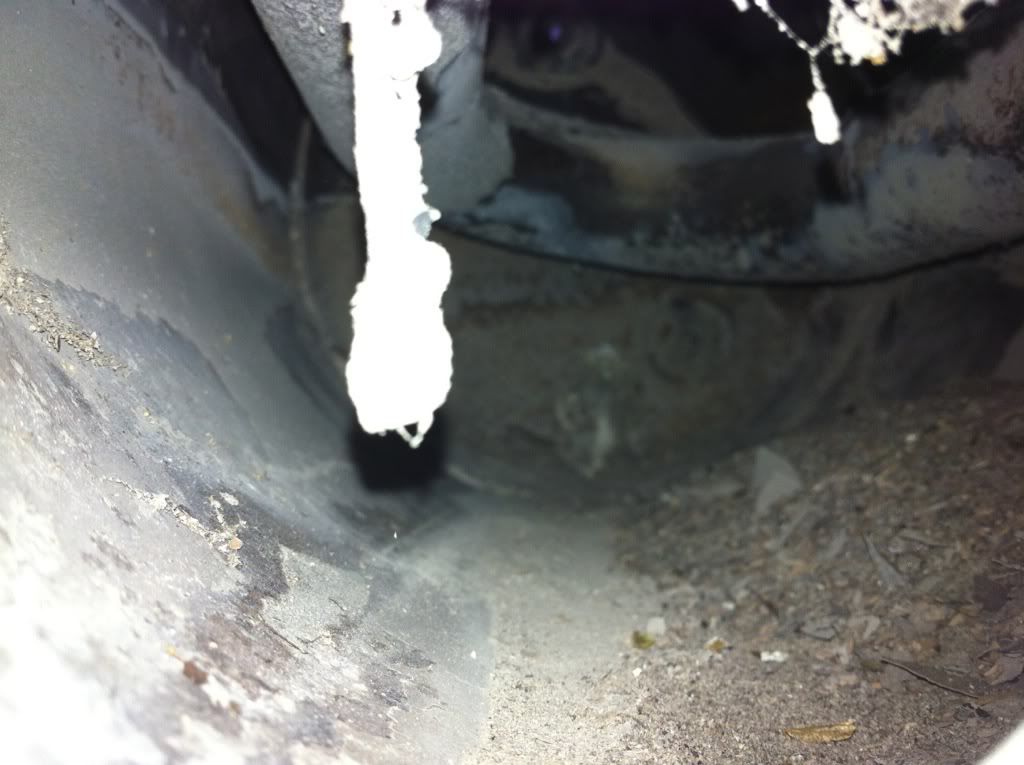
Lots of lime scale with heat exchanger pipe in foreground (i have a plan for that pipe :think: )
Element mount

Pressure relief (i wish I had one of those sometimes :laughing-rolling: )
Group head (and solenoid body) to be cut off and plugged
Espresso machine stripped with the copper boiler ready to be removed as soon as I get the group head mounts off
Business end of the boiler with it's numerous outlets.
Removed steam and hot water valves
Lots of lime scale with heat exchanger pipe in foreground (i have a plan for that pipe :think: )
Element mount
Pressure relief (i wish I had one of those sometimes :laughing-rolling: )
Group head (and solenoid body) to be cut off and plugged
- Modernity
- Posts: 183
- Joined: Sun Nov 27, 2011 2:34 pm
- Location: Southern Highlands, NSW
- equipment: I am currently refurbishing a 150 ltr mush tun.
Currently building a 150 ltr oil heated pot still, with 8" copper column.
Centre Downcomer (I give up)
![]() by Modernity » Sun Aug 12, 2012 5:34 pm
by Modernity » Sun Aug 12, 2012 5:34 pm
All the centre downcomer design work has come to an end and I have decide to go with a external downcomer design. www.5stardistilling.com.au's 3" sight glass's finally solved the plate access issue i was having with the current design. So ahead we go. 1" external downcomers will give me the openings options I need. I am still deciding on whether to go with 6 or 7 (www.5stardistilling.com.au) bubble caps per 4" plate.
I have a sheet of 3mm copper to water cut the plates and 4" end caps out of. I am going to soft solder the brass bubble cap centres to the top of the plate and create a "blow by gap" (because I can and my plate material is too think).
Now I have to decide how many plates I want in my 4" column. I am after gin as my Number One drink. Any thoughts folks....
- Modernity
- Posts: 183
- Joined: Sun Nov 27, 2011 2:34 pm
- Location: Southern Highlands, NSW
- equipment: I am currently refurbishing a 150 ltr mush tun.
Currently building a 150 ltr oil heated pot still, with 8" copper column.
Re: Mod's Build Log
![]() by emptyglass » Mon Aug 13, 2012 1:47 pm
by emptyglass » Mon Aug 13, 2012 1:47 pm
I don't make or drink Gin, but from what I know, you will need 11 plates to get a good one. Don't know how many caps per plate you will need.
I've seen a few gin stills that include a botanicals basket for some Juniper and other flavoring.
But I cant see why you couldnt run with 5 or 6 plates and run it twice.
I've seen a few gin stills that include a botanicals basket for some Juniper and other flavoring.
But I cant see why you couldnt run with 5 or 6 plates and run it twice.
- emptyglass
Re: Mod's Build Log
![]() by Modernity » Sat Aug 18, 2012 7:29 pm
by Modernity » Sat Aug 18, 2012 7:29 pm
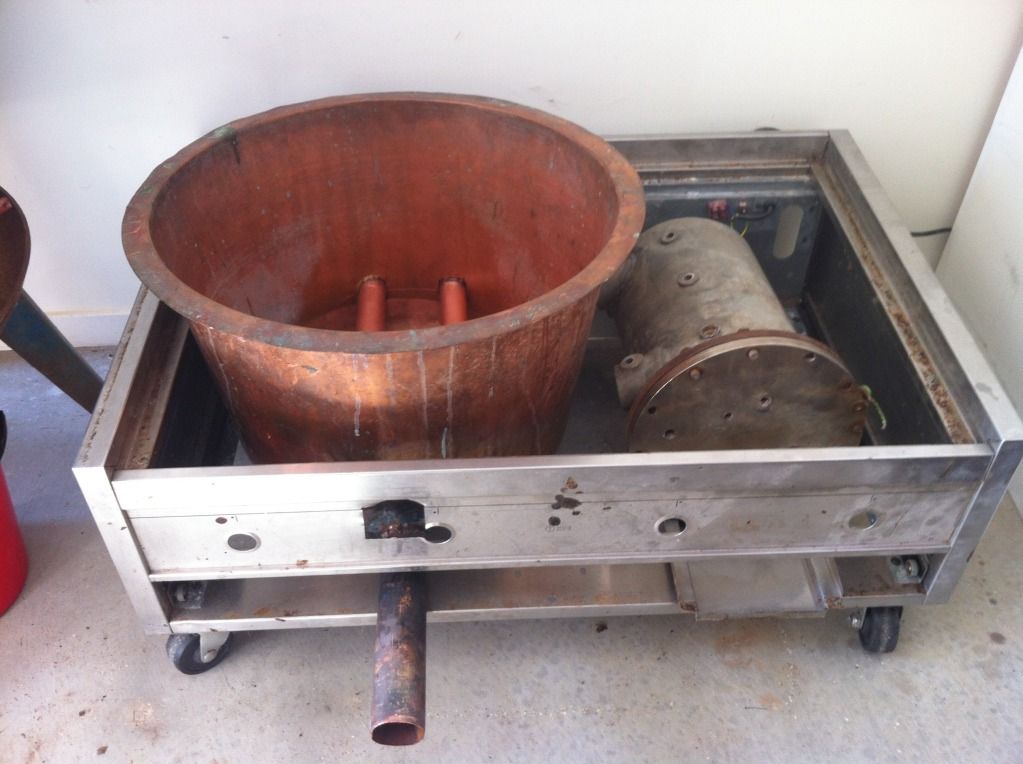
Progress is slow.
I have started work on the base that I intend to build the rig on. I had a stainless steel 4 burner ilve gas cook top I picked up on the side of the road when I lived in Sydney.
The boiler will live on the lefthand side under a cover made out of a old stainless wok burn unit also found on the side of the road for council pickup (it was on one of those massive BBQ's your see at Bunnings) I had a car full at the time so I only picked up the wok burner and when I got back to it 20 minutes later is was gone :angry-banghead:
So that is the base and the boiler cover sorted.
The espresso boiler is stripped and ready for sand blasting before it gets a new gasket and bolted back together. It also has a bunch of extra holes that need to be plugged with S/S bolts and needs a extra hole bored for a second element to be mounted.
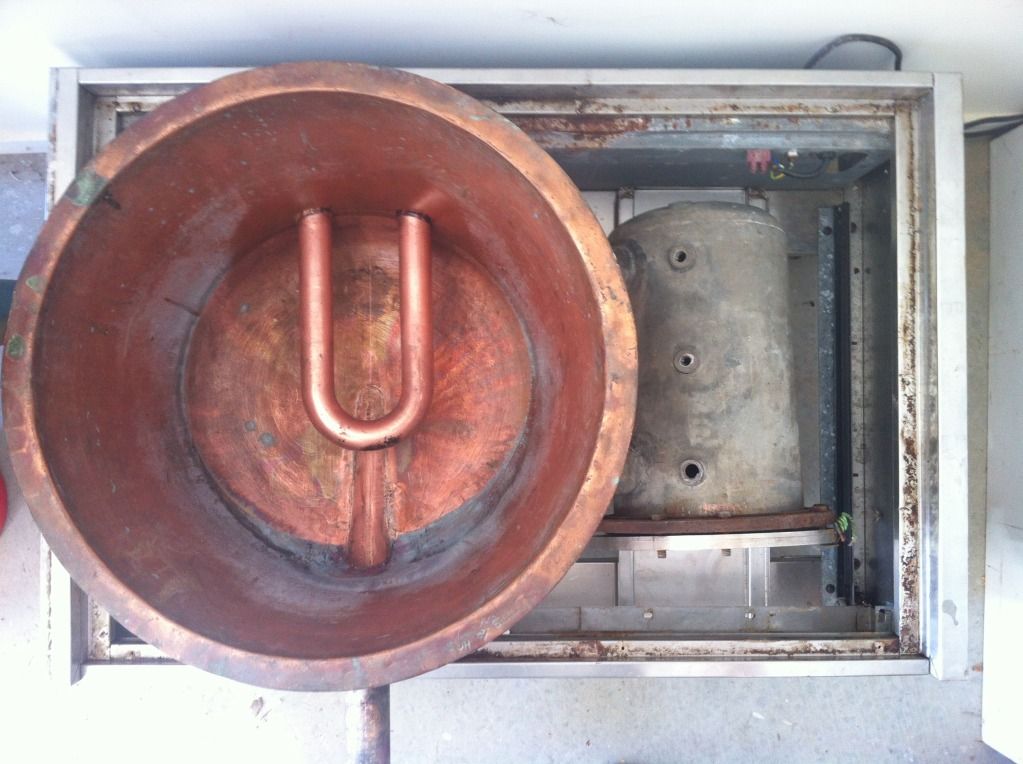
I have taken the heat exchanger out of the espresso boiler to use in the still pot. It is a big "U" shaped 40mm copper tube with fittings on both ends. This will be soldered into the still's boiler and heated with steam from the espresso boiler.
The whole lot will sit on four dolly wheels so it can be moved around.
I have started work on the base that I intend to build the rig on. I had a stainless steel 4 burner ilve gas cook top I picked up on the side of the road when I lived in Sydney.
The boiler will live on the lefthand side under a cover made out of a old stainless wok burn unit also found on the side of the road for council pickup (it was on one of those massive BBQ's your see at Bunnings) I had a car full at the time so I only picked up the wok burner and when I got back to it 20 minutes later is was gone :angry-banghead:
So that is the base and the boiler cover sorted.
The espresso boiler is stripped and ready for sand blasting before it gets a new gasket and bolted back together. It also has a bunch of extra holes that need to be plugged with S/S bolts and needs a extra hole bored for a second element to be mounted.
I have taken the heat exchanger out of the espresso boiler to use in the still pot. It is a big "U" shaped 40mm copper tube with fittings on both ends. This will be soldered into the still's boiler and heated with steam from the espresso boiler.
The whole lot will sit on four dolly wheels so it can be moved around.
- Modernity
- Posts: 183
- Joined: Sun Nov 27, 2011 2:34 pm
- Location: Southern Highlands, NSW
- equipment: I am currently refurbishing a 150 ltr mush tun.
Currently building a 150 ltr oil heated pot still, with 8" copper column.
Re: Mod's Build Log
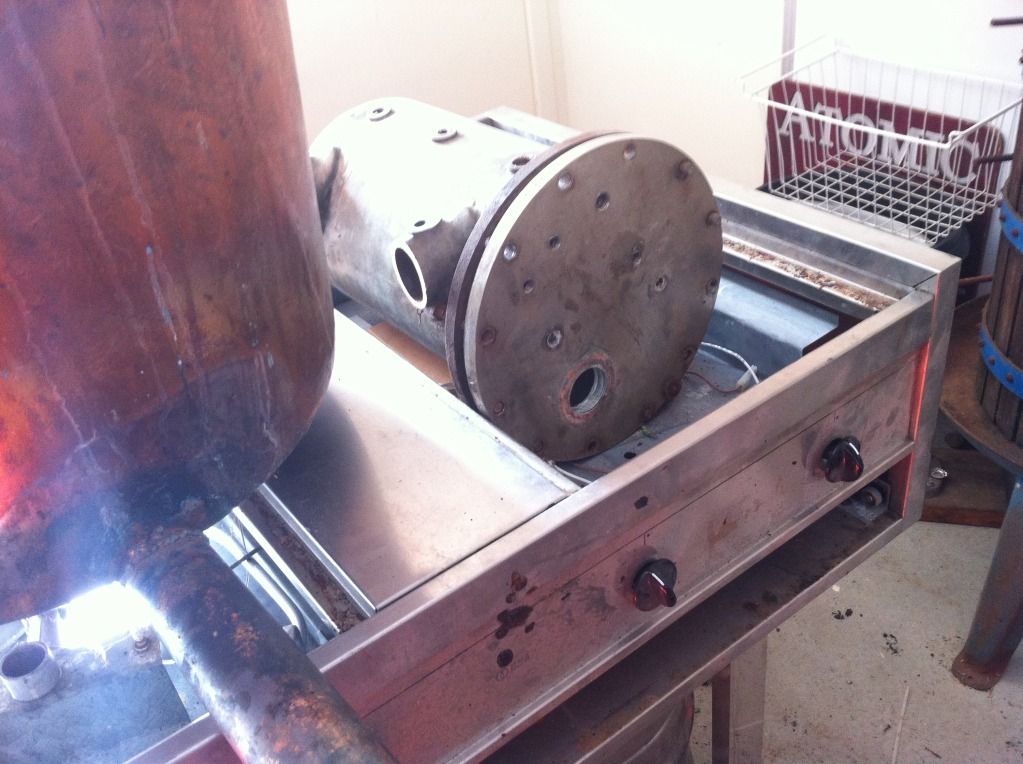
![]() by Modernity » Tue Aug 21, 2012 6:58 pm
by Modernity » Tue Aug 21, 2012 6:58 pm
Work continues on the copper boiler with the steam heater element being installed. Holes carefully cut and the edges are being flanged to the inside to create a cleaner surface.
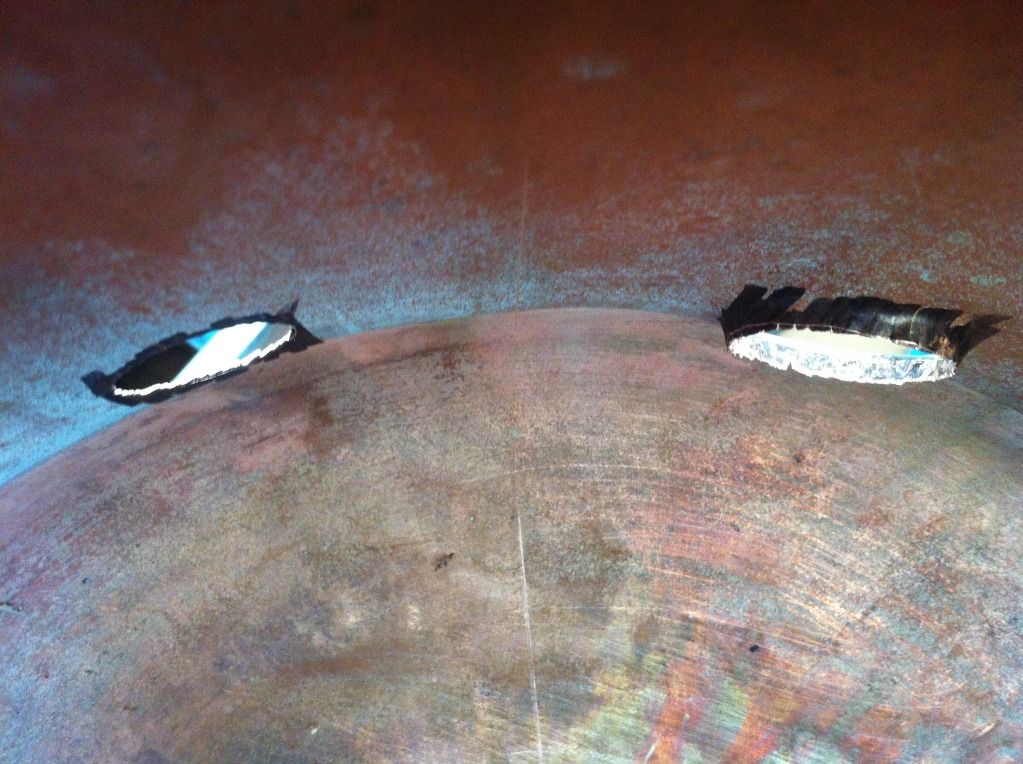
Steam heater pipe fitted and ready to solder.
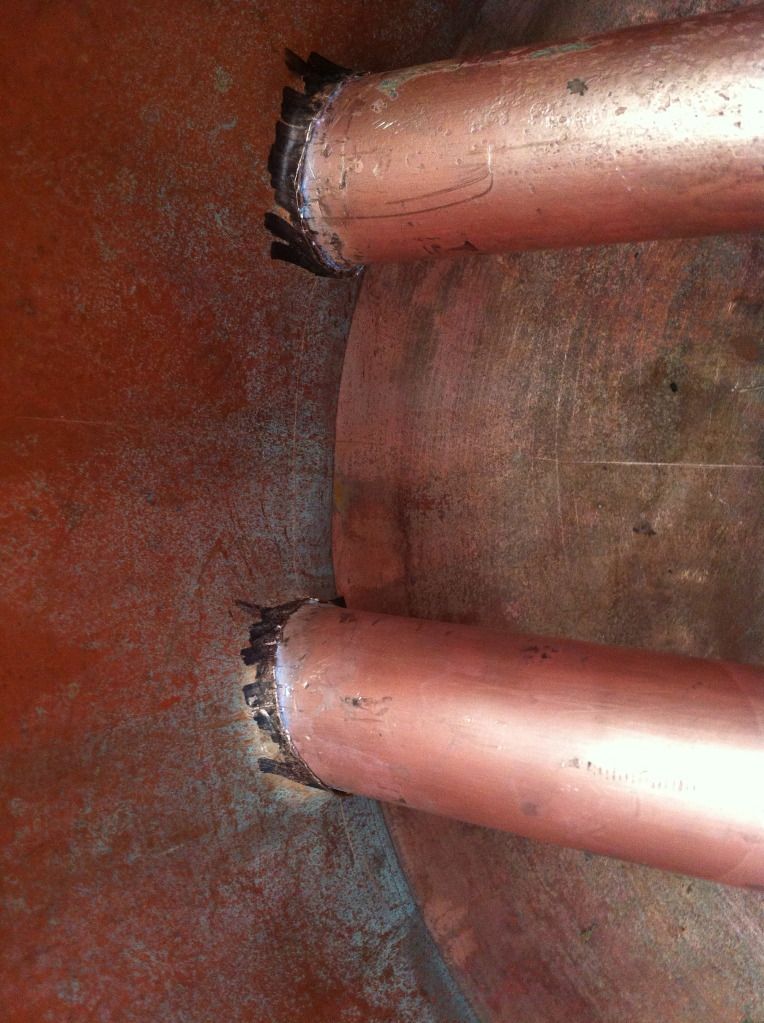
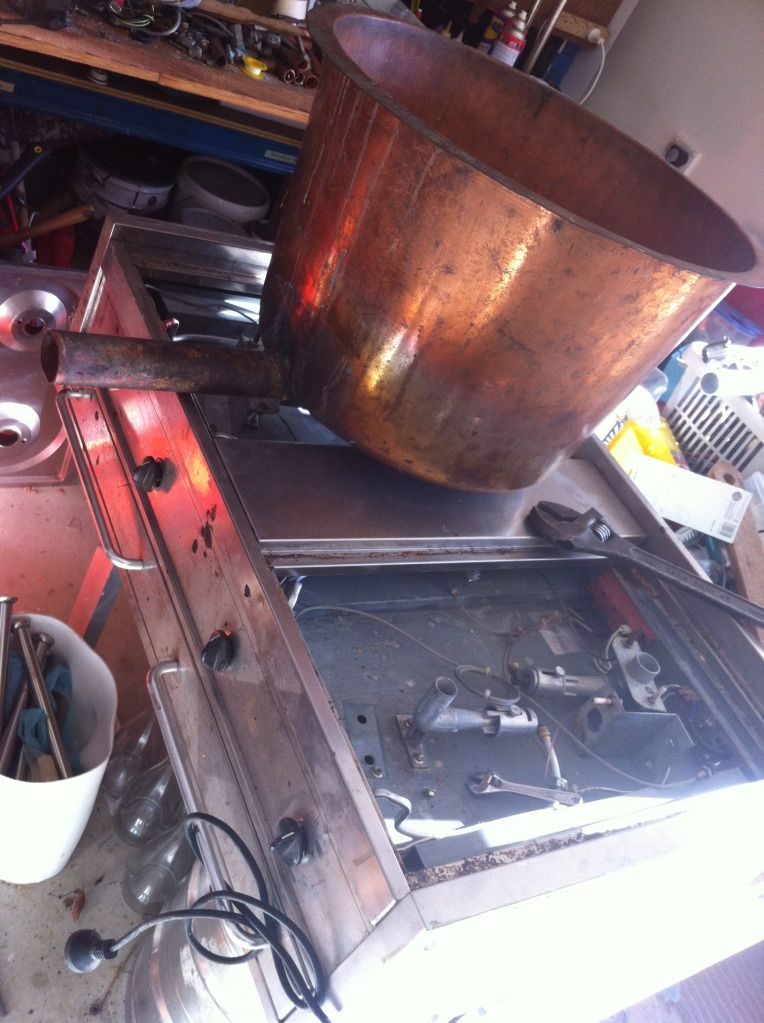
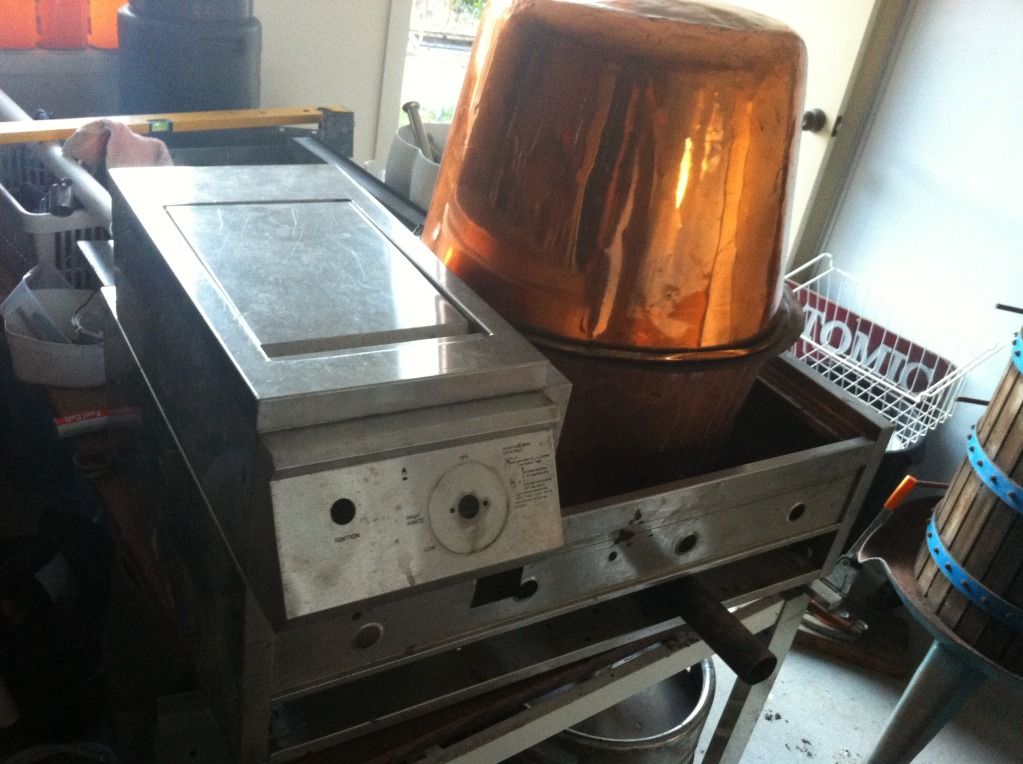
It's time plumb up the steam pipes and get that old boiler into service.
Here it is sitting on the base. A good use for a ilve cook top i say!
I am going to check the heating capacity before I seal the top on the boiler, just in case I need to up the surface area of the steam heater tube some more. It should be plenty though. 40mm pipe with a total length of 500mm heated with very hot steam, thats a lot of surface area.
Steam heater pipe fitted and ready to solder.
It's time plumb up the steam pipes and get that old boiler into service.
Here it is sitting on the base. A good use for a ilve cook top i say!
I am going to check the heating capacity before I seal the top on the boiler, just in case I need to up the surface area of the steam heater tube some more. It should be plenty though. 40mm pipe with a total length of 500mm heated with very hot steam, thats a lot of surface area.
- Modernity
- Posts: 183
- Joined: Sun Nov 27, 2011 2:34 pm
- Location: Southern Highlands, NSW
- equipment: I am currently refurbishing a 150 ltr mush tun.
Currently building a 150 ltr oil heated pot still, with 8" copper column.
Re: Mod's Build Log
![]() by Kimbo » Tue Aug 21, 2012 7:29 pm
by Kimbo » Tue Aug 21, 2012 7:29 pm
Good work Mod, keep us posted mate :handgestures-thumbupleft:
- Kimbo
- Lifetime Member
- Posts: 5461
- Images: 0
- Joined: Fri Mar 18, 2011 6:33 pm
- Location: Perf WA
- equipment: 4" bubbler with a 6"inline thumper
89 posts
• Page 3 of 5 • 1, 2, 3, 4, 5
Return to Plated Column Stills
Who is online
Users browsing this forum: No registered users and 79 guests