
 5 Star Store
 Community Guidelines
 Newbies Corner
 Recipes
 AD search
I like it!
Great job mate. Its all coming together :handgestures-thumbupleft:
Are you sure that your steam heater pipe wont let too much steam through?
I hope I'm way wrong, but I'm just thinking such a big diameter is going to let too much steam vapor through too fast, with not enough time for heat transfer.
How big/many are the main outlets of the boiler meant to run in coffee machine mode?
Mod's Build Log
89 posts
• Page 4 of 5 • 1, 2, 3, 4, 5
Re: Mod's Build Log
![]() by Modernity » Tue Aug 21, 2012 10:43 pm
by Modernity » Tue Aug 21, 2012 10:43 pm
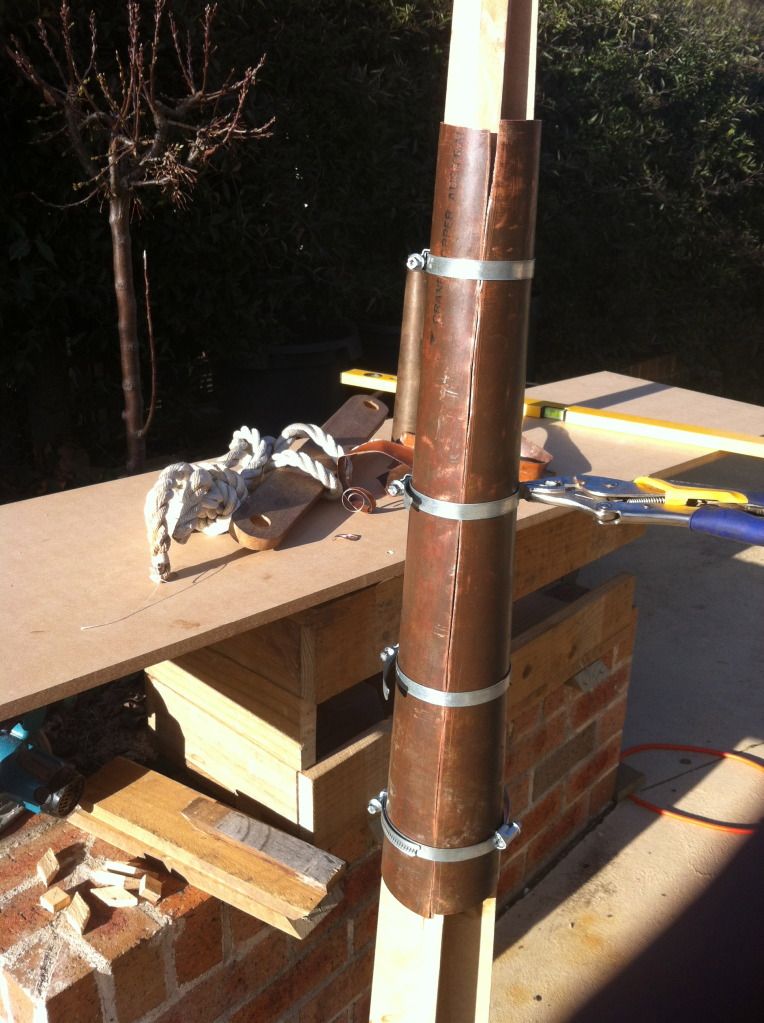
The steam inlet and outlet are about 3mm dia. The idea is the steam expands when it enters the heater element and condenses blowing water out leaving the heat behind. I am not sure yet, but I may have to super-heat the steam just before it enters the heater element. This will give me a steam temp of 200-300C and mean I need less time to get the pot up to temp. There properly will be a agitator in there to keep everything moving. Copper is a wet metal so there is a much less chance of scorching on the heater element than if it was stainless (which is a dry metal).
- Modernity
- Posts: 183
- Joined: Sun Nov 27, 2011 2:34 pm
- Location: Southern Highlands, NSW
- equipment: I am currently refurbishing a 150 ltr mush tun.
Currently building a 150 ltr oil heated pot still, with 8" copper column.
Re: Mod's Build Log
![]() by emptyglass » Tue Aug 21, 2012 10:57 pm
by emptyglass » Tue Aug 21, 2012 10:57 pm
Looks like you already thought about what I was thinking.
Well, on with the show!
Well, on with the show!
- emptyglass
Re: Mod's Build Log
![]() by Gas on » Wed Aug 22, 2012 1:31 am
by Gas on » Wed Aug 22, 2012 1:31 am
hey mod,
this is one sweet project youve got going there!. you still gunna be able to make a nice coffee with that beast?
i suspect you could if you wanted to - best of both worlds :handgestures-thumbupleft: :handgestures-thumbupleft:
cheers
this is one sweet project youve got going there!. you still gunna be able to make a nice coffee with that beast?
i suspect you could if you wanted to - best of both worlds :handgestures-thumbupleft: :handgestures-thumbupleft:
cheers
- Gas on
- Posts: 356
- Joined: Sun Jun 19, 2011 11:51 pm
- Location: perth sor
- equipment: baked beans & rum
arfa 5 star bubbler
Progress Report
![]() by Modernity » Sun Aug 26, 2012 5:12 pm
by Modernity » Sun Aug 26, 2012 5:12 pm
I spent the morning making a MDF former to start fabricating the conical neck for the still pot. I have changed the design and think I am going to do-away with the ball and go just for a conical neck starting at 7 1/2" and tapering to 2" before turn 45 degrees and then tapering to 1". The neck will sit on a flared piece that will join to the dished lid.
The former is 1700mm. 7 1/2" tapering to 1"
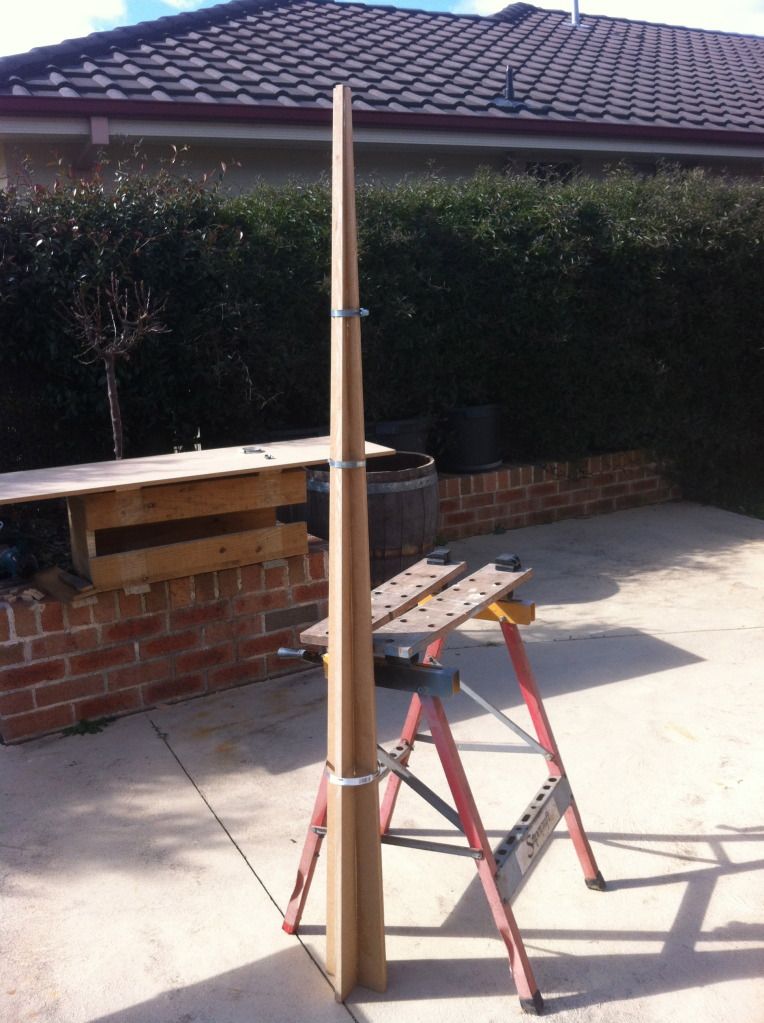
This is the 600mm length of 4" cut and rolled to fit.

fit to former
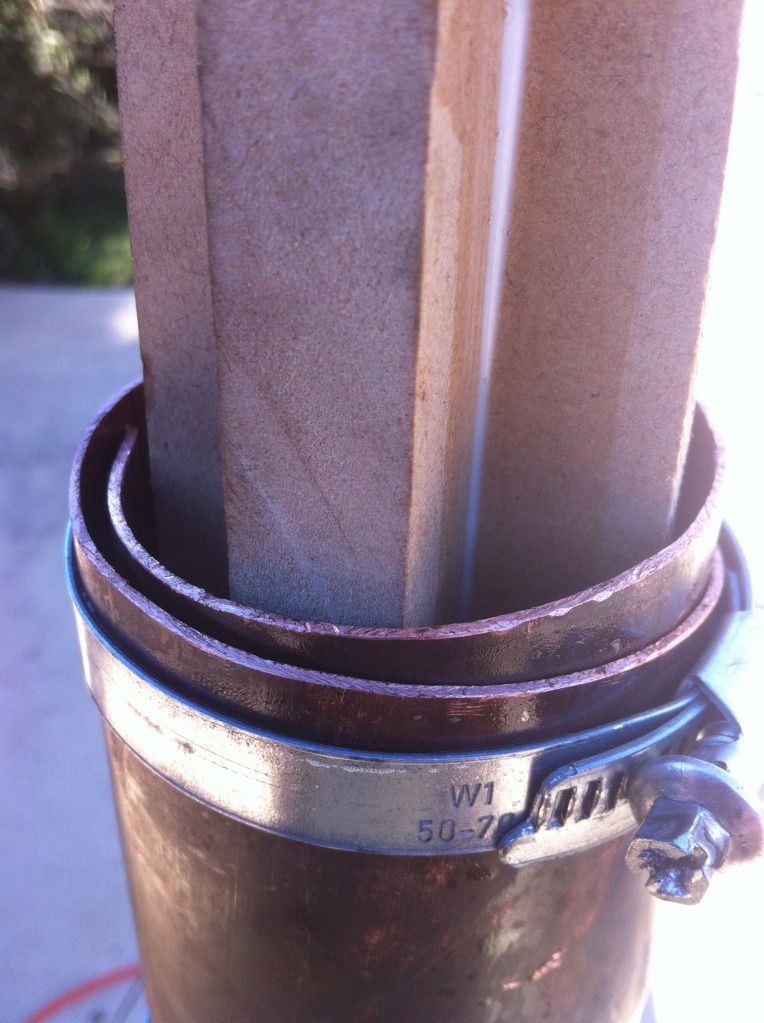
Over lap trimmed and now needs to be file for a good fit.
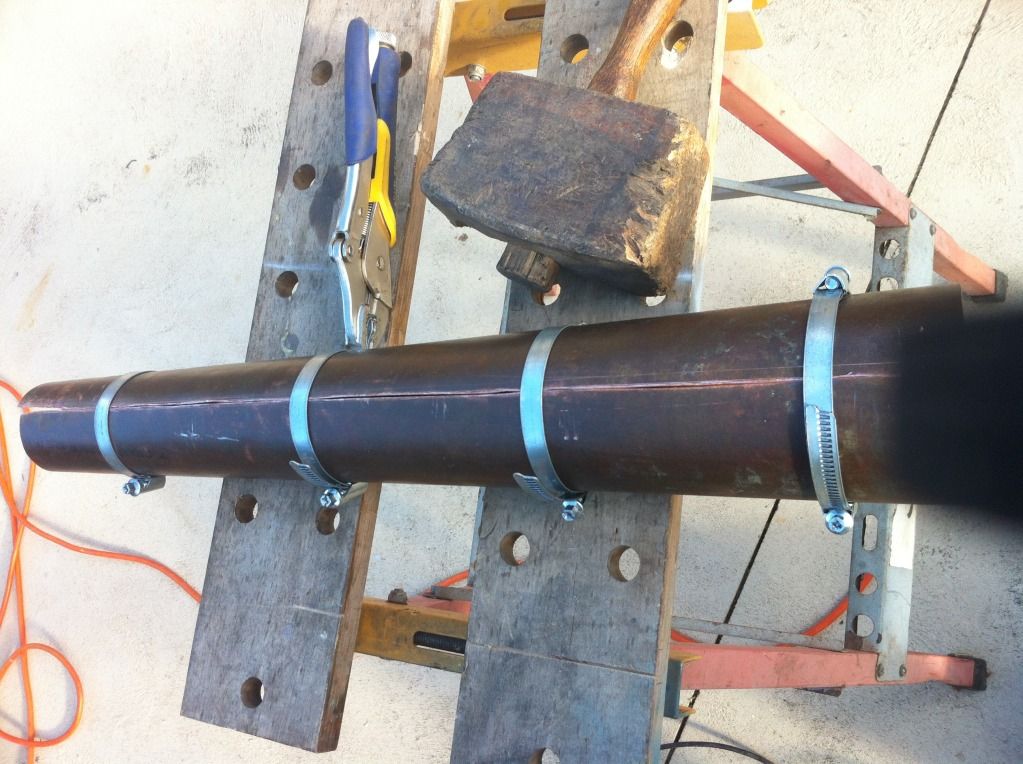
Filling need here and there and ...
Sitting on the former.
Not much to show for a days work. :violence-stickwhack:
The former is 1700mm. 7 1/2" tapering to 1"
This is the 600mm length of 4" cut and rolled to fit.
fit to former
Over lap trimmed and now needs to be file for a good fit.
Filling need here and there and ...
Sitting on the former.
Not much to show for a days work. :violence-stickwhack:
- Modernity
- Posts: 183
- Joined: Sun Nov 27, 2011 2:34 pm
- Location: Southern Highlands, NSW
- equipment: I am currently refurbishing a 150 ltr mush tun.
Currently building a 150 ltr oil heated pot still, with 8" copper column.
Re: Mod's Build Log
![]() by Modernity » Sun Sep 09, 2012 8:18 pm
by Modernity » Sun Sep 09, 2012 8:18 pm
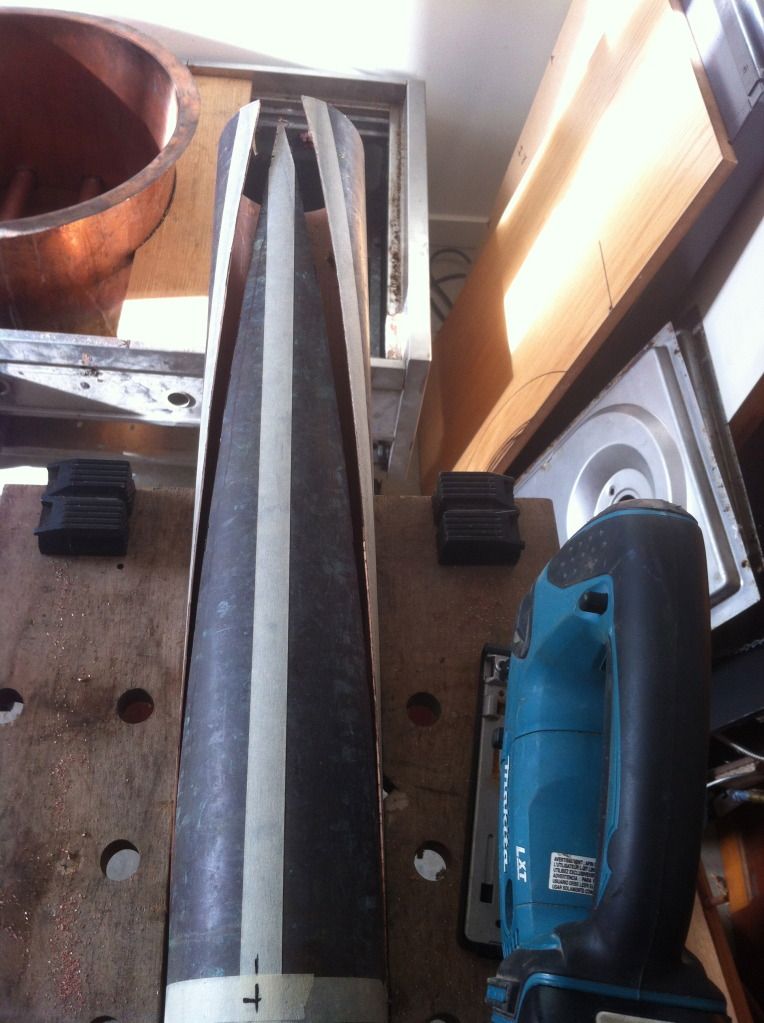
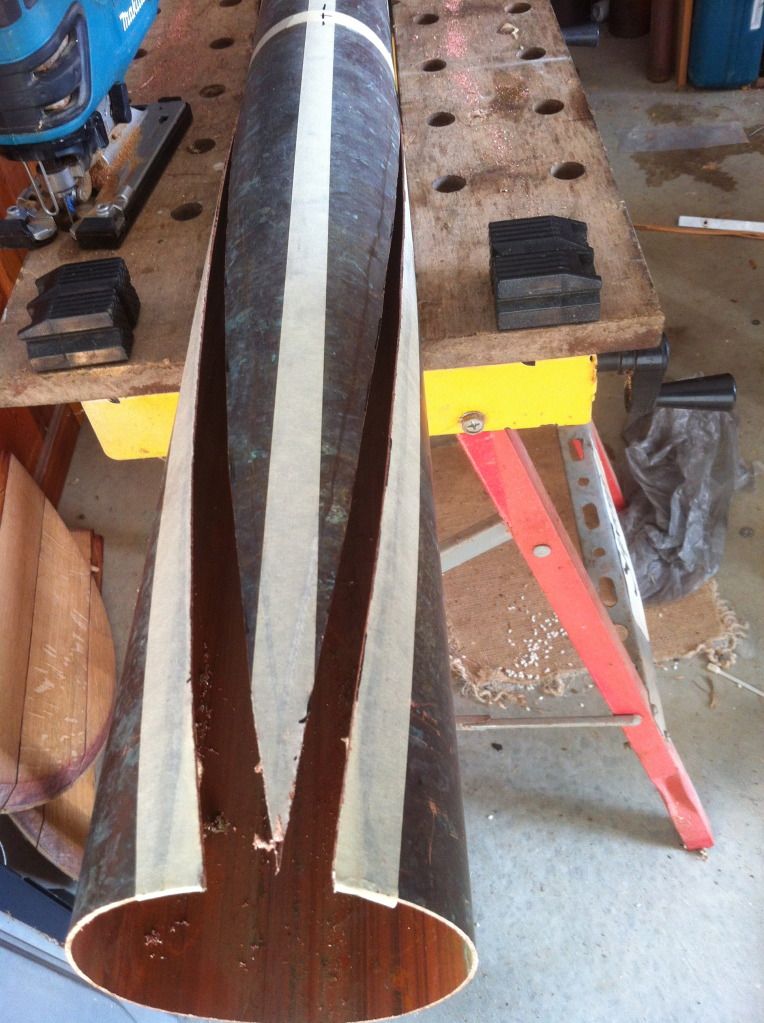
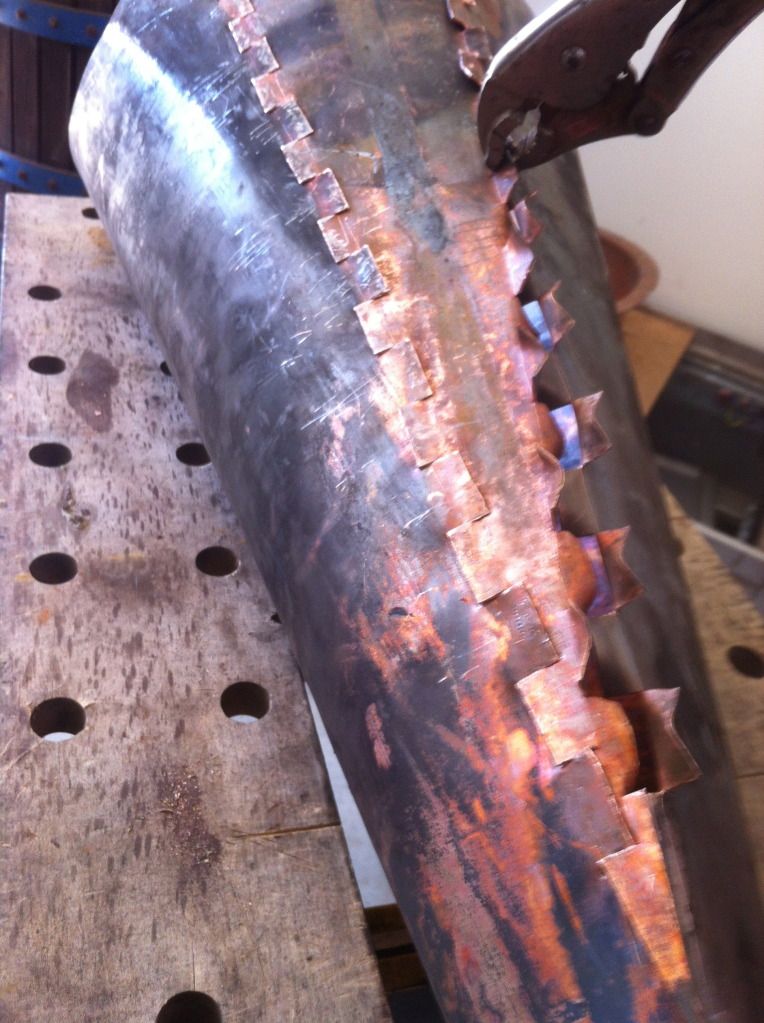
An other day of progress today. I started work on the lower section of the neck. I am after a flair from 100mm at the top out to 250mm<> and then a ball coming back to 150mm at the joint to the pot. All will become clear when I get to it (promise). So like a trumpet with and egg on the end of the bell.
Photos attached for those you care to see the work of a mad man. The Dept of Domestic Affairs was happy to listen of a afternoon of taping copper in the garage
I started by splitting some 100mm pipe and stitching the tapered lengths into a cone.
Stitching marked out at 25mm centres.
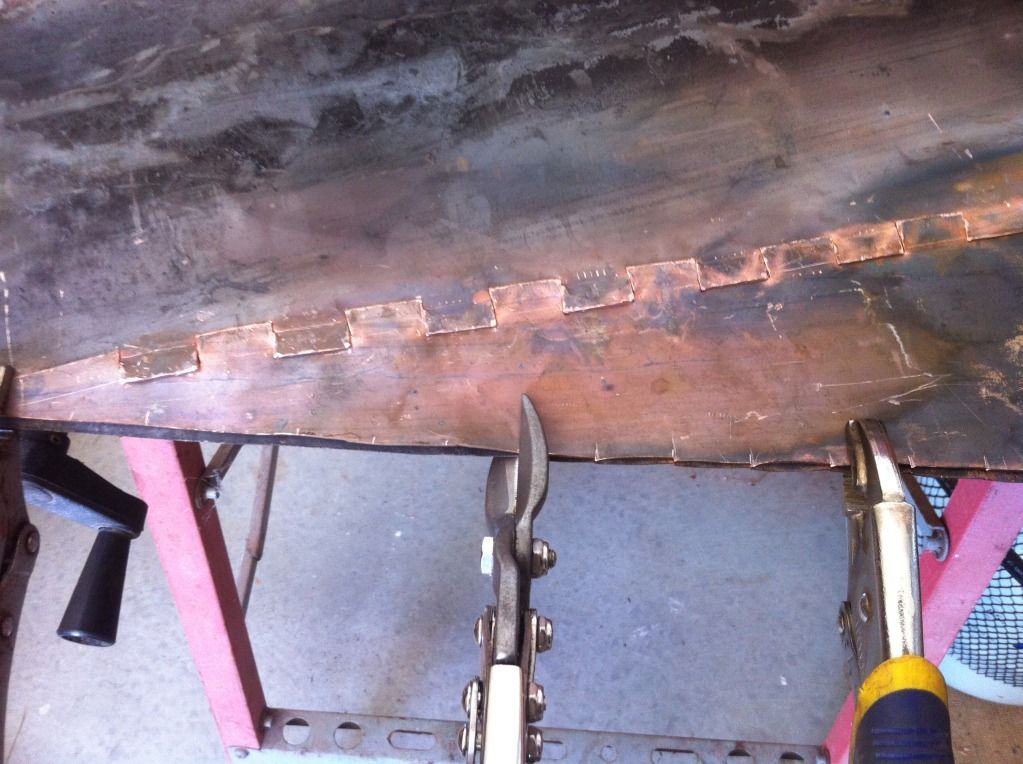
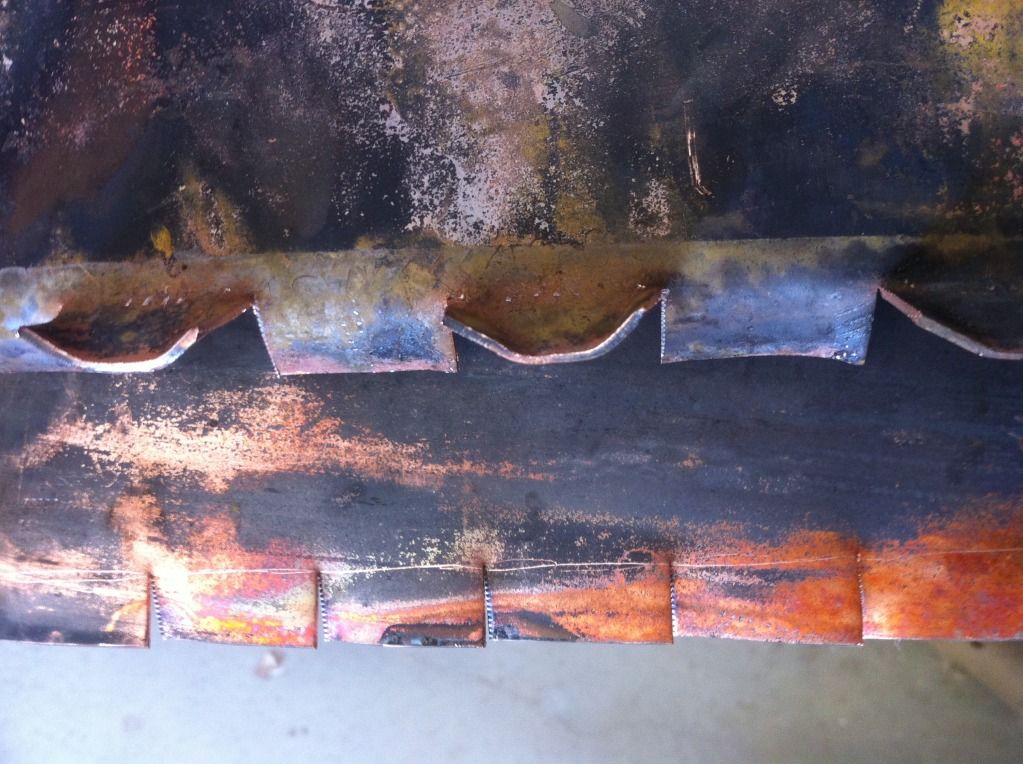
You can see the second row of stitching.

The cuts are started on both pieces so they are matching.
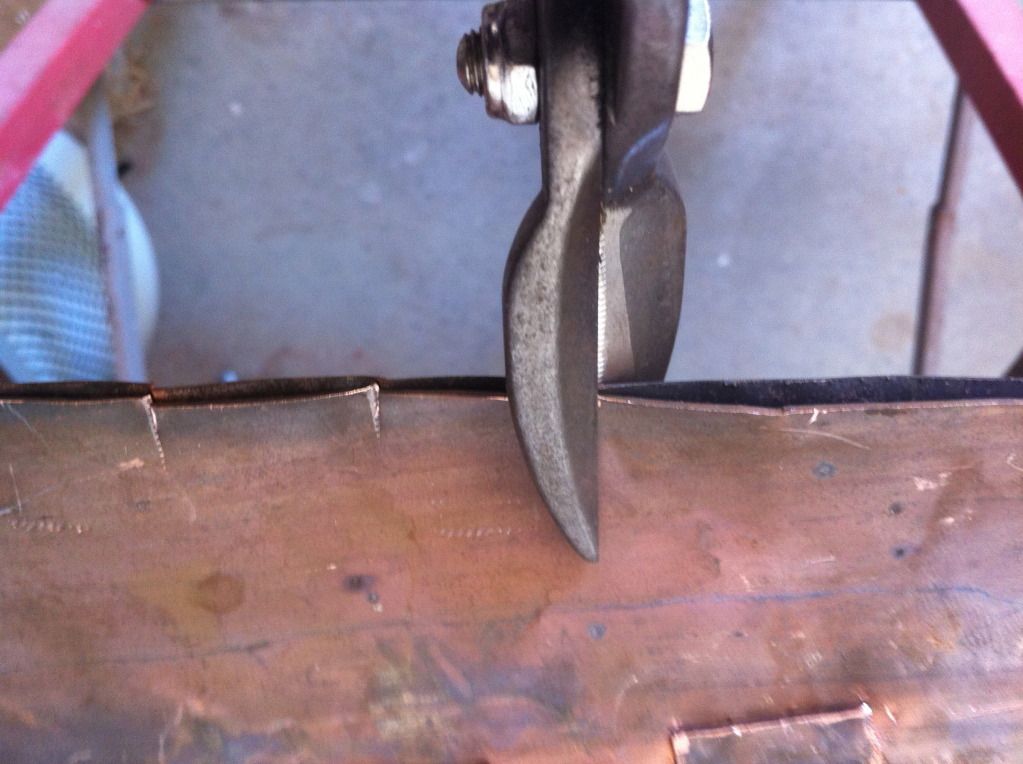
Stitching snipped up to the 10mm line
Stitch turned up
Stitching being tapped down
Stitching being tapped into place
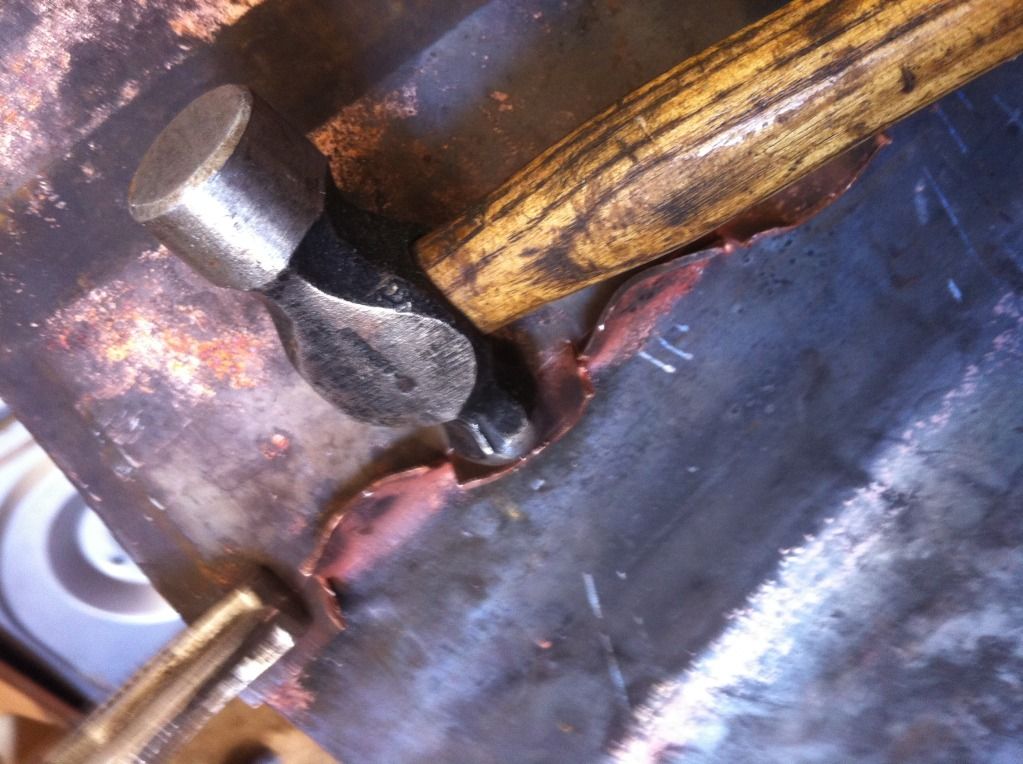
Stitching lined up.
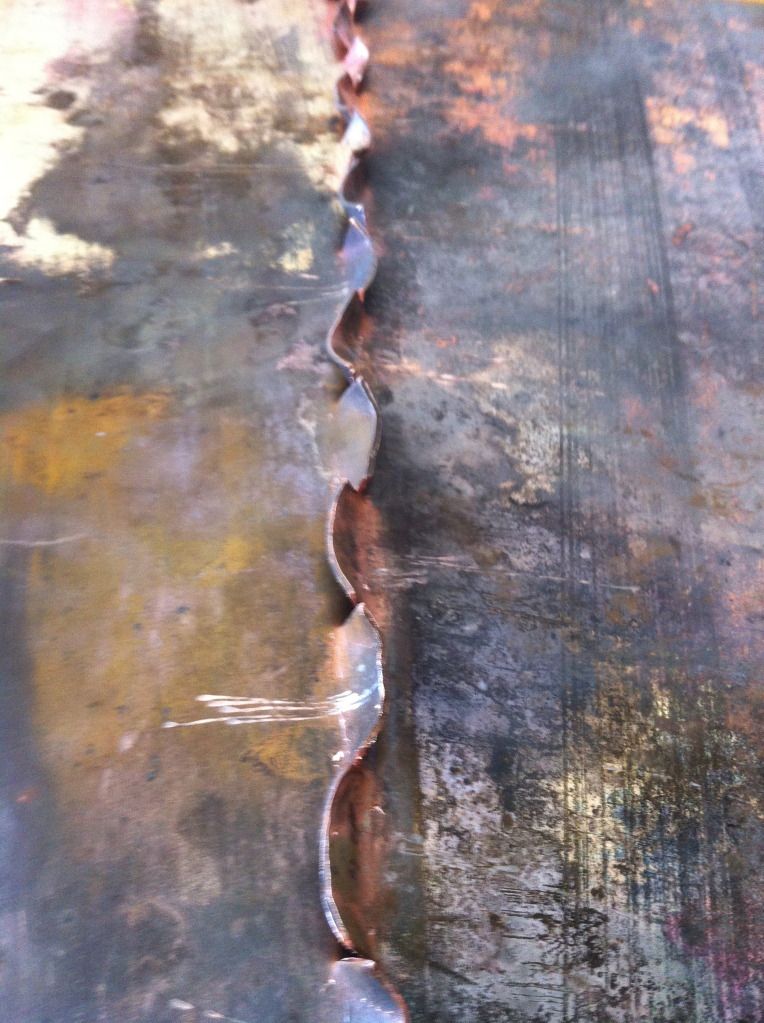
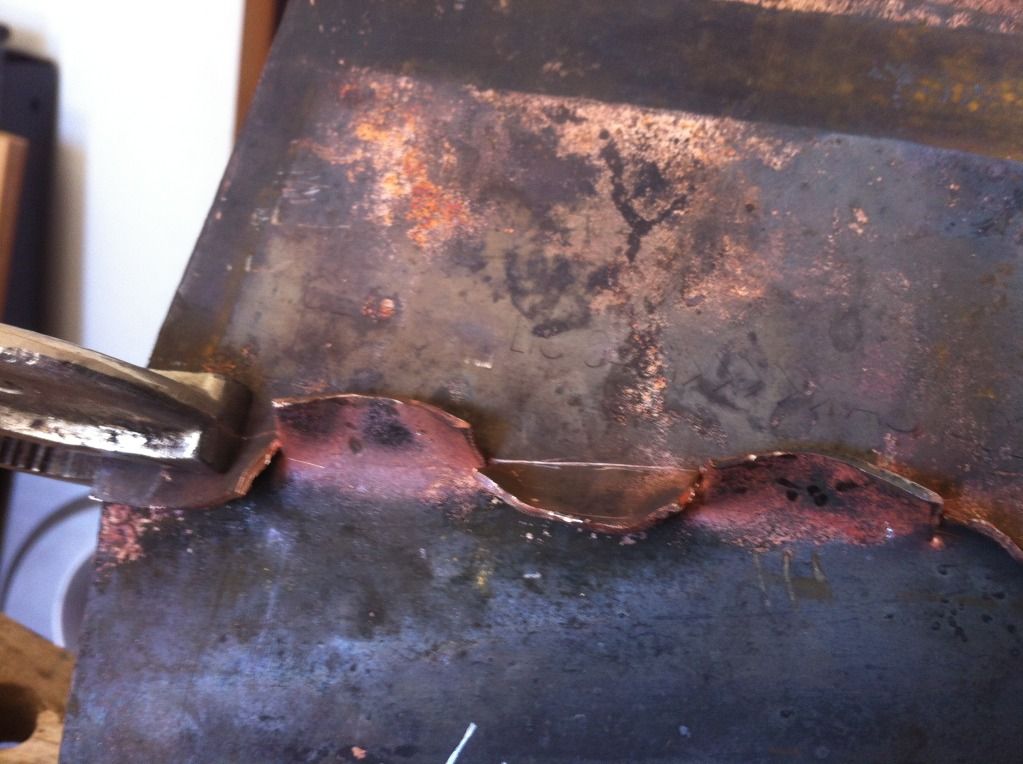
Stitching flattened and tight
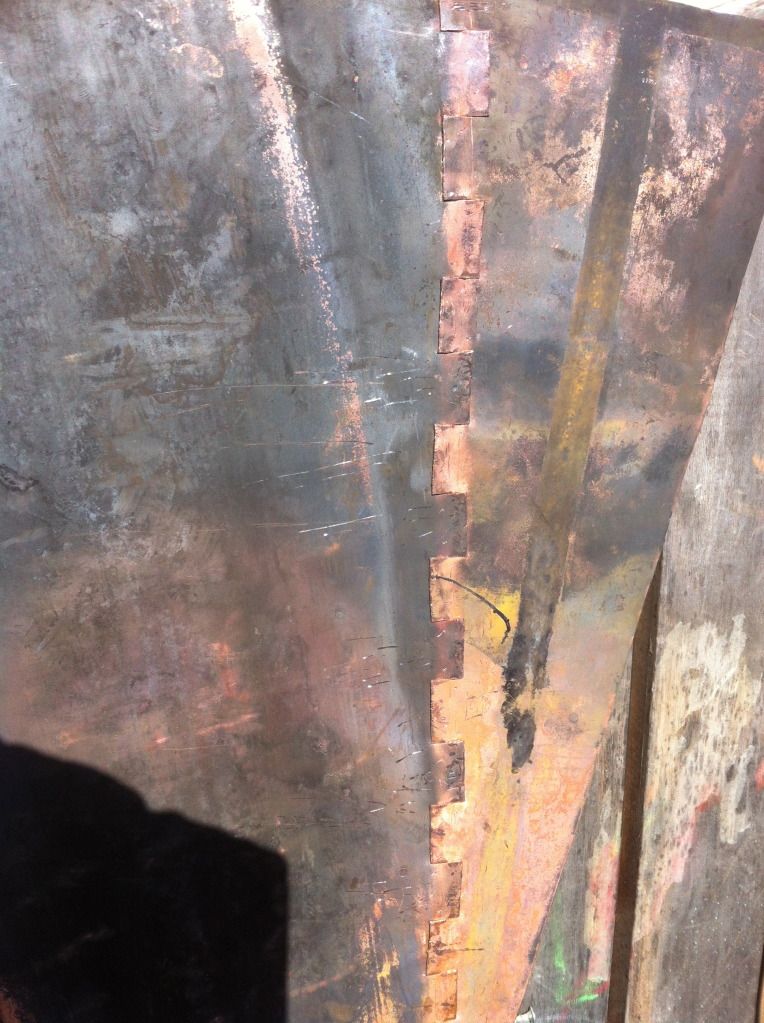
Two rows of stitching come together
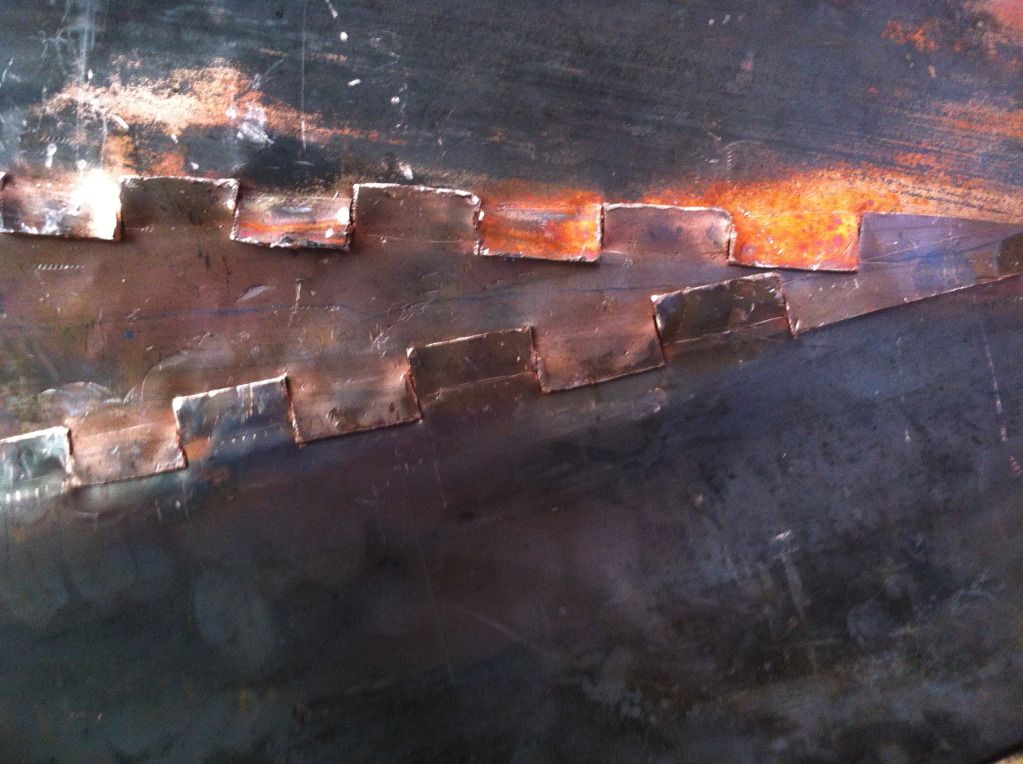
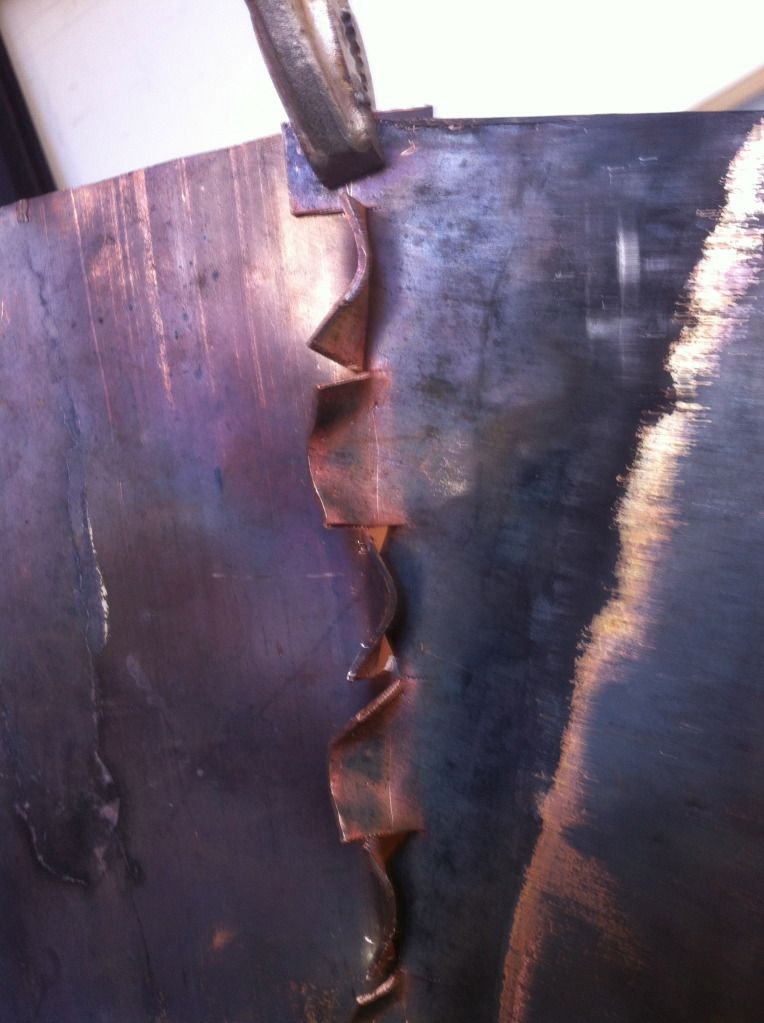
Turning the four panels into a cone
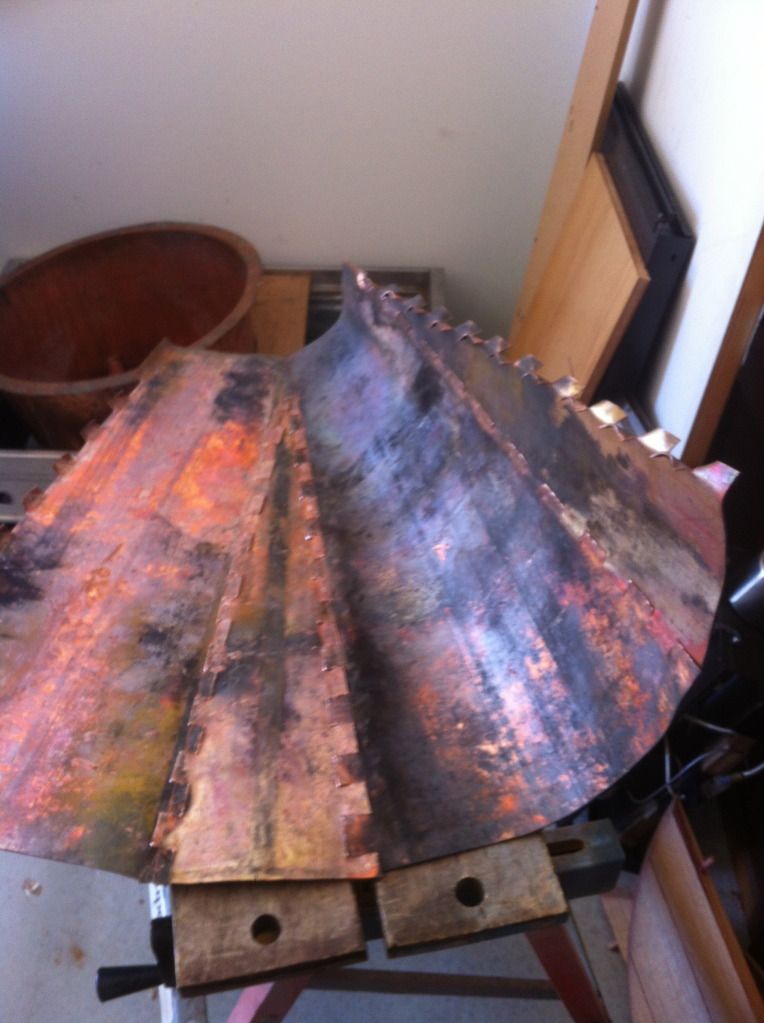
Bringing the edges together
All four pieces stitched
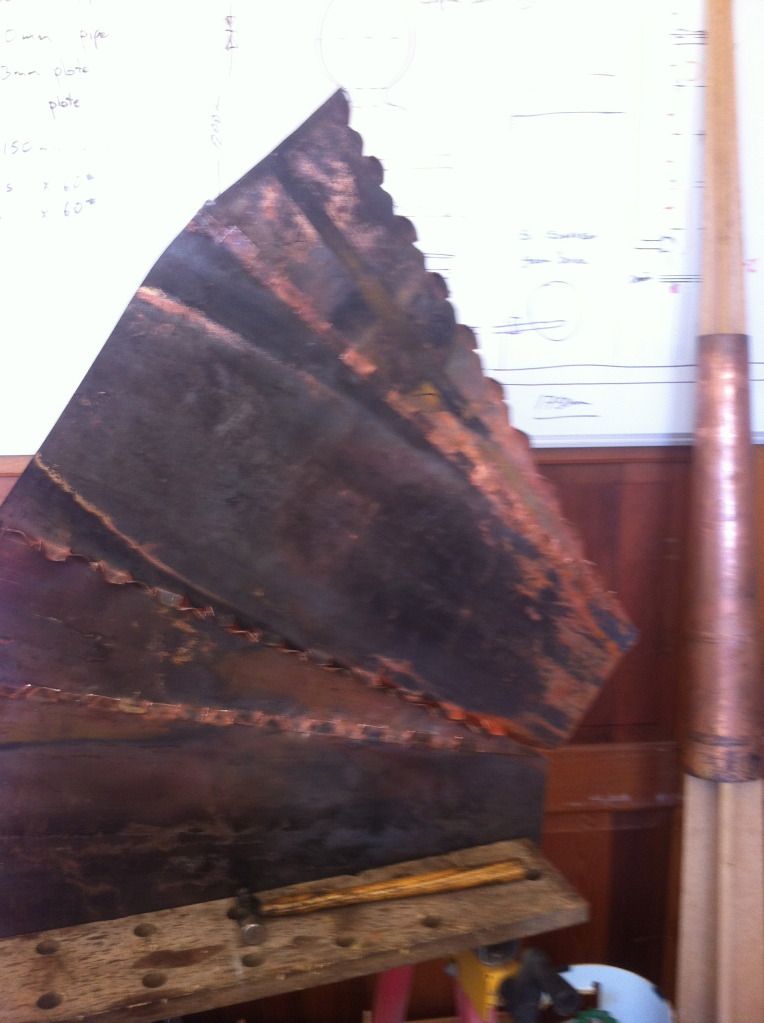
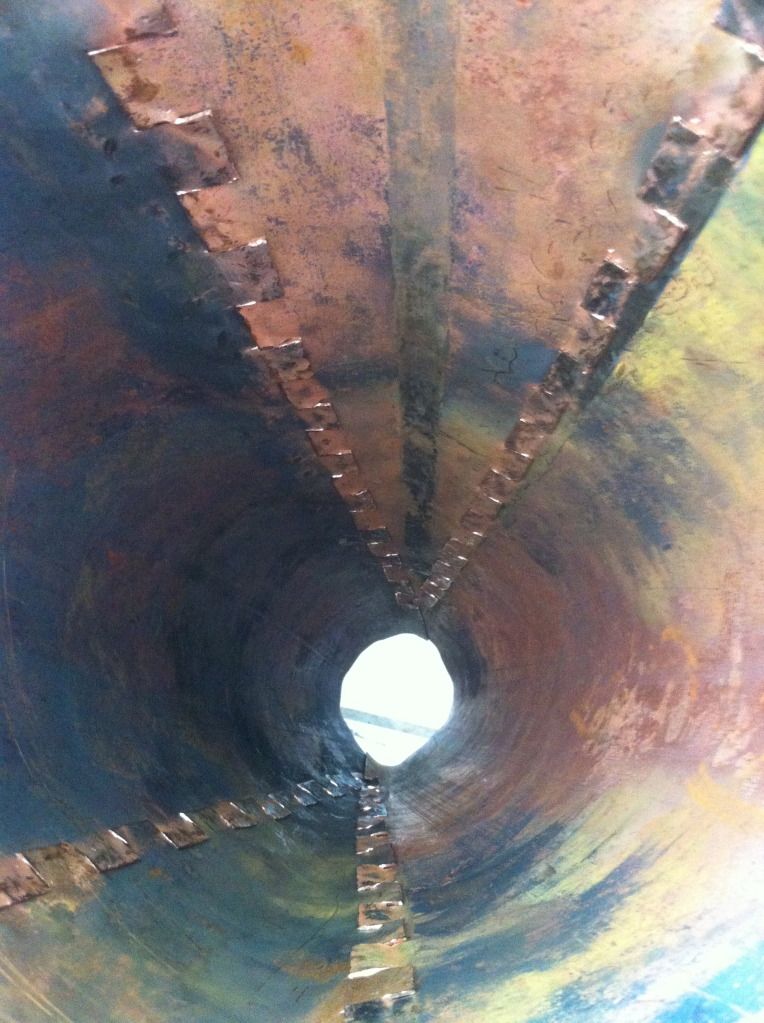
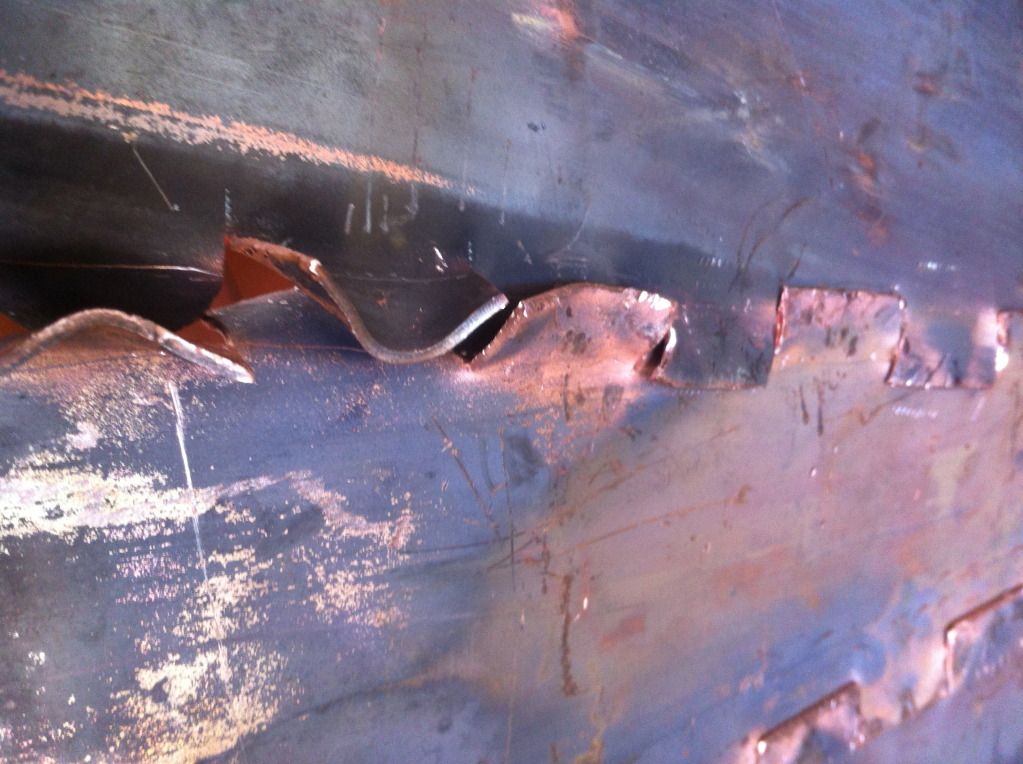
Tapered neck on the flared neck
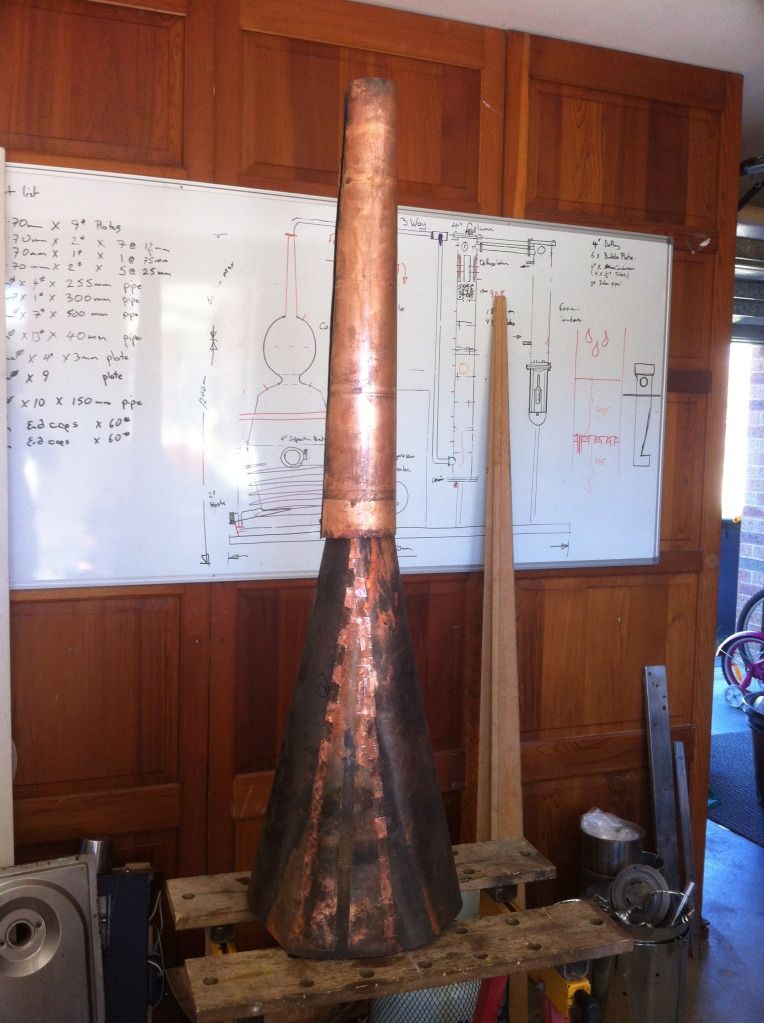
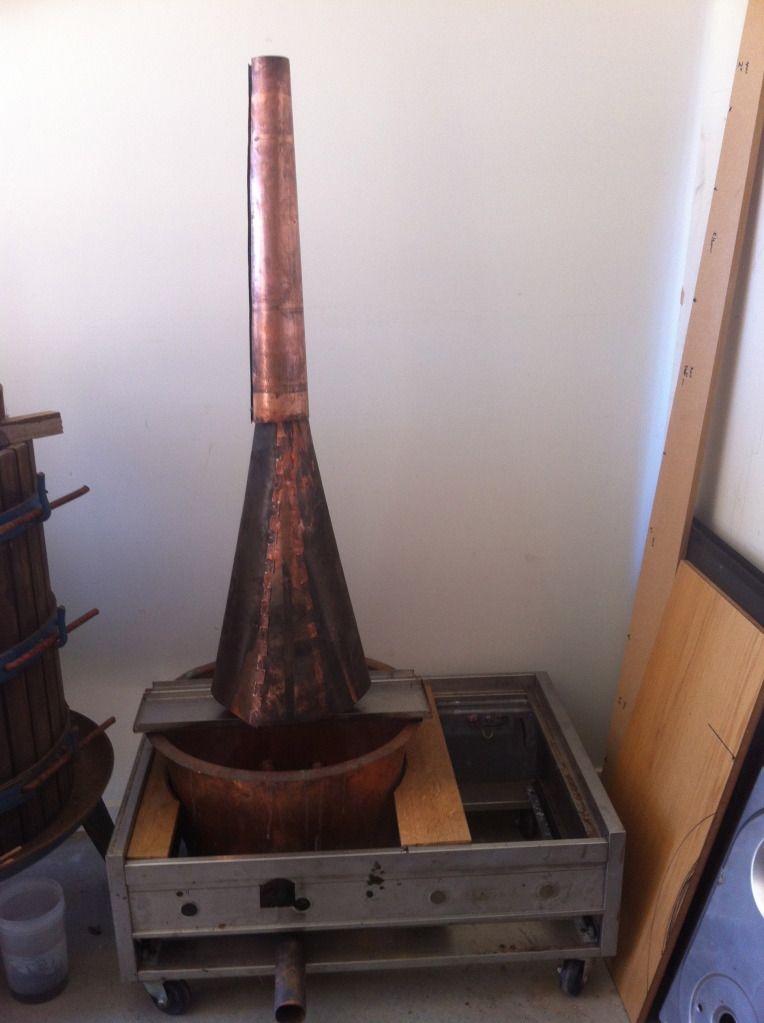
Sitting on the pot without a lid (not made yet)
Photos attached for those you care to see the work of a mad man. The Dept of Domestic Affairs was happy to listen of a afternoon of taping copper in the garage
I started by splitting some 100mm pipe and stitching the tapered lengths into a cone.
Stitching marked out at 25mm centres.
You can see the second row of stitching.
The cuts are started on both pieces so they are matching.
Stitching snipped up to the 10mm line
Stitch turned up
Stitching being tapped down
Stitching being tapped into place
Stitching lined up.
Stitching flattened and tight
Two rows of stitching come together
Turning the four panels into a cone
Bringing the edges together
All four pieces stitched
Tapered neck on the flared neck
Sitting on the pot without a lid (not made yet)
- Modernity
- Posts: 183
- Joined: Sun Nov 27, 2011 2:34 pm
- Location: Southern Highlands, NSW
- equipment: I am currently refurbishing a 150 ltr mush tun.
Currently building a 150 ltr oil heated pot still, with 8" copper column.
Re: Mod's Build Log
![]() by emptyglass » Sun Sep 09, 2012 10:05 pm
by emptyglass » Sun Sep 09, 2012 10:05 pm
I tip my hat to you.
You got some old school coppersmithing going on there.
Goes to show that a tradesman is not scared of hand tools. Who needs rollers?
Like they say Mod, its not what you got, its how you use it that counts. You use it well.
Please, carry on. Cant wait to see more steam punked copper porn.
You got some old school coppersmithing going on there.
Goes to show that a tradesman is not scared of hand tools. Who needs rollers?
Like they say Mod, its not what you got, its how you use it that counts. You use it well.
Please, carry on. Cant wait to see more steam punked copper porn.
- emptyglass
Re: Mod's Build Log
![]() by caveman » Sun Sep 09, 2012 10:07 pm
by caveman » Sun Sep 09, 2012 10:07 pm
this build is definatly involved but progress is looking great top effort mod :handgestures-thumbupleft: :handgestures-thumbupleft:
- caveman
- Posts: 238
- Joined: Thu May 10, 2012 1:49 am
- Location: sandgroper state
- equipment: 3" macStill boka
2" pot still with shotgun condencer (the swan with hotdog ) custom by mcstill
105L custom built s/s boiler with sight glass/fillport ,thermoport
Aces high thumper plate bubbler ( long term project)
building custom mobile boiler bench
Re: Mod's Build Log
![]() by stilly_bugger » Sun Sep 09, 2012 10:20 pm
by stilly_bugger » Sun Sep 09, 2012 10:20 pm
Inspiring stuff, Mod.
:handgestures-thumbupleft:
:handgestures-thumbupleft:
- stilly_bugger
- Posts: 338
- Joined: Sun Jul 03, 2011 9:05 pm
- equipment: simple pot with worm on an electric boiler.
Re: Mod's Build Log
![]() by Kimbo » Sun Sep 09, 2012 11:17 pm
by Kimbo » Sun Sep 09, 2012 11:17 pm
Mate, you're puttin' some work into that :clap: :clap:
lookin fanbloodytastic :handgestures-thumbupleft:
lookin fanbloodytastic :handgestures-thumbupleft:
- Kimbo
- Lifetime Member
- Posts: 5461
- Images: 0
- Joined: Fri Mar 18, 2011 6:33 pm
- Location: Perf WA
- equipment: 4" bubbler with a 6"inline thumper
Re: Mod's Build Log
![]() by MacStill » Mon Sep 10, 2012 3:16 am
by MacStill » Mon Sep 10, 2012 3:16 am
Mod,
I was showing off that cone today on my ipad to a couple off pissheads, just cause we aint sayin much dont mean we aint watching :handgestures-thumbupleft:
Those joins in that lyne arm takes some dedication, please carry on.
Mac.
I was showing off that cone today on my ipad to a couple off pissheads, just cause we aint sayin much dont mean we aint watching :handgestures-thumbupleft:
Those joins in that lyne arm takes some dedication, please carry on.
Mac.
- MacStill
- Lifetime Member
- Posts: 16835
- Joined: Fri Mar 18, 2011 1:40 pm
- Location: Wide Bay QLD
- equipment: Anything I choose :P
Re: Mod's Build Log
![]() by Gas on » Mon Sep 10, 2012 4:01 am
by Gas on » Mon Sep 10, 2012 4:01 am
This is true craftmanship!! :clap: :clap: :clap:
more please :clap: :clap: :clap:
more please :clap: :clap: :clap:
- Gas on
- Posts: 356
- Joined: Sun Jun 19, 2011 11:51 pm
- Location: perth sor
- equipment: baked beans & rum
arfa 5 star bubbler
Re: Mod's Build Log
![]() by JayD » Mon Sep 10, 2012 9:26 am
by JayD » Mon Sep 10, 2012 9:26 am
when you are finished your build and you sit there watching her perform there will be silly grin on your face cause you hand made her....good luck and keep up the good work.
- JayD
- Posts: 1669
- Joined: Mon Jul 09, 2012 7:46 pm
- Location: Tasmania
- equipment: JayD's Copper Worx
Re: Mod's Build Log
![]() by Modernity » Sat Sep 15, 2012 1:54 pm
by Modernity » Sat Sep 15, 2012 1:54 pm
All work has stopped on the copper due to no heat for soldering, so I have started work on the product condenser this week, something to do while I wait for a budget to get my gas setup sorted.
The main body of the condenser is being built out of a 100mm diameter stainless steel thermos flask. Tipped upside down with bottom carefully removed to access the business end of the flask. These things have a 12mm gap between the inner and outer walls. This gives the condenser a 100mm water jacketed over a 75mm inner. The whole condenser is 300mm long top to bottom.
I had to scratch my head for a while to work out how to get the bloody thing apart without wreaking it. Anyway I eased the bottom end cap off and then accessed the weld end cap that keep the thing in a vacuum. That came off with a quick grind along the TIG weld seam.
Photos to follow..
- Modernity
- Posts: 183
- Joined: Sun Nov 27, 2011 2:34 pm
- Location: Southern Highlands, NSW
- equipment: I am currently refurbishing a 150 ltr mush tun.
Currently building a 150 ltr oil heated pot still, with 8" copper column.
Re: Mod's Build Log
![]() by Modernity » Sun Sep 16, 2012 10:45 am
by Modernity » Sun Sep 16, 2012 10:45 am
Photos for the above post:
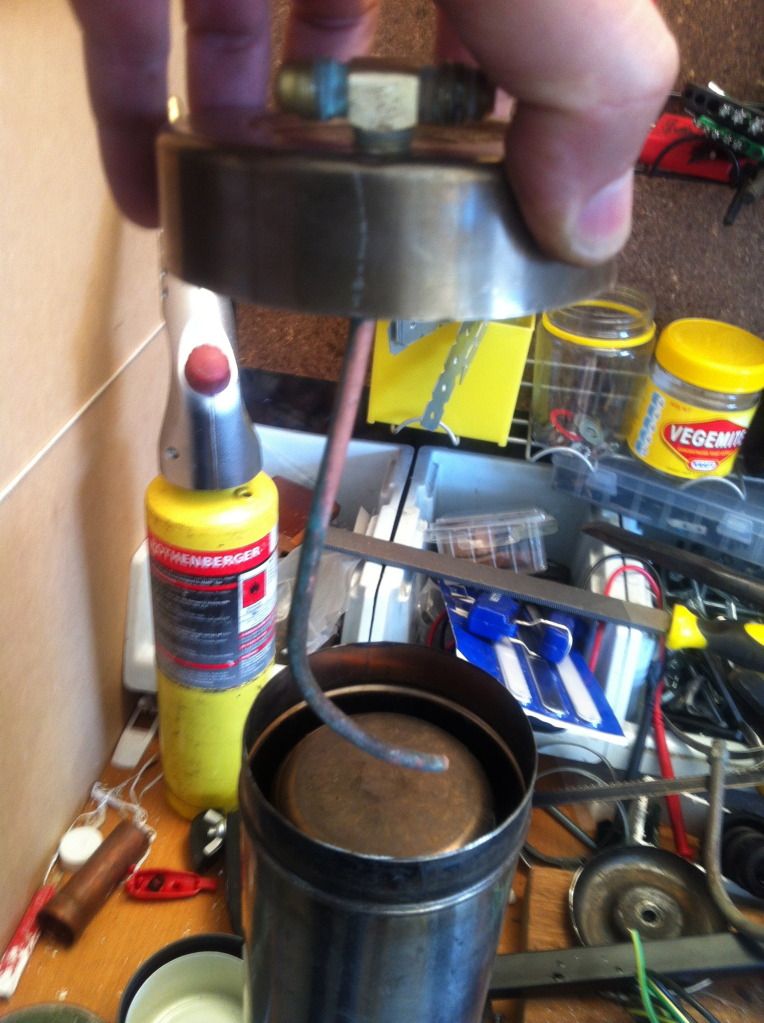
Thermos Flask

Bottom coming off
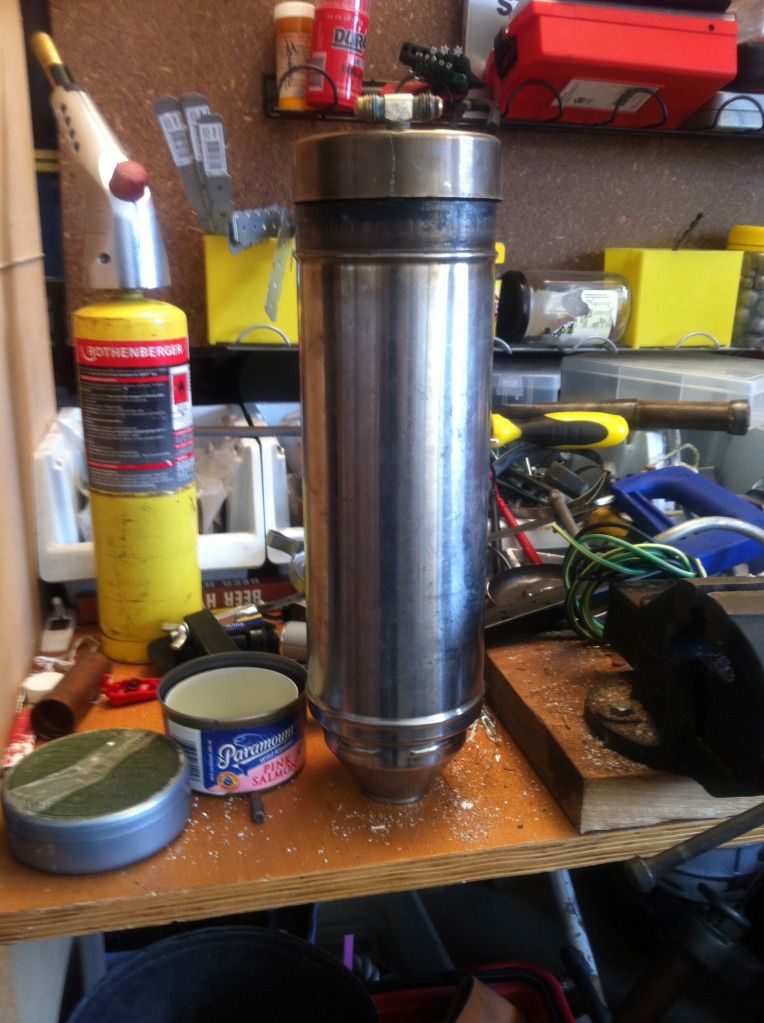
Grinding the base off
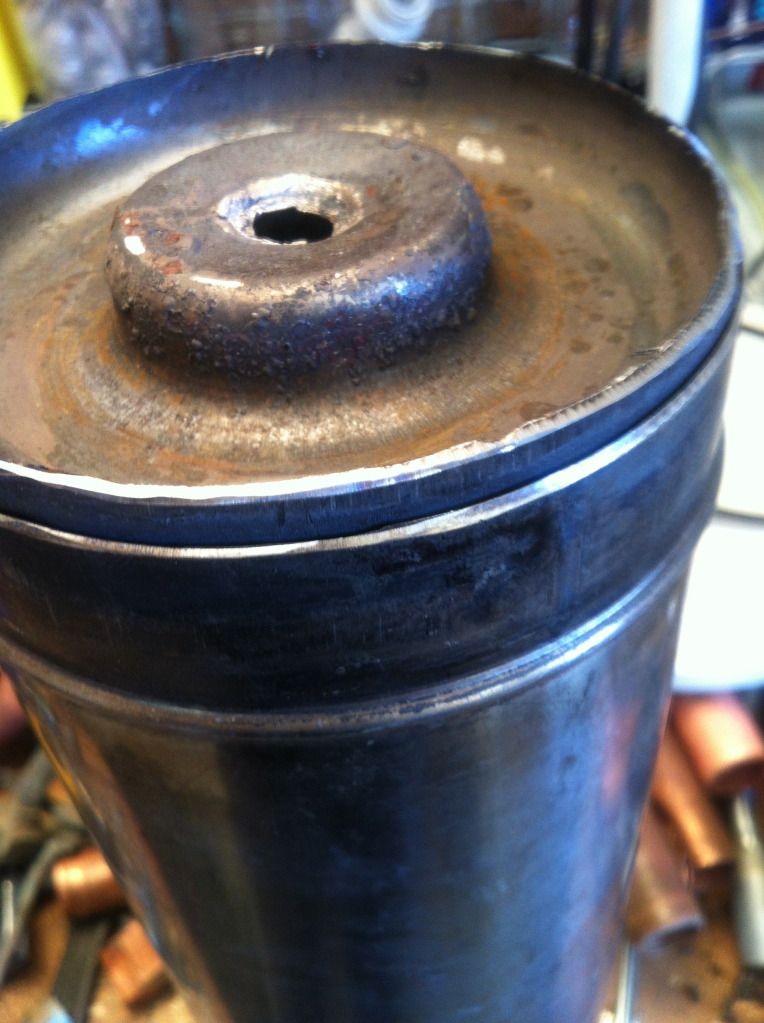
Inside the base
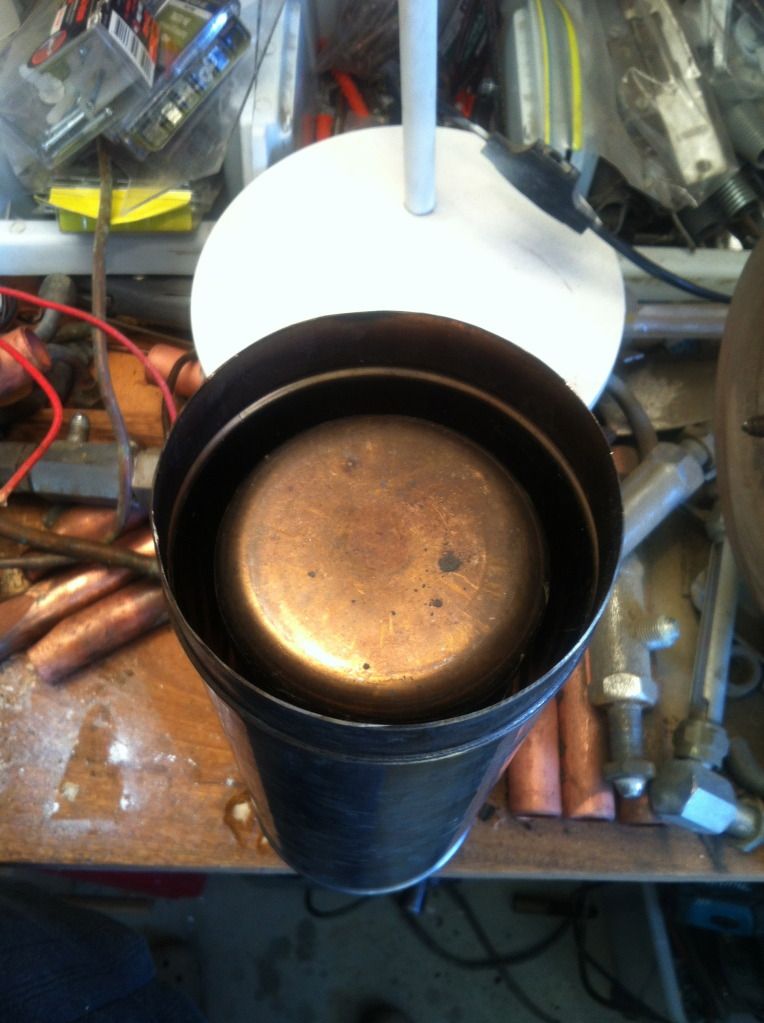
The wet wall space
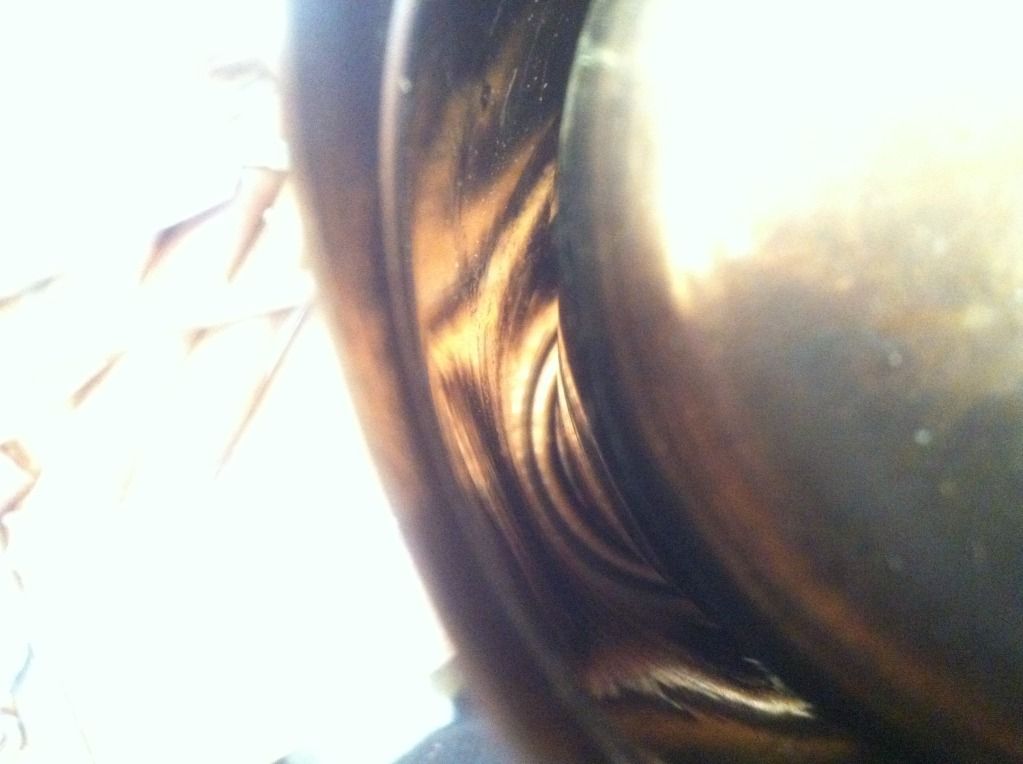
Inlet with dip tube
Thermos Flask
Bottom coming off
Grinding the base off
Inside the base
The wet wall space
Inlet with dip tube
- Modernity
- Posts: 183
- Joined: Sun Nov 27, 2011 2:34 pm
- Location: Southern Highlands, NSW
- equipment: I am currently refurbishing a 150 ltr mush tun.
Currently building a 150 ltr oil heated pot still, with 8" copper column.
Re: Mod's Build Log
![]() by Kimbo » Fri Nov 02, 2012 7:00 pm
by Kimbo » Fri Nov 02, 2012 7:00 pm
Bump!
how's this build going mod? must be getting close if your thinking of a barrel a week :teasing-tease:
how's this build going mod? must be getting close if your thinking of a barrel a week :teasing-tease:
- Kimbo
- Lifetime Member
- Posts: 5461
- Images: 0
- Joined: Fri Mar 18, 2011 6:33 pm
- Location: Perf WA
- equipment: 4" bubbler with a 6"inline thumper
- Modernity
- Posts: 183
- Joined: Sun Nov 27, 2011 2:34 pm
- Location: Southern Highlands, NSW
- equipment: I am currently refurbishing a 150 ltr mush tun.
Currently building a 150 ltr oil heated pot still, with 8" copper column.
Re: Mod's Build Log
![]() by MacStill » Fri Nov 02, 2012 7:08 pm
by MacStill » Fri Nov 02, 2012 7:08 pm
I cant wait to see this thing built, please stop keeping us in suspense :pray:
- MacStill
- Lifetime Member
- Posts: 16835
- Joined: Fri Mar 18, 2011 1:40 pm
- Location: Wide Bay QLD
- equipment: Anything I choose :P
Re: Mod's Build Log
![]() by Modernity » Fri Nov 02, 2012 7:19 pm
by Modernity » Fri Nov 02, 2012 7:19 pm
F**k you think you are in suspense, how the hell do you think I feel? ~x(
- Modernity
- Posts: 183
- Joined: Sun Nov 27, 2011 2:34 pm
- Location: Southern Highlands, NSW
- equipment: I am currently refurbishing a 150 ltr mush tun.
Currently building a 150 ltr oil heated pot still, with 8" copper column.
89 posts
• Page 4 of 5 • 1, 2, 3, 4, 5
Return to Plated Column Stills
Who is online
Users browsing this forum: No registered users and 94 guests