Bubbler time.

Perforated & bubble cap plated columns

Bubbler time.

Postby 2MEKE » Sun Mar 10, 2013 2:37 pm

I've started making parts for my bubbler build and want to hear peoples opinions.

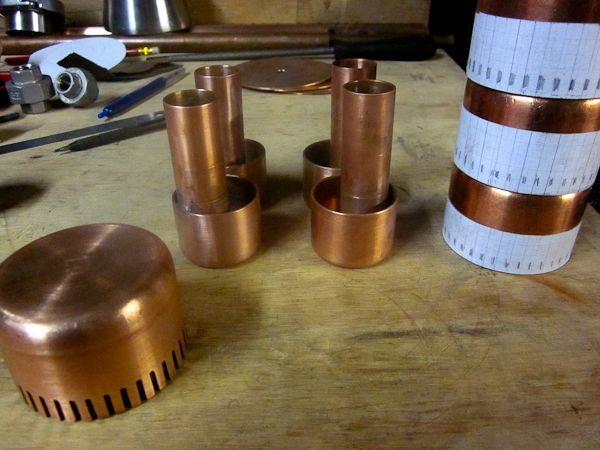
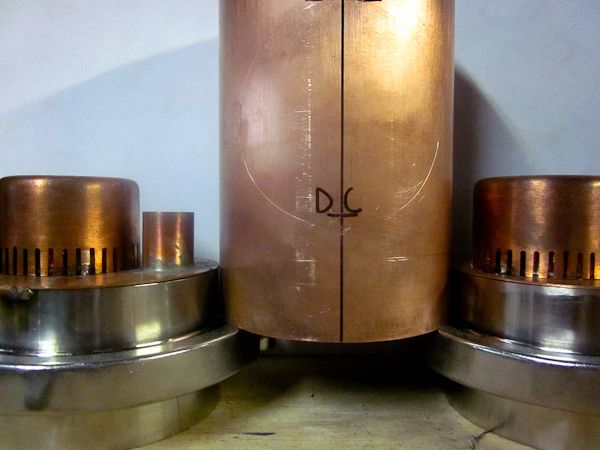
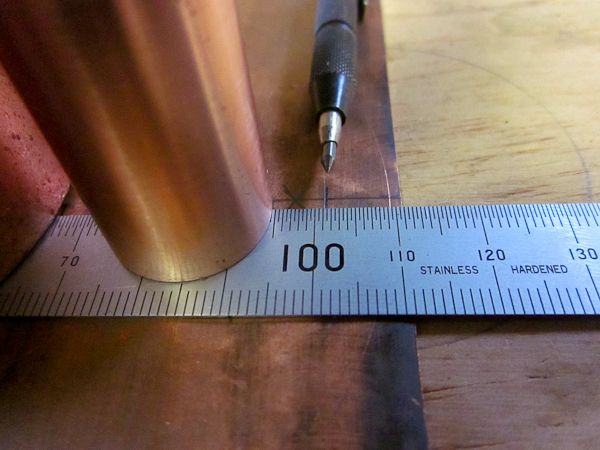
The plan at this stage is for a 4" modular 4 plate column.

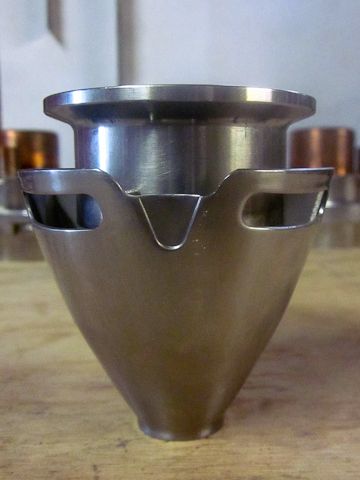
The question is what would YOU do and why?...perf plates or a single bubble cap.
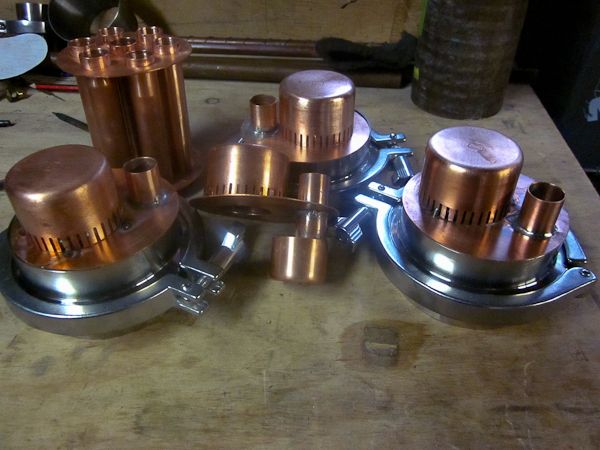
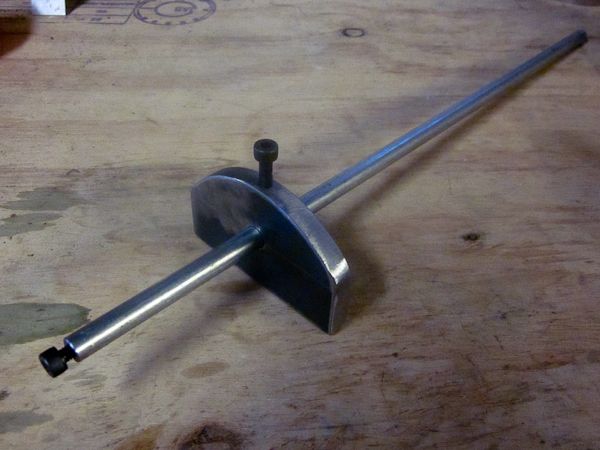
If I go the cap route it will look like this.
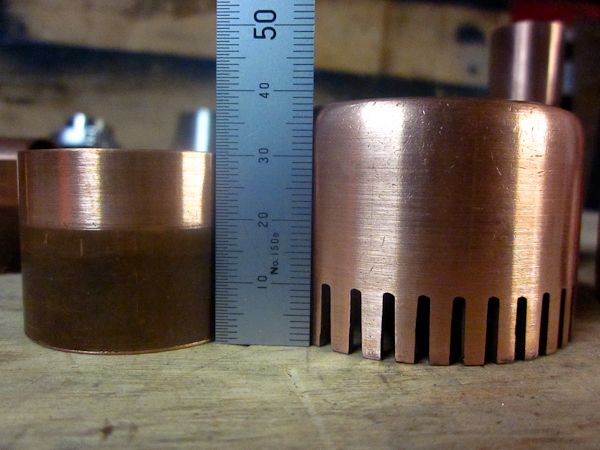
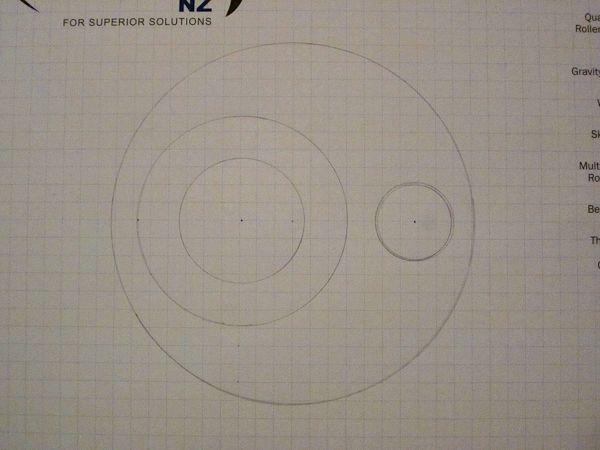
Is that too tight?? (paper is 5x5 quad)
Image
Image

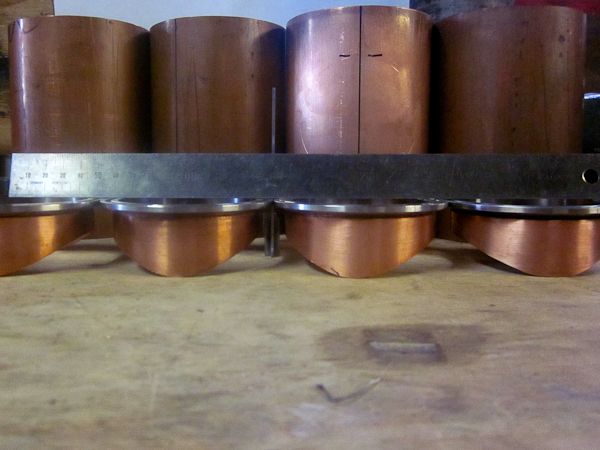
Secondly, what's the most efficient PC combo?
I have enough 2"ID copper and 3"OD SS to sheath either 0.5"ID or 0.75"ID copper tubes up to 600 long.

Looking forward to hearing you ideas.
Cheers
2MEKE
 
Posts: 24
Joined: Thu Jan 17, 2013 4:09 pm
Location: Northland, NZ
equipment: ...getting there...

Re: Bubbler time.

Postby blond.chap » Tue Mar 12, 2013 9:22 am

Hey mate, the bubbler club will welcome you kindly.

I like my perforated plate bubbler, but I've never run (or built) a single bubble cap so don't have a comparison.

It was simple to build the plates, but takes a while to drill the holes, I ended up buying a dremmel and a workstation that converts it to a mini drill press, with that thing I could drill the holes in each plate in less than an hour.

The thing turns out some really nice product, so my vote is for perforated.

The PC size depends on your boiler power, 400mm of 2" with 4 1/2" inner tubes works great for a 2.4kW boiler. Distillate comes out very cool.
blond.chap
 
Posts: 877
Images: 0
Joined: Tue Aug 07, 2012 12:11 pm
Location: South Australia
equipment: Paris Stillton (4" perforated bubbler)

Re: Bubbler time.

Postby 2MEKE » Wed Mar 13, 2013 5:44 pm

Cheers for that.

I'm leaning towards the perf plate now as I'm not convinced my single caps are quite right and don't want to buy lots of smaller ones right now.
Good to hear your PC handles the 2.4kw...I was hoping to build one at about 500 long.
How much more heat do you think yours could handle?
2MEKE
 
Posts: 24
Joined: Thu Jan 17, 2013 4:09 pm
Location: Northland, NZ
equipment: ...getting there...

Re: Bubbler time.

Postby blond.chap » Wed Mar 13, 2013 6:09 pm

No worries, from what I hear they perform pretty similarly, last I heard Mac was favouring the single cap, but I'll let him speak for himself.

I haven't tried the PC with any more heat than that, so couldn't say sorry. Just at a guess, you may be overloading a 3" column with more heat than that.
blond.chap
 
Posts: 877
Images: 0
Joined: Tue Aug 07, 2012 12:11 pm
Location: South Australia
equipment: Paris Stillton (4" perforated bubbler)

Re: Bubbler time.

Postby bt1 » Wed Mar 13, 2013 6:31 pm

Howdy,

I favour perf plates cos I'm yet to see a strong reason to go to caps...personal choice plus reading and happy with the results.

I've only built 1 cap plate and tested.

On PC I use a 5 x 1/2tube 2" x 625mm long shell and it handles 100K BTU+ on a 32 jet Mongolian burner no issues and in bloody hot SA weather.

cheers
bt1
bt1
 
Posts: 2448
Joined: Sun Apr 22, 2012 11:56 am
Location: Adelaide
equipment: 2 x Glass Bubblers, 5 plate 89mm & 6 plate 110mm
4" 6 plate copper bubbler, 500mm copper packed section
Several pots, custom boiler
14 keg rotating brew setup, fermentation & dispenser fridges.

Re: Bubbler time.

Postby MacStill » Wed Mar 13, 2013 6:58 pm

blond.chap wrote:No worries, from what I hear they perform pretty similarly, last I heard Mac was favouring the single cap, but I'll let him speak for himself.


This is correct, yes :handgestures-thumbupleft:

The reason I prefer the single cap is because of ease of construction, there is no noticeable difference to the end product.

People who are saying they reckon one is better than the other, that have not used or built other types of trays really have no first hand knowledge & can not fairly comment on what really is actually better.

;-)
MacStill
Lifetime Member
 
Posts: 16835
Joined: Fri Mar 18, 2011 1:40 pm
Location: Wide Bay QLD
equipment: Anything I choose :P

Re: Bubbler time.

Postby 2MEKE » Thu Mar 14, 2013 6:45 pm

I agree a single cap would be much easier to build unless...
Today we got a job at work to build rainheads for a customer...out of copper :shock: Hopefully there are some out-cuts large enough to go in the plasma.
Perf plates may work out the easiest after all.

@Mac - I'd be interest to hear your opinion on the spacing in the pics above.
2MEKE
 
Posts: 24
Joined: Thu Jan 17, 2013 4:09 pm
Location: Northland, NZ
equipment: ...getting there...

Re: Bubbler time.

Postby googe » Thu Mar 14, 2013 8:49 pm

Hey mate, good to see another bubbler on the go :handgestures-thumbupleft: I like the sound of the plate you Might be able to get through work, would save alot of stuffing around!. Ive got single caps on mine, havnt done perfs so cant compare sorry. They were easy to make though, 4' plate with 2' cap and 1.5' riser, 3/4' downcomer. Pretty much the same as Mac, but he's probably done 10 different varieties since then lol good luck mate.
googe
 

Re: Bubbler time.

Postby 2MEKE » Sat Mar 16, 2013 6:53 pm

After spending the day fabbing the said copper rainheads (some people have WAY too much money) I've ended up with a couple of useable pieces of 'scrap'. Unfortunately none are suitable to go through the plasma so this afternoon I decided to go for it and build the single caps. If they don't work I'll look at making perf plates.
So far...
Image

Image
The down-comers are to be set at 25mm and will have 18mm clearance between the underside of the plate and the top of the down-comer cup.
Is this enough? I'm wondering if I don't drop the down-comer by 5mm. :?
And how important is the clearance between the top of the riser and the underside of the cap? Current design has it at about 80% of the riser volume.
Or just maybe I'm over thinking it.....oh to think like an artist instead of always looking out for potential weak points. :doh:
2MEKE
 
Posts: 24
Joined: Thu Jan 17, 2013 4:09 pm
Location: Northland, NZ
equipment: ...getting there...

Re: Bubbler time.

Postby googe » Sat Mar 16, 2013 9:15 pm

Have a look at Macs 4' and 6' rum maker stills in the plated column threads, all your answers are there.
googe
 

Re: Bubbler time.

Postby 2MEKE » Sun Mar 17, 2013 5:31 pm

This afternoons progress.

Image
2MEKE
 
Posts: 24
Joined: Thu Jan 17, 2013 4:09 pm
Location: Northland, NZ
equipment: ...getting there...

Re: Bubbler time.

Postby 1 2many » Sun Mar 17, 2013 6:03 pm

Hi 2MEKE Wow your photography is sick .You will have some awesome centerfolds real soon, not to mention an incredible build .Keep those pics coming great work. :text-coolphotos:
1 2many
Lifetime Member
 
Posts: 4215
Joined: Sun Jan 27, 2013 6:08 am
Location: Where the sun shines
equipment: Portable A.G brewery ,#001 5 STAR blockhead 4" Modular 4 plate SSG with,6"inline thumper, 2.5" 9 tube shotgun, packed section, Boiler 50 ltr inverted keg 4"still mount, 2.4 Kw FSD elements 1"drain.

Re: Bubbler time.

Postby 2MEKE » Sun Apr 07, 2013 5:27 pm

1 2many wrote:your photography is sick

Thanks. Only using my daughter's IXUS 130

Had a very productive day. :D
Got the column sections cut.
Made the sight glass extensions and only used 87mm of tube to build all 4. Stoked!

Image

This is where they're going.

Image

Got this done

Image

Breather before dropping into the parrot

Image

Made some brass fittings to use for cooling water connections...must go back and make them all the same :doh:
Going to use this valve for the foreshots drain.

Image

Finished the day making this for work

Image

Even got the lawns done.... Happy wife, happy life.
2MEKE
 
Posts: 24
Joined: Thu Jan 17, 2013 4:09 pm
Location: Northland, NZ
equipment: ...getting there...

Re: Bubbler time.

Postby SBB » Sun Apr 07, 2013 6:10 pm

Thats some really nice work your doing there 2meke
SBB
Lifetime Member
 
Posts: 2451
Joined: Mon Mar 21, 2011 8:12 pm
Location: Northern NSW
equipment: (The Pelican) a 2 inch pot / stripper on 25L electric boiler interchangable with T500 reflux still...... 2 1/2 inch pot still on 50L keg (gas burner).....
3 inch Boka (half share with Draino),...... 4 inch 4 plate perforated plate Bubbler

Re: Bubbler time.

Postby Yummyrum » Sun Apr 07, 2013 6:42 pm

Hi 2meke

Your missus aut to be happy and proud to have such a talented hubby :handgestures-thumbupleft:

Damn fine job there .I'm enjoying the look.

That ID copper over in Kiwi land really looks the job with the ferrules .Saves all the easy flange bashing and couplings that have to go on over here in Oz with our OD stuff.

Just wondering what you used to cut the slots in the bubble caps. Hacksaw ,cutoff disc , other ?

Thanks
Yummyrum
 
Posts: 1897
Joined: Fri Dec 28, 2012 3:19 pm
Location: Near Coffs
equipment: Did use Still Spirits Reflux
Now use 50l Keg with Pot head for Rum and Neutral stripping runs on gas .
LM/VM head with 1m packed 2" on Still Spirits boiler for Neutrals.

Re: Bubbler time.

Postby Kimbo » Sun Apr 07, 2013 6:47 pm

Nice work mate :clap: :clap: :clap:
Kimbo
Lifetime Member
 
Posts: 5461
Images: 0
Joined: Fri Mar 18, 2011 6:33 pm
Location: Perf WA
equipment: 4" bubbler with a 6"inline thumper

Re: Bubbler time.

Postby MacStill » Sun Apr 07, 2013 6:48 pm

Kimbo wrote:Nice work mate :clap: :clap: :clap:


:text-+1: :text-imwithstupid:

^:)^ ^:)^ ^:)^ ^:)^ ^:)^ ^:)^
MacStill
Lifetime Member
 
Posts: 16835
Joined: Fri Mar 18, 2011 1:40 pm
Location: Wide Bay QLD
equipment: Anything I choose :P

Re: Bubbler time.

Postby 2MEKE » Sun Apr 07, 2013 8:06 pm

I do like the SS/copper look but the real reason was the price of copper fittings in NZ...tell him he's dreamin.
And ferrules, though a tad spendy, are easier or at least are meant to be. Problem I've run into is the copper is 101.2 ID and the ferrules 101.6 OD.
After a bit of reading tonight and am going to try a heat/freeze shrink fit.

The caps I cut with an angle grinder running a 1.6mm Pferd cutoff. Clamped the grinder in the vice and set to. Wasn't too hard, just very slow and carefully.
2MEKE
 
Posts: 24
Joined: Thu Jan 17, 2013 4:09 pm
Location: Northland, NZ
equipment: ...getting there...

Re: Bubbler time.

Postby 2MEKE » Fri Jun 07, 2013 5:59 pm

So after 2 months with no update! :scared-eek:

FINALLY...


As of this week I've been back at the workshop so with a couple of lateish nights after work and this is where I'm up to.
The original copper RC ended up in the scrap/recycle bin...soldering pisses me off sometimes. Kept have pinhole leaks. :angry-banghead: :angry-banghead: :angry-banghead: :angry-banghead:
I've gone with a leak free SS tig welded model .... 4 x 25mm tubes (0.51mm wall) @ 90mm long so hopefully it transfers enough heat.
Cooling water runs triple pass.


Image
2MEKE
 
Posts: 24
Joined: Thu Jan 17, 2013 4:09 pm
Location: Northland, NZ
equipment: ...getting there...

Re: Bubbler time.

Postby punchy21 » Fri Jun 07, 2013 6:22 pm

That's schmick mate :clap:
punchy21
 
Posts: 619
Images: 0
Joined: Fri Nov 04, 2011 11:56 am
Location: South West
equipment: Modular 4" 4 plate Bubbler
6kW 50L Boiler

Next

Return to Plated Column Stills


Who is online

Users browsing this forum: No registered users and 114 guests

x