
 5 Star Store
 Community Guidelines
 Newbies Corner
 Recipes
 AD search
Wiki defines Steampunk as " A sub-genre of science fiction that typically features steam-powered machinery, especially in a setting inspired by industrialized Western civilization during the 19th century. "
Steam powered - yes
Inspired by industrialised Western civilization - tick
Think I just might build me a 4" Steampunk :twisted: :twisted:
The story so far:
Went down to the scrap metal dealer and inquired about some copper pipe.
"Yep got all that - come with me"
"How much 3" you need?"
"Hmmm (rubbing chin) I'd have to cut that piece,,,,,,,, and that one"............... long pause......
...................................................................................... walks away talking about some 4" he had years ago.
.....................
So after following him around and talking to him for a good hour and a half, I walked out of the scrap yard with....... nothing
Yep he wouldn't cut any pipe.
Hmmmm Ok two days later I decided to bite the bullet and buy a 3mtr length of 3" and whatever he wanted to sell in 4", 2" etc.
Same scenario..... "How much of that you want?" "OK I'll cut that for you." :wtf:
Same bloke same bit of pipe>>>> :wtf:
"You said something about fittings in copper ..... come with me young fella"
He's in his 70's so he can say that
Climbing over scrap from... who knows were and when... right out the back.... cut off 44gal drum.. full of fittings
"Have a look in there, was gunna build a ?.. twenty years ago but didn't."
30Mins later.... I had 5x 4" T's unknown number of reducers (never been used), plenty of 3", 2", 1", 3/4" and a new mate. :D :D :D
He really is a nice bloke.... must have caught him on a bad day.
So my plans for a modular still were born.
:D :D :D :D
Stay tuned.
DBV
"Steampunk" - the build
"Steampunk" - the build
![]() by dogbreath vodka » Sun Jun 09, 2013 2:45 pm
by dogbreath vodka » Sun Jun 09, 2013 2:45 pm
- dogbreath vodka
- Posts: 1396
- Joined: Sun Jan 15, 2012 5:10 pm
- Location: Somewhere over the rainbow
- equipment: "Steampunk 2 - 6" Bubble cap
"Jimmy" the 4" Carter head
Re: "Steampunk" - the build
![]() by dogbreath vodka » Sun Jun 09, 2013 2:51 pm
by dogbreath vodka » Sun Jun 09, 2013 2:51 pm
So then I get in contact with Mac....
"Mac I need parts, this, this, this, this."
Pays the man and thinks he is sending them road freight.....
Couple of days later there are two parcels waiting for me at the front door when I get home. :D :D
Air freight
Damn man that's genius :handgestures-thumbupleft: :handgestures-thumbupleft: :handgestures-thumbupleft:
Got me some fittings, got copper pipe..... long weekend
"Steampunk" is on the way. :twisted: :twisted:
DBV
- dogbreath vodka
- Posts: 1396
- Joined: Sun Jan 15, 2012 5:10 pm
- Location: Somewhere over the rainbow
- equipment: "Steampunk 2 - 6" Bubble cap
"Jimmy" the 4" Carter head
Re: "Steampunk" - the build
![]() by Kimbo » Sun Jun 09, 2013 4:25 pm
by Kimbo » Sun Jun 09, 2013 4:25 pm
Well done on embarking on a new build DBV, you wont regret it, BUT!
:text-worthless:
:text-worthless:
- Kimbo
- Lifetime Member
- Posts: 5461
- Images: 0
- Joined: Fri Mar 18, 2011 6:33 pm
- Location: Perf WA
- equipment: 4" bubbler with a 6"inline thumper
Re: "Steampunk" - the build
![]() by dogbreath vodka » Sun Jun 09, 2013 4:56 pm
by dogbreath vodka » Sun Jun 09, 2013 4:56 pm
Fair enough I guess
Started with a few of these
Made em into a lot of these.
Still working on a lot of these
And have made these, last night and yesterday
Finished them to this stage today, just got to cut them round at the right diameter.
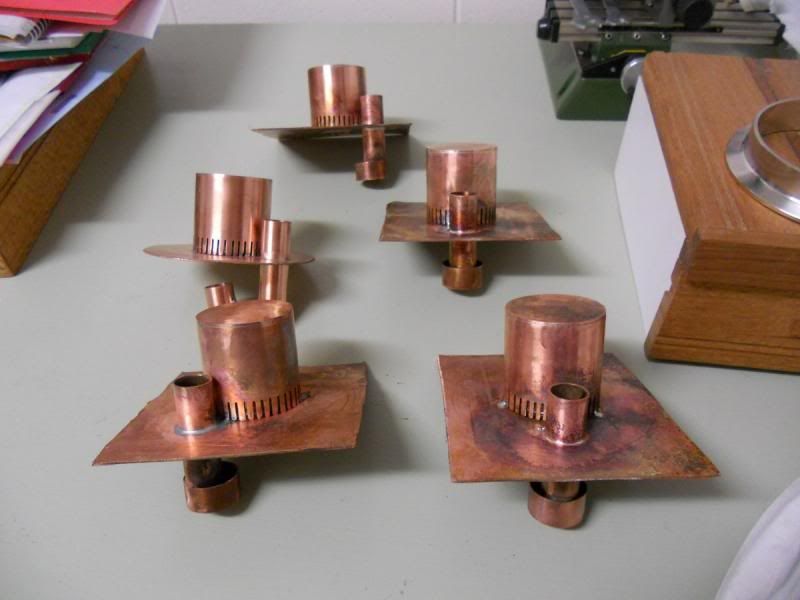
Taking a break as it has been two days of copper copper and more copper....
Will get there over the next couple of weeks I suspect
DBV
Started with a few of these

Made em into a lot of these.

Still working on a lot of these

And have made these, last night and yesterday

Finished them to this stage today, just got to cut them round at the right diameter.

Taking a break as it has been two days of copper copper and more copper....
Will get there over the next couple of weeks I suspect
DBV
- dogbreath vodka
- Posts: 1396
- Joined: Sun Jan 15, 2012 5:10 pm
- Location: Somewhere over the rainbow
- equipment: "Steampunk 2 - 6" Bubble cap
"Jimmy" the 4" Carter head
Re: "Steampunk" - the build
![]() by punchy21 » Sun Jun 09, 2013 5:26 pm
by punchy21 » Sun Jun 09, 2013 5:26 pm
Nice score at the scrappy DBV :D and awesome job sp far :handgestures-thumbupleft:
- punchy21
- Posts: 619
- Images: 0
- Joined: Fri Nov 04, 2011 11:56 am
- Location: South West
- equipment: Modular 4" 4 plate Bubbler
6kW 50L Boiler
Re: "Steampunk" - the build
![]() by dogbreath vodka » Sun Jun 09, 2013 6:03 pm
by dogbreath vodka » Sun Jun 09, 2013 6:03 pm
Thanks mate
Here's what a lot of it looks like
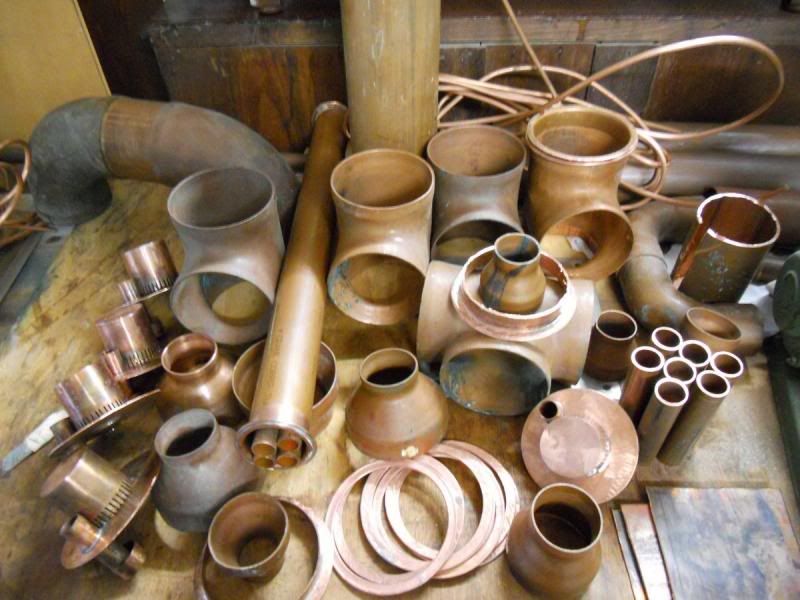
Some of the fittings still had the original tags on them.... new old stock... gotta love that. :D
One happy camper here, I can tell ya.
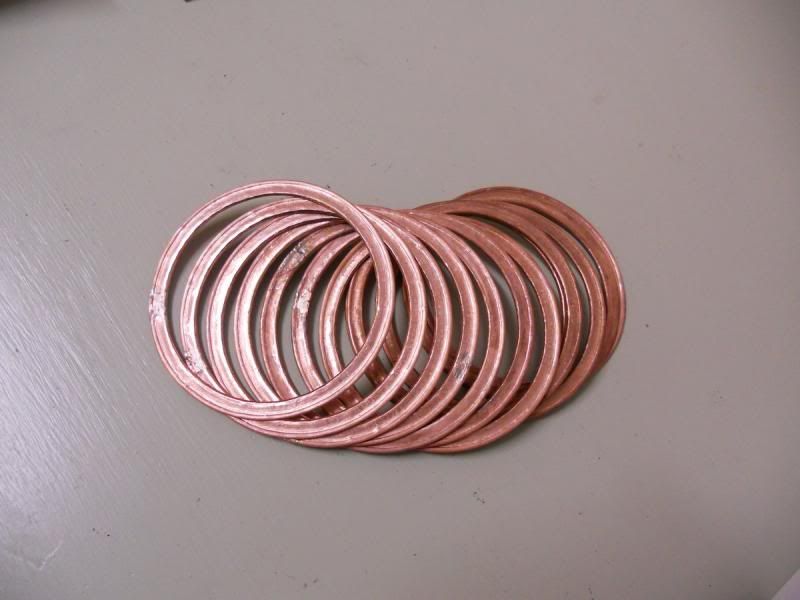
And I've been busy flattening some 1/4" tube for flanges
Plenty left to be done so tonight is another busy one :-D
DBV
Here's what a lot of it looks like

Some of the fittings still had the original tags on them.... new old stock... gotta love that. :D
One happy camper here, I can tell ya.
And I've been busy flattening some 1/4" tube for flanges

Plenty left to be done so tonight is another busy one :-D
DBV
- dogbreath vodka
- Posts: 1396
- Joined: Sun Jan 15, 2012 5:10 pm
- Location: Somewhere over the rainbow
- equipment: "Steampunk 2 - 6" Bubble cap
"Jimmy" the 4" Carter head
Re: "Steampunk" - the build
![]() by Bushy » Sun Jun 09, 2013 9:22 pm
by Bushy » Sun Jun 09, 2013 9:22 pm
Look at this bloke go. Well done DB. Love to see these things comin together. :handgestures-thumbupleft: :handgestures-thumbupleft:
- Bushy
- Posts: 1003
- Images: 0
- Joined: Sun Jun 17, 2012 8:25 am
- Location: Crabland, West Australia
- equipment: 50l keg boiler with 5Star 3600 watt element
4 inch plated column. 4 perf plates.
Lava Rock Behemoth
Re: "Steampunk" - the build
![]() by Kimbo » Sun Jun 09, 2013 10:28 pm
by Kimbo » Sun Jun 09, 2013 10:28 pm
Don't stop him now...... he got momentum :dance: :dance: :dance:
well done dude :handgestures-thumbupleft:
well done dude :handgestures-thumbupleft:
- Kimbo
- Lifetime Member
- Posts: 5461
- Images: 0
- Joined: Fri Mar 18, 2011 6:33 pm
- Location: Perf WA
- equipment: 4" bubbler with a 6"inline thumper
Re: "Steampunk" - the build
![]() by jasonc2861 » Mon Jun 10, 2013 10:35 am
by jasonc2861 » Mon Jun 10, 2013 10:35 am
Hey DB if you don't mind me asking,how much all up was all that lovely copper etc?
- jasonc2861
- Posts: 313
- Joined: Sat Oct 20, 2012 10:56 am
- Location: Western straya.
- equipment: Extended Pure distilling reflux,110cm,,bigger is better!
Re: "Steampunk" - the build
![]() by dogbreath vodka » Mon Jun 10, 2013 2:15 pm
by dogbreath vodka » Mon Jun 10, 2013 2:15 pm
Hey Jason
Let's just say it cost less than the five "T's" would if new :D
It's more about being in the right place at the right time.
The scrap dealer was keeping them for himself for another project.
I came along at the right time and he was willing to let them go.... :D
Won't get a second chance at a first pick ;-)
Cheers
DBV
- dogbreath vodka
- Posts: 1396
- Joined: Sun Jan 15, 2012 5:10 pm
- Location: Somewhere over the rainbow
- equipment: "Steampunk 2 - 6" Bubble cap
"Jimmy" the 4" Carter head
Re: "Steampunk" - the build
![]() by jasonc2861 » Mon Jun 10, 2013 3:51 pm
by jasonc2861 » Mon Jun 10, 2013 3:51 pm
Yer I'm going to cruise the scrap joints tomoz,put on my happy face and see what I can score.cheers again. :handgestures-thumbupleft:
- jasonc2861
- Posts: 313
- Joined: Sat Oct 20, 2012 10:56 am
- Location: Western straya.
- equipment: Extended Pure distilling reflux,110cm,,bigger is better!
Re: "Steampunk" - the build
![]() by Milky » Mon Jun 10, 2013 4:46 pm
by Milky » Mon Jun 10, 2013 4:46 pm
jasonc2861 wrote:Yer I'm going to cruise the scrap joints tomoz,put on my happy face and see what I can score.cheers again. :handgestures-thumbupleft:
Yeah cruising scrap joints really pays off in the end! Patience is the key! (unless you got cash to burn & buy new copper!)
- Milky
- Posts: 349
- Joined: Wed Apr 03, 2013 7:15 pm
- Location: Brisbane
- equipment: Bender The 4" Copper Bubbler
Bender The 50L Electric Keg Boiler (2 xoxo 2000w 5 Star Elements)
Pure Distilling 2 Inch Reflux Still with 30 Litre Electric Boiler (2000w)
Homemade Copper 2 Inch Pot Still Condenser to fit the 30 Litre Electric Boiler.
Re: "Steampunk" - the build
![]() by 2MEKE » Mon Jun 10, 2013 6:13 pm
by 2MEKE » Mon Jun 10, 2013 6:13 pm
Awesome score on the new old stock but
what's the story with this...DIY or something of the shelf??
Steam powered - yes
what's the story with this...DIY or something of the shelf??
- 2MEKE
- Posts: 24
- Joined: Thu Jan 17, 2013 4:09 pm
- Location: Northland, NZ
- equipment: ...getting there...
Re: "Steampunk" - the build
![]() by dogbreath vodka » Mon Jun 10, 2013 6:39 pm
by dogbreath vodka » Mon Jun 10, 2013 6:39 pm
Hey 2meke
Sorry to disappoint but no... steam powered was a reference to the alcoholic vapour... :-D
or maybe me getting steamed up over this build 8-}
But a good thought..... maybe someone can come up with a decent idea.. then I'll build it. :D :D
DBV
Sorry to disappoint but no... steam powered was a reference to the alcoholic vapour... :-D
or maybe me getting steamed up over this build 8-}
But a good thought..... maybe someone can come up with a decent idea.. then I'll build it. :D :D
DBV
- dogbreath vodka
- Posts: 1396
- Joined: Sun Jan 15, 2012 5:10 pm
- Location: Somewhere over the rainbow
- equipment: "Steampunk 2 - 6" Bubble cap
"Jimmy" the 4" Carter head
Re: "Steampunk" - the build
![]() by snapperhead » Tue Jun 11, 2013 7:49 am
by snapperhead » Tue Jun 11, 2013 7:49 am
Awesome idea, I love it and Im looking forward to seeing your ideas.
I am adding this little unit to my build and fitting the torches generator to it, so I can power the thermo's and lighting (generator charges mini battery bank)
The world needs more steampunk, go that man.
I am adding this little unit to my build and fitting the torches generator to it, so I can power the thermo's and lighting (generator charges mini battery bank)
The world needs more steampunk, go that man.
You do not have the required permissions to view the files attached to this post.
- snapperhead
- Posts: 68
- Joined: Thu Apr 18, 2013 5:52 am
- Location: Auckland NZ
- equipment: Currently building an artisan copper alembic pot of approx 60 litres. more planned, but first things first.
Re: "Steampunk" - the build
![]() by dogbreath vodka » Sat Jun 15, 2013 8:50 pm
by dogbreath vodka » Sat Jun 15, 2013 8:50 pm
So this morning my condenser looked like this (bottom right hand corner)
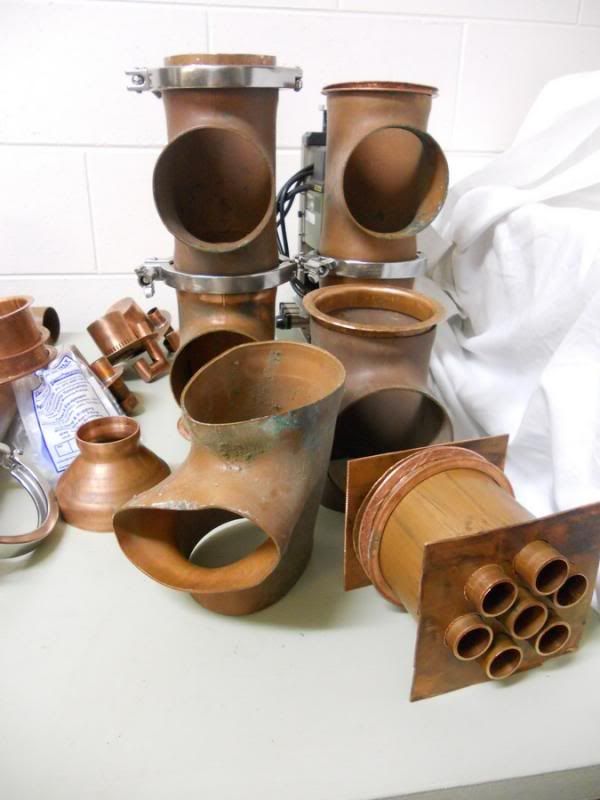
Then about 4pm it looked like this
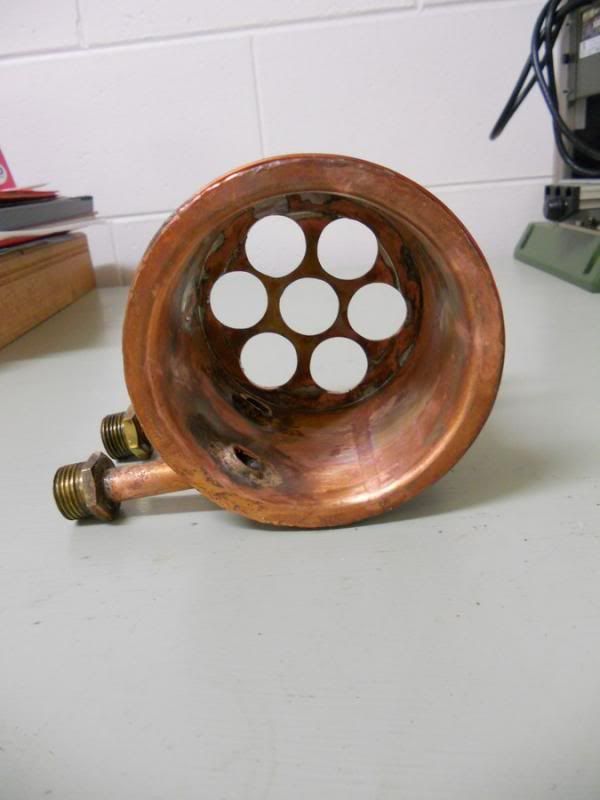
And now it looks like this.
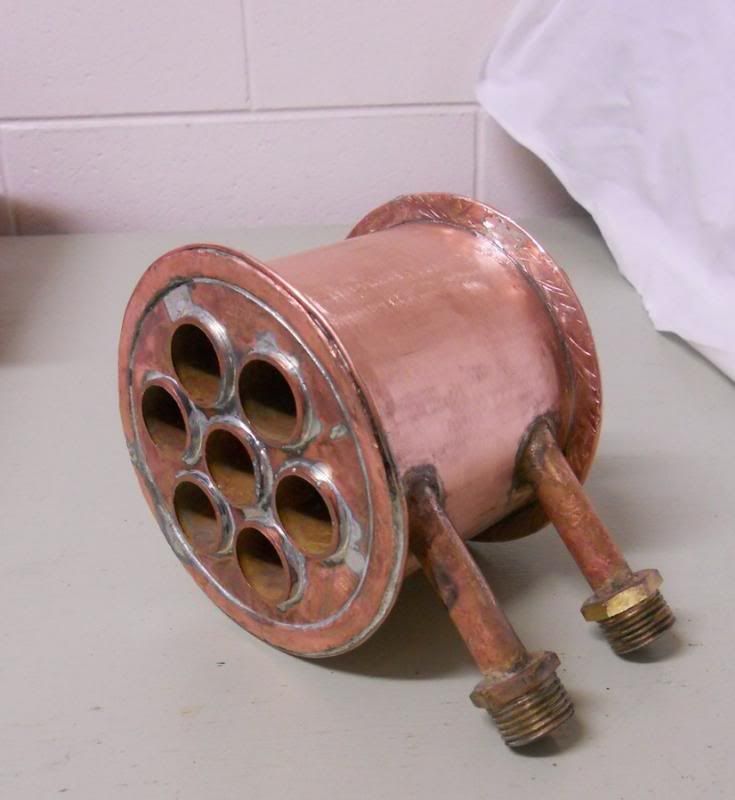
Damn that took some doing.
OK I also ground a heap of plates and stuffed around .... but it takes some time to make one of them there condensers, don't it?
Another bit almost finished :D
DBV

Then about 4pm it looked like this

And now it looks like this.

Damn that took some doing.
OK I also ground a heap of plates and stuffed around .... but it takes some time to make one of them there condensers, don't it?
Another bit almost finished :D
DBV
- dogbreath vodka
- Posts: 1396
- Joined: Sun Jan 15, 2012 5:10 pm
- Location: Somewhere over the rainbow
- equipment: "Steampunk 2 - 6" Bubble cap
"Jimmy" the 4" Carter head
Re: "Steampunk" - the build
![]() by 1 2many » Sat Jun 15, 2013 9:47 pm
by 1 2many » Sat Jun 15, 2013 9:47 pm
You are sure to have a Great still there mate , your soldering skills are top notch :handgestures-thumbupleft:
- 1 2many
- Lifetime Member
- Posts: 4215
- Joined: Sun Jan 27, 2013 6:08 am
- Location: Where the sun shines
- equipment: Portable A.G brewery ,#001 5 STAR blockhead 4" Modular 4 plate SSG with,6"inline thumper, 2.5" 9 tube shotgun, packed section, Boiler 50 ltr inverted keg 4"still mount, 2.4 Kw FSD elements 1"drain.
Re: "Steampunk" - the build
![]() by dogbreath vodka » Sun Jun 16, 2013 8:21 am
by dogbreath vodka » Sun Jun 16, 2013 8:21 am
Thanks for that 1 2many :-D
After making this one I got to thinking.... (a dangerous thing that - me having thoughts.)
Would it be a cooling advantage to put the inlet and outlet tubes on opposite sides of the condenser?
That way the water has to flow not only top to bottom or visa versa, but also across the condenser to get out.
:-B
Just askin
DBV
- dogbreath vodka
- Posts: 1396
- Joined: Sun Jan 15, 2012 5:10 pm
- Location: Somewhere over the rainbow
- equipment: "Steampunk 2 - 6" Bubble cap
"Jimmy" the 4" Carter head
Re: "Steampunk" - the build
![]() by Cane Toad » Sun Jun 16, 2013 8:35 am
by Cane Toad » Sun Jun 16, 2013 8:35 am
Either or mate,no real biggy,so just for shits and giggles,maybe you should pull it all apart and put the outlet on the opposite side :laughing-rolling: :laughing-rolling: great build BTW :handgestures-thumbupleft:
- Cane Toad
- Posts: 2473
- Joined: Thu Jul 28, 2011 9:14 pm
- Location: ask punkin
- equipment: where's my football :(
Return to Plated Column Stills
Who is online
Users browsing this forum: No registered users and 93 guests