
 5 Star Store
 Community Guidelines
 Newbies Corner
 Recipes
 AD search
Good onya Bryan , I am really surprised that you were so close to finishing and about to give in ...and secondly that nobody snatched up you bargain
Anyway it looks like its going to work out all right for you :handgestures-thumbupleft:
Bryan's Bubbler Build
Re: Bryan's Bubbler Build
![]() by Yummyrum » Tue Sep 16, 2014 7:18 pm
by Yummyrum » Tue Sep 16, 2014 7:18 pm
- Yummyrum
- Posts: 1897
- Joined: Fri Dec 28, 2012 3:19 pm
- Location: Near Coffs
- equipment: Did use Still Spirits Reflux
Now use 50l Keg with Pot head for Rum and Neutral stripping runs on gas .
LM/VM head with 1m packed 2" on Still Spirits boiler for Neutrals.
Re: Bryan's Bubbler Build
![]() by woodduck » Tue Sep 16, 2014 9:16 pm
by woodduck » Tue Sep 16, 2014 9:16 pm
G'day brian,
good to see you giving the build another go. I didn't mean to talk you into/out of anything as I'm sure you would have loved mac's still, i just love talking about builds and it's not something you can do with "normal" everyday people, they just don't get it plus you can't just go tell everyone your building a still.
I look forward to seeing your progress and we want to see plenty of photos :handgestures-thumbupleft:
- woodduck
- Lifetime Member
- Posts: 3497
- Joined: Mon Jun 16, 2014 5:54 pm
- Location: Good old country SA
- equipment: 4 plate 6" copper bubbler, 6 plate 4" glass bubbler with 500mm packed section three way thumper sitting on a 50 ltr keg boiler with 6000watts, 2" pot still and a 2" boka.
Re: Bryan's Bubbler Build
![]() by Yummyrum » Tue Sep 16, 2014 9:42 pm
by Yummyrum » Tue Sep 16, 2014 9:42 pm
woodduck wrote:.....i just love talking about builds and it's not something you can do with "normal" everyday people, they just don't get it plus you can't just go tell everyone your building a still....:
You too Woody .....whats wrong with everday folk these days :laughing-rolling:
- Yummyrum
- Posts: 1897
- Joined: Fri Dec 28, 2012 3:19 pm
- Location: Near Coffs
- equipment: Did use Still Spirits Reflux
Now use 50l Keg with Pot head for Rum and Neutral stripping runs on gas .
LM/VM head with 1m packed 2" on Still Spirits boiler for Neutrals.
Re: Bryan's Bubbler Build
![]() by dogbreath vodka » Wed Sep 17, 2014 6:44 am
by dogbreath vodka » Wed Sep 17, 2014 6:44 am
Good to see you getting the build back on track. :handgestures-thumbupleft: :handgestures-thumbupleft:
But.... :banana-gotpics: :banana-gotpics: :banana-gotpics: :D :D :D
As some have told me.... we love copper porn. :-p :-p
Looking forward to the rest of this build.
DBV
But.... :banana-gotpics: :banana-gotpics: :banana-gotpics: :D :D :D
As some have told me.... we love copper porn. :-p :-p
Looking forward to the rest of this build.
DBV
- dogbreath vodka
- Posts: 1396
- Joined: Sun Jan 15, 2012 5:10 pm
- Location: Somewhere over the rainbow
- equipment: "Steampunk 2 - 6" Bubble cap
"Jimmy" the 4" Carter head
Re: Bryan's Bubbler Build
![]() by RuddyCrazy » Sat Sep 20, 2014 4:02 pm
by RuddyCrazy » Sat Sep 20, 2014 4:02 pm
G'day Guy's,
Well as I stuffed up the alignment of the 4th site glass mount I'm now going to make a total modular still so yea more $$ for tri clamps, I did try and use that aqua safe solder today but found the flux was the wrong one. So used a silver brazing rod found in my dad's gear and got that first section soldered up but in the tried profession of copper porn, Sorry NO PIC'S until everything is acid washed and cleaned up. My wounded finger was copping a beating so decided to get an early start just to watch the SA team cop a flogging.
Anyway if any bogan's want a chat I will be in the pub
Cheers Bryan ( wounded after trying to keep swmbo happy)
- RuddyCrazy
- Mentor
- Posts: 2449
- Joined: Thu Oct 31, 2013 6:36 pm
- Location: Not far from Kanmantoo SA
- equipment: 4" copper bubbler with a setup for Neutral and a thumper for Whisky and my old 5 litre pot for doing maceration runs and MiniMe the baby pot still
Re: Bryan's Bubbler Build
![]() by RuddyCrazy » Fri Oct 03, 2014 12:36 pm
by RuddyCrazy » Fri Oct 03, 2014 12:36 pm
G'day Guy's,
Well getting there and was busy this morning getting the downcomers installed on the perf plates so pic's will come later today as I have a guy from Vic coming over. Anyway abu dropped in this morning and grabbed the keg and from what he was telling me the still he bought it does sound like a nice one that will fit straight on the keg boiler.
Now as I have decided to go modular I do have a 200mm section below the bottom site glass mount and all this talk about thumpers has got me going. Now never seeing the insides of an inline one I've no idea how the setup is and below is a crude pic of how I think it should go. :geek:
Now have I got all balls up or is this the correct way.
Cheers Bryan
You do not have the required permissions to view the files attached to this post.
- RuddyCrazy
- Mentor
- Posts: 2449
- Joined: Thu Oct 31, 2013 6:36 pm
- Location: Not far from Kanmantoo SA
- equipment: 4" copper bubbler with a setup for Neutral and a thumper for Whisky and my old 5 litre pot for doing maceration runs and MiniMe the baby pot still
Re: Bryan's Bubbler Build
![]() by Zak Griffin » Fri Oct 03, 2014 2:00 pm
by Zak Griffin » Fri Oct 03, 2014 2:00 pm
You've got it right, Bryan, but a 200mm tall 4" inline thumper isn't going to hold enough distillate to be particularly effective...
Id be using that 200mm for either a gin basket or another plate tee :handgestures-thumbupleft:
Id be using that 200mm for either a gin basket or another plate tee :handgestures-thumbupleft:
- Zak Griffin
- Lifetime Member
- Posts: 6832
- Joined: Mon Jul 15, 2013 9:34 pm
- Location: Radelaide
- equipment: "The Heart of Gold" - 4" Bubbler - finally bubbling!
"Zaphod" - 3" Pot - retired
"Agrajag" - 6" Bubbler - midlife crisis build?
Re: Bryan's Bubbler Build
![]() by RuddyCrazy » Fri Oct 03, 2014 4:33 pm
by RuddyCrazy » Fri Oct 03, 2014 4:33 pm
Thanks for that Zac :greetings-waveyellow: yea I did think about the volume and can make a longer thumper to go before the first sight glass and make a new gin basket for above the RC. That will cure the impending problem of height on the PC side aswell. Anyway mate from Vic left a little while ago so went and got some liquid amber so now off to take a few pic's.
Cheers Bryan
Cheers Bryan
- RuddyCrazy
- Mentor
- Posts: 2449
- Joined: Thu Oct 31, 2013 6:36 pm
- Location: Not far from Kanmantoo SA
- equipment: 4" copper bubbler with a setup for Neutral and a thumper for Whisky and my old 5 litre pot for doing maceration runs and MiniMe the baby pot still
Re: Bryan's Bubbler Build
![]() by RuddyCrazy » Fri Oct 03, 2014 5:22 pm
by RuddyCrazy » Fri Oct 03, 2014 5:22 pm
G'day Guy's,
Took a couple of pic's and the first is the perf plates all done, just need to do the final polish one the 2 I've made sofar and was getting in the swing of things when our new forum member arrived.
The down comer pipe is 3/4" and 15mm above the perf plate, I set up a crude jig so I could soft solder all 3 joints being the 3.4" to the perf plate, the base to the 1" thick wall pipe and the 1" pipe to the 3/4". I had to scribe a line 3.5mm smaller so the perf plate can sit inside the pipe and linished it down until I had a snug fit. I'll be putting a 1/2" strip of 4" cut down enough to be a snug fit and and thinking I have 2 ways to hold that said 4". Drill say 3 holes where it's going to sit then soft solder up the holes then the plate can sit ontop and be taken out for cleaning later or just peen just under where the 4" will sit so it can't fall down
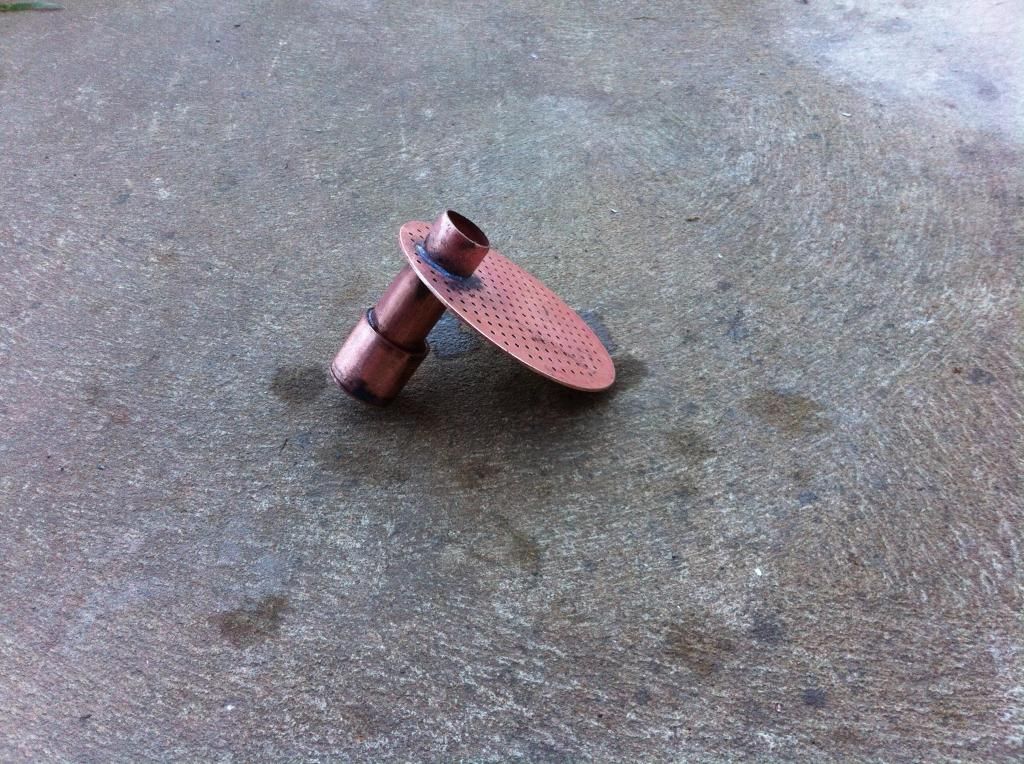
Now as far as volume I have enough 4" left to use for the thumper and below is a pic of the impending thought
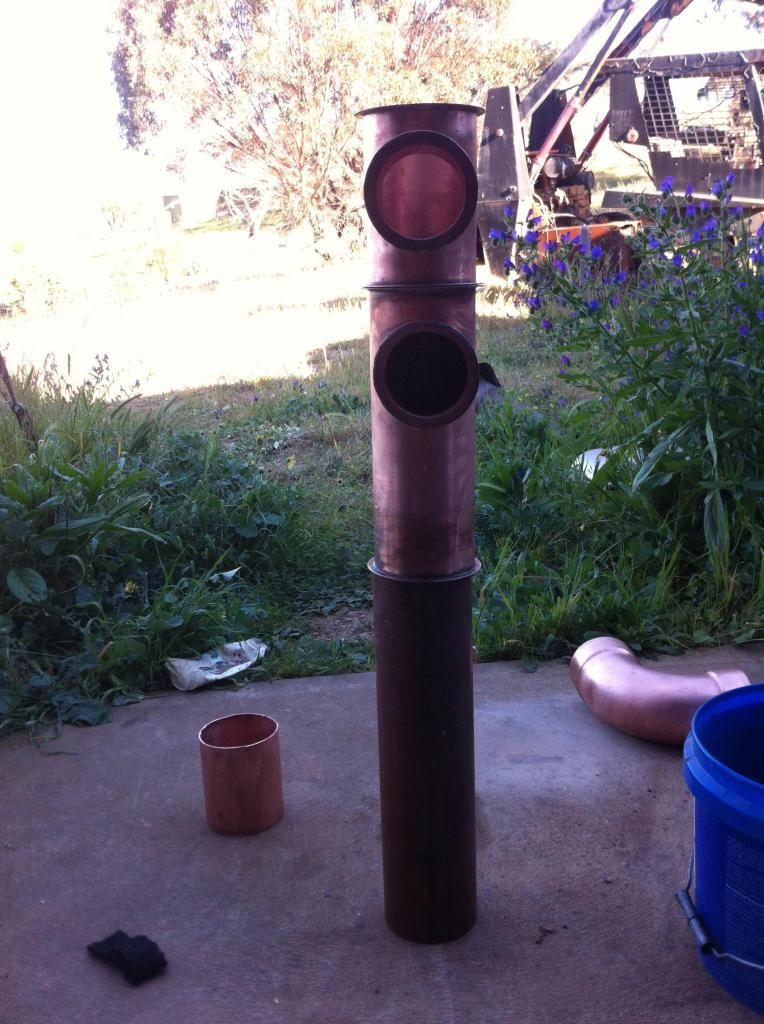
This will give 550mm to the centre of the lower site glass and should hold enough volume. I will use the thick wall 1" for the internals and that should prove a nice exercise in mating joints for soldering. I will need to get more 4" for the gin basket as that spare 4" I had went into making a flash boiler casing.
I do need to get a heap of tri clamps off Mac so will have to make sure that cabbage patch next week is picked so I will have enough to place the order. Still need to sort out from the base of the PC and to the parrot (yet to make) and the 4" to 2 " reducer for the keg mount. That 4" ferrule I have here will be for the boiler filling point so will arrange to go to my mates place to do the keg as my gensets don't like my caddy welder any more :crying-blue:
Tomorrow's job is getting the perf plates finished (only 2 to go :mrgreen: ) then get onto finishing the last 2 site glass mounts. Still got the RC to do and thinking of starting from scratch on that one as everything will be soft soldered a fresh start will be the way to go. As this build is still a ways off it will be good to get the report on Woodducks idea of using the baffle plate in the centre.
The yard arm has come around so will be in the pub.
Cheers Bryan
Took a couple of pic's and the first is the perf plates all done, just need to do the final polish one the 2 I've made sofar and was getting in the swing of things when our new forum member arrived.
The down comer pipe is 3/4" and 15mm above the perf plate, I set up a crude jig so I could soft solder all 3 joints being the 3.4" to the perf plate, the base to the 1" thick wall pipe and the 1" pipe to the 3/4". I had to scribe a line 3.5mm smaller so the perf plate can sit inside the pipe and linished it down until I had a snug fit. I'll be putting a 1/2" strip of 4" cut down enough to be a snug fit and and thinking I have 2 ways to hold that said 4". Drill say 3 holes where it's going to sit then soft solder up the holes then the plate can sit ontop and be taken out for cleaning later or just peen just under where the 4" will sit so it can't fall down
Now as far as volume I have enough 4" left to use for the thumper and below is a pic of the impending thought
This will give 550mm to the centre of the lower site glass and should hold enough volume. I will use the thick wall 1" for the internals and that should prove a nice exercise in mating joints for soldering. I will need to get more 4" for the gin basket as that spare 4" I had went into making a flash boiler casing.
I do need to get a heap of tri clamps off Mac so will have to make sure that cabbage patch next week is picked so I will have enough to place the order. Still need to sort out from the base of the PC and to the parrot (yet to make) and the 4" to 2 " reducer for the keg mount. That 4" ferrule I have here will be for the boiler filling point so will arrange to go to my mates place to do the keg as my gensets don't like my caddy welder any more :crying-blue:
Tomorrow's job is getting the perf plates finished (only 2 to go :mrgreen: ) then get onto finishing the last 2 site glass mounts. Still got the RC to do and thinking of starting from scratch on that one as everything will be soft soldered a fresh start will be the way to go. As this build is still a ways off it will be good to get the report on Woodducks idea of using the baffle plate in the centre.
The yard arm has come around so will be in the pub.
Cheers Bryan
- RuddyCrazy
- Mentor
- Posts: 2449
- Joined: Thu Oct 31, 2013 6:36 pm
- Location: Not far from Kanmantoo SA
- equipment: 4" copper bubbler with a setup for Neutral and a thumper for Whisky and my old 5 litre pot for doing maceration runs and MiniMe the baby pot still
Re: Bryan's Bubbler Build
![]() by RuddyCrazy » Sun Oct 05, 2014 4:54 pm
by RuddyCrazy » Sun Oct 05, 2014 4:54 pm
Ok guy's just had a thought at about this inline thumper and adding infusions to the thumper after the fores and heads are out of the way. Wouldn't a simple fitting on the side of the thumper with a non return valve. Then when the heads are finished a quick 5psi air blast with the botanicals ground and mixed with some hearts from a previous run would charge the thumper with the botanicals so the full flavour will get thru. Eh The more I think about this build although average to the porn I've seen here if I am going down this path eh I'm fully onto it but if my idea's are way out consider I am on the vape trail and clearing my head and body.
- RuddyCrazy
- Mentor
- Posts: 2449
- Joined: Thu Oct 31, 2013 6:36 pm
- Location: Not far from Kanmantoo SA
- equipment: 4" copper bubbler with a setup for Neutral and a thumper for Whisky and my old 5 litre pot for doing maceration runs and MiniMe the baby pot still
Re: Bryan's Bubbler Build
![]() by flamehawk » Sun Oct 05, 2014 9:21 pm
by flamehawk » Sun Oct 05, 2014 9:21 pm
Glad to hear your going to give it another go. Once you see all the bits coming together it will drive to complete it and see the bastard run. Few hours a day will see it completed in no time.
- flamehawk
- Posts: 260
- Joined: Fri Feb 07, 2014 8:43 pm
- equipment: 4 plate custom built bubbler
50k Keg
2400w element
Re: Bryan's Bubbler Build
![]() by dogbreath vodka » Mon Oct 06, 2014 6:38 am
by dogbreath vodka » Mon Oct 06, 2014 6:38 am
Bryan1 wrote:Ok guy's just had a thought at about this inline thumper and adding infusions to the thumper after the fores and heads are out of the way.
Look for Mac's comment on this page.
viewtopic.php?f=36&t=4639&start=80
Better than I can explain it.
DBV
- dogbreath vodka
- Posts: 1396
- Joined: Sun Jan 15, 2012 5:10 pm
- Location: Somewhere over the rainbow
- equipment: "Steampunk 2 - 6" Bubble cap
"Jimmy" the 4" Carter head
Re: Bryan's Bubbler Build
![]() by RuddyCrazy » Fri Oct 24, 2014 8:56 pm
by RuddyCrazy » Fri Oct 24, 2014 8:56 pm
gday guy's,
Well got some time this week to work on the bubbler again and got the 4" tee's all soldered up along with the 4-3" reducer. Drilled the plates for the RC and cut the 3/4" to suit so ready to solder it up tomorrow. Now true tradition no one wants to see dirty copper so this weekend more pic's on the way. I'm going to have a go at cutting scanner glass off old scanners for my site glass's and machine up a mount for them. Then just need some cabbage for 4" triclamps and 1 3" clamp to get this bubbler finished.
Sunday is the Cally show so tomorrow on working and cleaning duties so pic's can be shown and gotta say that 21 litre tub of citric acid although the black shit is in there still works a treat.
Any idea's of the thumper can sit for awhile and still gotta workout heights but getting there guy's
Cheers Bryan
P.S. note to say I do have an old Ronaldson/Tippet 3.5hp diesel that I want to get going but the counter weight will need 2 guys to lift it into my jig where some local heat and a 14lb will get that coupling moving.
- RuddyCrazy
- Mentor
- Posts: 2449
- Joined: Thu Oct 31, 2013 6:36 pm
- Location: Not far from Kanmantoo SA
- equipment: 4" copper bubbler with a setup for Neutral and a thumper for Whisky and my old 5 litre pot for doing maceration runs and MiniMe the baby pot still
Re: Bryan's Bubbler Build
![]() by allnamestaken » Fri Oct 24, 2014 9:15 pm
by allnamestaken » Fri Oct 24, 2014 9:15 pm
Good to hear the build is progressing, hope to see it one day soon. :dance:
Cheers
Cheers
- allnamestaken
- Posts: 25
- Joined: Tue Oct 14, 2014 1:58 pm
- Location: Adelaide, North East
- equipment: FSD 4" modular pot still.
Re: Bryan's Bubbler Build
![]() by RuddyCrazy » Wed Mar 11, 2015 6:44 pm
by RuddyCrazy » Wed Mar 11, 2015 6:44 pm
G'day Guy's,
Well got a few shed jobbies out of the way so back into working on the bubbler, made the RC the other night and still to clean it up also got the last 2 3" site glass mounts soldered on the 4" sections. Still got a few easy flanges to make and put on then time for the big cleanup.
It will be a while to get all the tri clamps, seals and maybe 3" glass ( want to have a go at cnc'in some glass and drill mounting holes) so my plan get to get everything done then I still need to turn that 50 litre keg into a boiler.
Also need to sort out running water for the shed and thinking 2 off 1,000 litre IBC's up the hill at the back of the shed the with enough head pressure only need a small pump to return the water.
Anyway pic's to come soon after the cleanup.
Cheers Bryan
- RuddyCrazy
- Mentor
- Posts: 2449
- Joined: Thu Oct 31, 2013 6:36 pm
- Location: Not far from Kanmantoo SA
- equipment: 4" copper bubbler with a setup for Neutral and a thumper for Whisky and my old 5 litre pot for doing maceration runs and MiniMe the baby pot still
Re: Bryan's Bubbler Build
![]() by 1 2many » Wed Mar 11, 2015 6:53 pm
by 1 2many » Wed Mar 11, 2015 6:53 pm
Good to hear your back into the building again looking forward to the pics. :handgestures-thumbupleft:
Do you think you will get it finished by May 16.... :)) :))
Do you think you will get it finished by May 16.... :)) :))
- 1 2many
- Lifetime Member
- Posts: 4215
- Joined: Sun Jan 27, 2013 6:08 am
- Location: Where the sun shines
- equipment: Portable A.G brewery ,#001 5 STAR blockhead 4" Modular 4 plate SSG with,6"inline thumper, 2.5" 9 tube shotgun, packed section, Boiler 50 ltr inverted keg 4"still mount, 2.4 Kw FSD elements 1"drain.
Re: Bryan's Bubbler Build
![]() by RuddyCrazy » Thu Mar 19, 2015 5:21 pm
by RuddyCrazy » Thu Mar 19, 2015 5:21 pm
G'day Guy's,
Well been up the shed over the last couple of weeks and progressing with the new bubbler, just got one more easy flange to make for the last sight glass section then onto the 4" section to connect to the RC. Also that 400mm of 4" I have left over is going to become a packed section. I got one of those blue disks and it does a great job getting the copper clean. Then a rub with 240 then 400 grit wet and dry brings the copper up nicely. Still got the final polish to do and the top section is getting clean in the citric acid bucket.
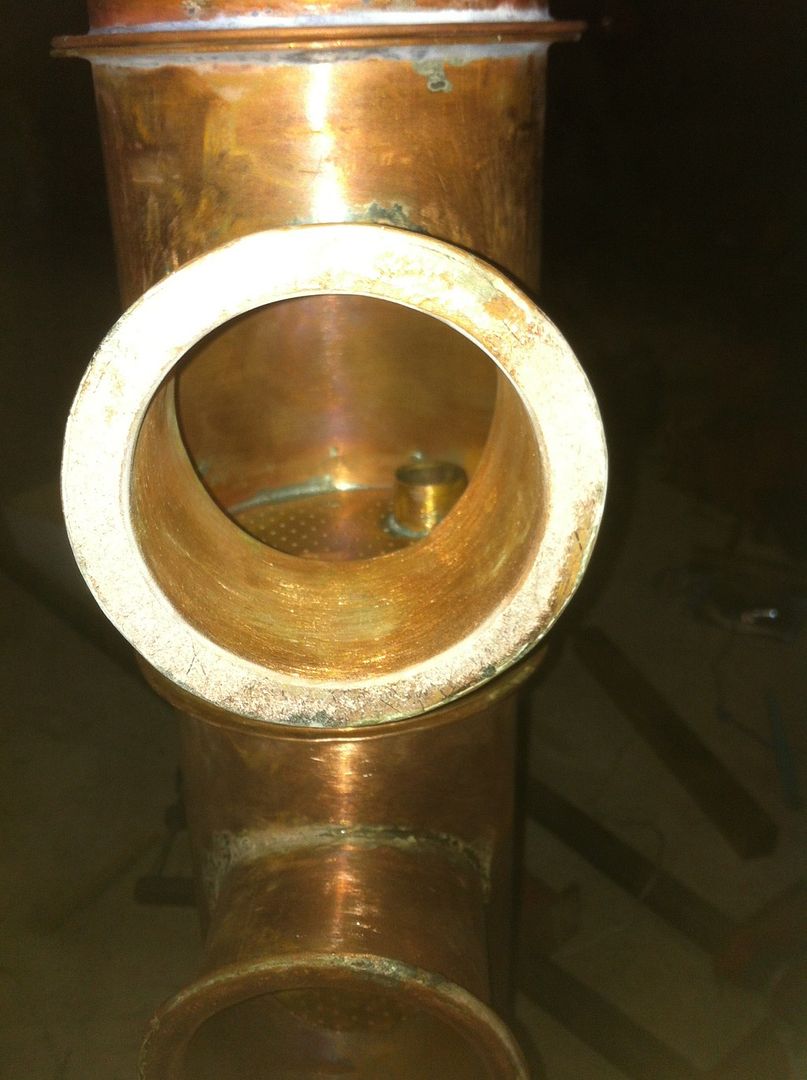
Here's a pic of the RC, 85mm high flange to flange and 8 3/4" tubes. All soft soldered too and with the inlet/outlet not inline ( well that incident we all guard against but do anyway Dropped the bloody thing :angry-banghead: )
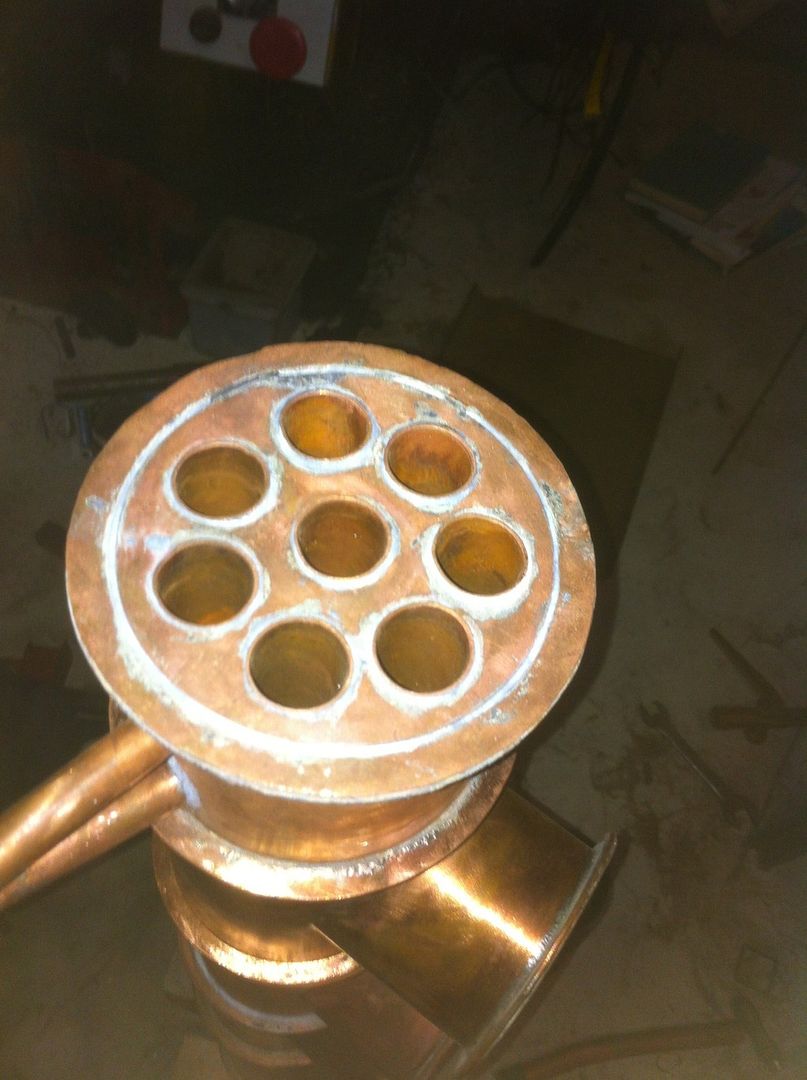
Now as I went with the perf plates I got from Mac, I just ground the OD down to be a snug fit in the 4" and soft soldered them in 20mm below the 3" site glass mount and the bath depth is 15mm.
Anyway over the next few weeks I'll get the still done to the outlet of the PC then time to think about from there the best way to go for the parrot etc. Hopefully next month I'll have some cabbage so I'll get all the tri-clamps and rest of the stuff I need off Mac.
Then also have make the new keg boiler so I'll get a bottle of argon and tig weld all the fittings.
Cheers Bryan
Well been up the shed over the last couple of weeks and progressing with the new bubbler, just got one more easy flange to make for the last sight glass section then onto the 4" section to connect to the RC. Also that 400mm of 4" I have left over is going to become a packed section. I got one of those blue disks and it does a great job getting the copper clean. Then a rub with 240 then 400 grit wet and dry brings the copper up nicely. Still got the final polish to do and the top section is getting clean in the citric acid bucket.
Here's a pic of the RC, 85mm high flange to flange and 8 3/4" tubes. All soft soldered too and with the inlet/outlet not inline ( well that incident we all guard against but do anyway Dropped the bloody thing :angry-banghead: )
Now as I went with the perf plates I got from Mac, I just ground the OD down to be a snug fit in the 4" and soft soldered them in 20mm below the 3" site glass mount and the bath depth is 15mm.
Anyway over the next few weeks I'll get the still done to the outlet of the PC then time to think about from there the best way to go for the parrot etc. Hopefully next month I'll have some cabbage so I'll get all the tri-clamps and rest of the stuff I need off Mac.
Then also have make the new keg boiler so I'll get a bottle of argon and tig weld all the fittings.
Cheers Bryan
- RuddyCrazy
- Mentor
- Posts: 2449
- Joined: Thu Oct 31, 2013 6:36 pm
- Location: Not far from Kanmantoo SA
- equipment: 4" copper bubbler with a setup for Neutral and a thumper for Whisky and my old 5 litre pot for doing maceration runs and MiniMe the baby pot still
Re: Bryan's Bubbler Build
![]() by 1 2many » Thu Mar 19, 2015 5:28 pm
by 1 2many » Thu Mar 19, 2015 5:28 pm
Nice work bryan1 getting closer, any reason you soldered in the plate. :-B
- 1 2many
- Lifetime Member
- Posts: 4215
- Joined: Sun Jan 27, 2013 6:08 am
- Location: Where the sun shines
- equipment: Portable A.G brewery ,#001 5 STAR blockhead 4" Modular 4 plate SSG with,6"inline thumper, 2.5" 9 tube shotgun, packed section, Boiler 50 ltr inverted keg 4"still mount, 2.4 Kw FSD elements 1"drain.
Re: Bryan's Bubbler Build
![]() by RuddyCrazy » Thu Mar 19, 2015 7:42 pm
by RuddyCrazy » Thu Mar 19, 2015 7:42 pm
1 2many wrote: any reason you soldered in the plate. :-B
Well I thought whynot and as I used secondhand 4" the ID isn't 100% true and noway would a plate tree seal.
Off memory that place I got the copper had some 4" T-sections so might have go for a look as I've made it modular a future project will be a carter head.
I am still undecided about the still mount too as the original keg outlet does fit my 2" pot still. I do have 1 4" flange plate here so may weld that in then make a 4" pot for stripping then my 2" setup can go to SWMBO for doing the herbs.
Cheers Bryan
- RuddyCrazy
- Mentor
- Posts: 2449
- Joined: Thu Oct 31, 2013 6:36 pm
- Location: Not far from Kanmantoo SA
- equipment: 4" copper bubbler with a setup for Neutral and a thumper for Whisky and my old 5 litre pot for doing maceration runs and MiniMe the baby pot still
Re: Bryan's Bubbler Build
![]() by woodduck » Sat Mar 21, 2015 10:48 am
by woodduck » Sat Mar 21, 2015 10:48 am
Nice work bryan :handgestures-thumbupleft:
She's looking real nice. It won't be long now.
Keep up the good work and keep them photos coming.
She's looking real nice. It won't be long now.
Keep up the good work and keep them photos coming.
- woodduck
- Lifetime Member
- Posts: 3497
- Joined: Mon Jun 16, 2014 5:54 pm
- Location: Good old country SA
- equipment: 4 plate 6" copper bubbler, 6 plate 4" glass bubbler with 500mm packed section three way thumper sitting on a 50 ltr keg boiler with 6000watts, 2" pot still and a 2" boka.
Return to Plated Column Stills
Who is online
Users browsing this forum: No registered users and 46 guests