
 5 Star Store
 Community Guidelines
 Newbies Corner
 Recipes
 AD search
G'day guy's,
Well with the long weekend got some time to get working on the still and now thinking about the keg boiler. As I'll be using gas the keg will just sit on a rim and I won't worry about a drain hole as I have a rule pump that will empty the keg in a few minutes. Now as the the original outlet will fit a 2" triclamp I can make a 4"-2" reducer or would it be better to weld on a 4" outlet for the still ? I do have a 4" outlet here and want to use that for the fill port. Got a few packs of 316SS 2.5mm welding rods here too so I'll arc weld the 4" fitting.
I had a go at making a 3"-1/2" reducer and did a search only to come up blank then AFTER I made it that thread popped up on making them. I must of spent a few hours on this reducer only to find while tapping the seam to get it smick the seam split so :angry-banghead: time to start from scratch and use that template given.
Hopefully in the next month I'll have enough cabbage to get that order done off Mac then it won't be too far away. Also getting there on setting up my main shed for now and have a 1" pressure pump to hookup to a 9,000 litre tank full of dam water for the cooling.
Cheers Bryan
Bryan's Bubbler Build
Re: Bryan's Bubbler Build
![]() by RuddyCrazy » Sat Apr 04, 2015 7:55 am
by RuddyCrazy » Sat Apr 04, 2015 7:55 am
- RuddyCrazy
- Mentor
- Posts: 2448
- Joined: Thu Oct 31, 2013 6:36 pm
- Location: Not far from Kanmantoo SA
- equipment: 4" copper bubbler with a setup for Neutral and a thumper for Whisky and my old 5 litre pot for doing maceration runs and MiniMe the baby pot still
Re: Bryan's Bubbler Build
![]() by rumdidlydum » Sat Apr 04, 2015 12:22 pm
by rumdidlydum » Sat Apr 04, 2015 12:22 pm
How are you doing the seam? Are you making a fold one way then on the other end folding the opposite way so when they meet they lock together.
Or just over lapping?
Just curious :think:
Your rig is looking great. I bet you are itching to get it going.
Or just over lapping?
Just curious :think:
Your rig is looking great. I bet you are itching to get it going.
- rumdidlydum
- Posts: 2619
- Joined: Sun Oct 27, 2013 7:20 pm
- Location: CQ
- equipment: The infamous Illuminated chicken leg boiler, Rum glass and other bits and bobs
Re: Bryan's Bubbler Build
![]() by RuddyCrazy » Sat Apr 04, 2015 12:32 pm
by RuddyCrazy » Sat Apr 04, 2015 12:32 pm
G'day Guy's,
Had a bit of fun this morning and got the top section soldered up and had a bit of fun with the one for the 3", damm thing didn't fully solder so after 3 goes finally got it to seal so now on to getting it cleaned up.
Anyway put it all together on the concrete so this is how it will look.
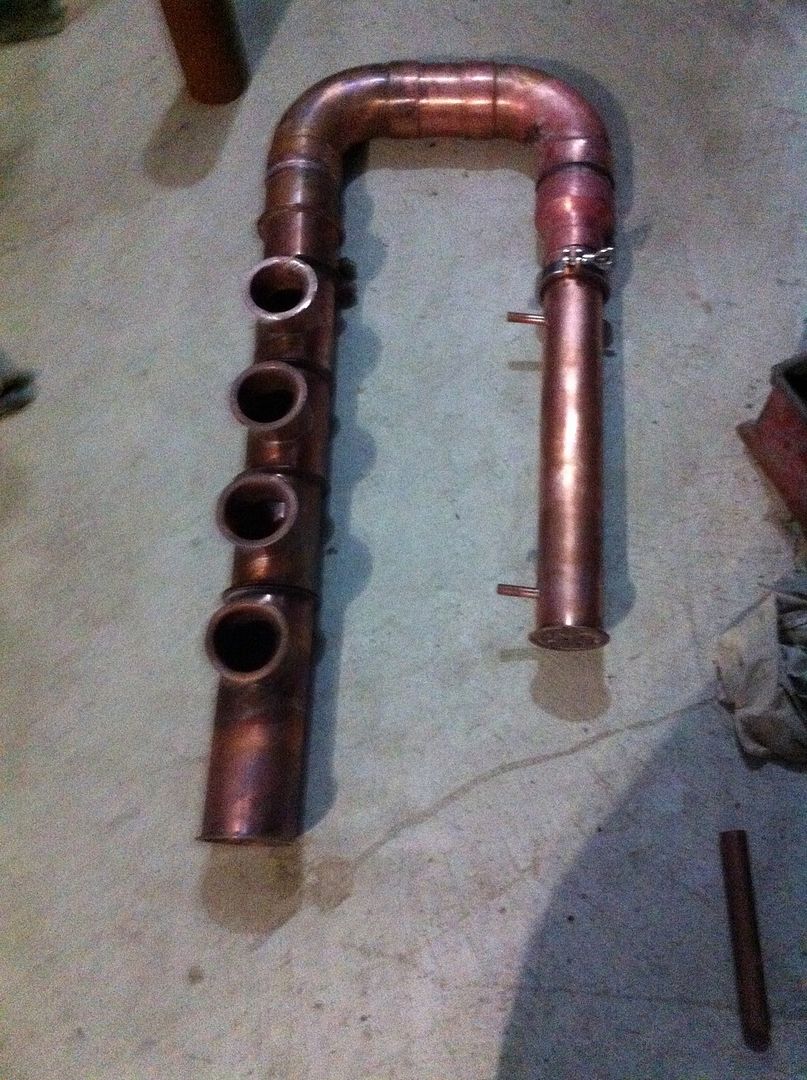
Cheers Bryan
Had a bit of fun this morning and got the top section soldered up and had a bit of fun with the one for the 3", damm thing didn't fully solder so after 3 goes finally got it to seal so now on to getting it cleaned up.
Anyway put it all together on the concrete so this is how it will look.
Cheers Bryan
- RuddyCrazy
- Mentor
- Posts: 2448
- Joined: Thu Oct 31, 2013 6:36 pm
- Location: Not far from Kanmantoo SA
- equipment: 4" copper bubbler with a setup for Neutral and a thumper for Whisky and my old 5 litre pot for doing maceration runs and MiniMe the baby pot still
Re: Bryan's Bubbler Build
![]() by RuddyCrazy » Mon Apr 20, 2015 8:14 pm
by RuddyCrazy » Mon Apr 20, 2015 8:14 pm
G'day Guy's,
Well getting closer to the finish and having some cabbage to get the triclamps etc off Mac. Anyway made a start on the parrot, I used some 1" tube and made the flare and used 1/2" tube for the output. It was fun soft soldering as one bit would fall out but got there in the end. I found a tee-piece mad from bronze and found and old bunsen burner gas valve for the fore/heads to drain away. I do need to set the still up to get the height correct for the 1/2" downcomer tube so a hunt for every clamp on the farm will be on :handgestures-thumbdown: to make sure it stays upright.
I got the 3" to 1/2" reducer made on the second attempt, still yet to make a 4" to 2" reducer so I can get the thing going and at a later date weld a 4" fitting to the keg.
More pic's to come soon once the parrot is finished and hopefully not too long after the vinegar run.
Cheers Bryan
- RuddyCrazy
- Mentor
- Posts: 2448
- Joined: Thu Oct 31, 2013 6:36 pm
- Location: Not far from Kanmantoo SA
- equipment: 4" copper bubbler with a setup for Neutral and a thumper for Whisky and my old 5 litre pot for doing maceration runs and MiniMe the baby pot still
Re: Bryan's Bubbler Build
![]() by Zak Griffin » Tue Apr 21, 2015 7:46 am
by Zak Griffin » Tue Apr 21, 2015 7:46 am
Looking good Bryan... That is a pretty serious top section/PC!
Got any pics of the homemade reducers?
Got any pics of the homemade reducers?
- Zak Griffin
- Lifetime Member
- Posts: 6832
- Joined: Mon Jul 15, 2013 9:34 pm
- Location: Radelaide
- equipment: "The Heart of Gold" - 4" Bubbler - finally bubbling!
"Zaphod" - 3" Pot - retired
"Agrajag" - 6" Bubbler - midlife crisis build?
Re: Bryan's Bubbler Build
![]() by RuddyCrazy » Wed Apr 22, 2015 10:20 pm
by RuddyCrazy » Wed Apr 22, 2015 10:20 pm
G'day Zac,
I thought I better get on with that 4-2" reducer as you want to see some pic's and I do have a 2" SS ferrule along with that 4" ferrule I got. When for a search and found that old thread on soldering copper to SS so read that for over an hour. Decided time to play so annealed the reducer and finally got it 98% true. But not good enough for the SS ferrule so decided to go the easy flange way. Made one up and filed out ID to get a snug fit then YEA it soldered in nicely :happy-partydance:. Anyway looked at the time and well that was it for the night. Just now need to make a 4" easy flange and go copper all way. Time permitting tomorrow I'll get it finished so pic's will be on.
Cheers Bryan
- RuddyCrazy
- Mentor
- Posts: 2448
- Joined: Thu Oct 31, 2013 6:36 pm
- Location: Not far from Kanmantoo SA
- equipment: 4" copper bubbler with a setup for Neutral and a thumper for Whisky and my old 5 litre pot for doing maceration runs and MiniMe the baby pot still
Re: Bryan's Bubbler Build
![]() by dogbreath vodka » Thu Apr 23, 2015 9:32 am
by dogbreath vodka » Thu Apr 23, 2015 9:32 am
Great to see the progress Bryan :handgestures-thumbupleft: :handgestures-thumbupleft:
Is it going onto a 50ltr keg boiler with legs?
Others may not agree - But - I've found that to keep the column the most stable reducing the space between the column and PC helps heaps.
OR a keg with legs, then it doesn't matter.
DBV
Is it going onto a 50ltr keg boiler with legs?
Others may not agree - But - I've found that to keep the column the most stable reducing the space between the column and PC helps heaps.
OR a keg with legs, then it doesn't matter.
DBV
- dogbreath vodka
- Posts: 1396
- Joined: Sun Jan 15, 2012 5:10 pm
- Location: Somewhere over the rainbow
- equipment: "Steampunk 2 - 6" Bubble cap
"Jimmy" the 4" Carter head
Re: Bryan's Bubbler Build
![]() by RuddyCrazy » Mon May 11, 2015 7:14 pm
by RuddyCrazy » Mon May 11, 2015 7:14 pm
G'day Guy's,
Well getting a tad closer now, today cleaned up a new area for the still and getting all fittings to plumb up that 5,000 gal rainwater tank. Thought about that burner my mate gave me and why we could only get a yellow flame, took the fitting off and sure enough no jet. Measured the hole ID 5.5mm then thought eh a 6mm SS grease nipple may be the go. So just filed off the back until the ball and spring came out then ran a 6mm tap down the hole. As the 9kg bunnings bottle was empty had some fumes in an old 4kg tank. Fired it up and with a tweak got an intense blue flame going. I do have a HP reg so I'll use that but looks like the heating problem is sorted. Just going to sit the keg on 3 bricks for now and I reckon with the weight of the top section and PC I will make a brace so the 2" fitting isn't stressed.
Once the water is setup I'll put my 2" pot on and do a 40 litre strip run on the TPW I have fermenting now. Stripped the UJ and man with that barely extract edition this UJ has taken on a new twist.
Cheers Bryan
- RuddyCrazy
- Mentor
- Posts: 2448
- Joined: Thu Oct 31, 2013 6:36 pm
- Location: Not far from Kanmantoo SA
- equipment: 4" copper bubbler with a setup for Neutral and a thumper for Whisky and my old 5 litre pot for doing maceration runs and MiniMe the baby pot still
Re: Bryan's Bubbler Build
![]() by 1 2many » Mon May 11, 2015 7:21 pm
by 1 2many » Mon May 11, 2015 7:21 pm
Bryan1 wrote: Just going to sit the keg on 3 bricks for now
Yeah that's what I said and it's still on bricks. :laughing-rolling:
- 1 2many
- Lifetime Member
- Posts: 4215
- Joined: Sun Jan 27, 2013 6:08 am
- Location: Where the sun shines
- equipment: Portable A.G brewery ,#001 5 STAR blockhead 4" Modular 4 plate SSG with,6"inline thumper, 2.5" 9 tube shotgun, packed section, Boiler 50 ltr inverted keg 4"still mount, 2.4 Kw FSD elements 1"drain.
Re: Bryan's Bubbler Build
![]() by rumdidlydum » Mon May 11, 2015 7:24 pm
by rumdidlydum » Mon May 11, 2015 7:24 pm
Can't wait to hear how she goes B
- rumdidlydum
- Posts: 2619
- Joined: Sun Oct 27, 2013 7:20 pm
- Location: CQ
- equipment: The infamous Illuminated chicken leg boiler, Rum glass and other bits and bobs
Re: Bryan's Bubbler Build
![]() by RuddyCrazy » Sun Oct 25, 2015 7:29 pm
by RuddyCrazy » Sun Oct 25, 2015 7:29 pm
G'day Guy's,
Well it has been awhile so today decided to start on the boiler so welded the 4" fitting I had for the fill port and as I ark welded it man it was fun but got there. Then decided to do a buildup only to find the 4" triclamps I scored from the scrap yard have a 10-8mm grip area. Of course Murphy ( that top bloke) had to come and play and after making 2 off 1.6mm gaskets for each joint there still was some small play in each of the joints. So got it all built up and when I put the top 4" section on no dramas. Put the shotgun PC on then the final 3-1/2" reducer them Murphy laughed as the 2" base connection at the still let go. Anyway gotta grab a 4" SS flange section to weld on the keg and just go 4" from the boiler.
Not sure if this should go into the 'fuckup thread' but I'm now on a total rethink on this build. As blockheads are all the go now I reckon I can get a 4" tee piece then branch off that for normal runs and down the track go the gin caddy.
After looking at some of the great links on this forum like that Scottish tour and a few others going the AG route has to be the go so a mash pot setup needs to be made. I'll try and find a decent SS tank at the scrap yard to convert over and in my gear I do have a 1/2hp 12 volt low rpm gearbox/motor setup which will make for a rake drive ( just like the big guys). That 200 litre black tank I used to use for coolant water will be my new fermenter so this mash setup will be made to suit that.
Anyway finally working again but not in my trade rather my new path where manual labour is a thing of the past. Some may not agree but I'm now a 'Slave Driver' working as a supervisor for work for the dole. Got 2 football clubs to repaint and some fun times ahead.
Cheers Bryan
- RuddyCrazy
- Mentor
- Posts: 2448
- Joined: Thu Oct 31, 2013 6:36 pm
- Location: Not far from Kanmantoo SA
- equipment: 4" copper bubbler with a setup for Neutral and a thumper for Whisky and my old 5 litre pot for doing maceration runs and MiniMe the baby pot still
Re: Bryan's Bubbler Build
![]() by RuddyCrazy » Thu Dec 17, 2015 3:41 pm
by RuddyCrazy » Thu Dec 17, 2015 3:41 pm
Well guy's,
It has been a while and after several months of staleness getting back into it slowly, big rethink on this still design as I'm going to go 3" after the RC and go blockhead style on the 3" so I can make a carter head down the track. For a trial on the gaskets I cut 2off rings out of 1.8mm gasket paper then used a full role of pipe tape and it made up the gap nicely for those SS316 4" clamps I got.(Reminder to myself don't hammer down the easy flange to 2mm :angry-banghead:). My idea is off the RC go 4" into 3" then a 500mm packed section then off to the 3" shotty I made and finally fixed the leaking problem.
Anyway got around to making a standalone parrot and for a bit of fun domed the base so it wasn't just sitting flat on the deck. Being 42C in the shade here later I'll go take a pic just to so this thread can be updated on the long slow build. Anyway got 20 liters of TPW sealed up ready to strip after sitting for a few months and the last 5 litres of my UJ gen run to make a spirit run, as the UJ I had oak since May is a really nice drop but only 2 goons left so best get my shed setup for the new home for the still. That pressure pump I had had a small leak and it turned out the plastic base thread was split. So I have set it up as direct pump and I'll be usig my 5,000 gal tank as the cooling water thru a 1" pipe run then a 3/4" return to the tank.
It is always said to watch Murphy ( that good bloke) when welding on the 4" fill port on the 50 litre keg as now it is a bee's dick clearance for the triclamps. I do have a 3" SS fitting here which isn't a flat triclamp one but a bit of machining will fix that. So a 3" base from the keg into a 4 off site glass section then back to 3" on the new mod's.
Cheers Bryan
- RuddyCrazy
- Mentor
- Posts: 2448
- Joined: Thu Oct 31, 2013 6:36 pm
- Location: Not far from Kanmantoo SA
- equipment: 4" copper bubbler with a setup for Neutral and a thumper for Whisky and my old 5 litre pot for doing maceration runs and MiniMe the baby pot still
Re: Bryan's Bubbler Build
![]() by Zak Griffin » Fri Dec 18, 2015 5:11 am
by Zak Griffin » Fri Dec 18, 2015 5:11 am
Why do you want a packed section after the RC?
- Zak Griffin
- Lifetime Member
- Posts: 6832
- Joined: Mon Jul 15, 2013 9:34 pm
- Location: Radelaide
- equipment: "The Heart of Gold" - 4" Bubbler - finally bubbling!
"Zaphod" - 3" Pot - retired
"Agrajag" - 6" Bubbler - midlife crisis build?
Re: Bryan's Bubbler Build
![]() by crow » Tue Dec 29, 2015 3:16 pm
by crow » Tue Dec 29, 2015 3:16 pm
Zak Griffin wrote:Why do you want a packed section after the RC?
Maybe a catylist to remove remaining sulphides and ethyl carbamate prior to the vapour entering the lynne arm. :-B
- crow
- Posts: 2363
- Joined: Tue Mar 13, 2012 1:44 am
- Location: Central Highlands Victoria
- equipment: ultra pure reflux still and a 4" 4 plate MacStill built copper bubble cap column and a 500mm scoria packed rectifying module
Re: Bryan's Bubbler Build
![]() by RuddyCrazy » Fri Feb 19, 2016 5:19 pm
by RuddyCrazy » Fri Feb 19, 2016 5:19 pm
G'Day Guy's,
Well finally got onto the new design and nearly got it all done, still need to get the 3" siteglass and clamps off Mac to get it finished.
As this still be run on gas I needed a base of the still so the trusty ol' car wheel rim was the idea so grabbed a 15" wheel ( as that is all I have here) then after trying for 5 minutes to get the tyre off decided to get the 9" out and cut the tyre off. Didn't take long and also cut the hole for the burner then off to test it only to find a friggin 16" rim is the preferred one for the keg. Not to outdone got the 4lber and my heavyduty set of locking pliers and bent the out rim out so the keg now sit firmly on the rim.
For the gaskets, used the pfte tape method and used a roll on each seal, for the backing material I used some 1.6mm gasket paper and with a couple went 2 thick.
Went with the blockhead style and only had 450mm of 3" left so with a bit of fiddling managed to make up the piece. For the 45 degree bend I just cut it with my mitre handsaw and got a nice square cut. As with the T-piece I silver soldered both joints just to be sure be sure. As in the pic below rather than butcher my free standing parrot decided to make a new one. Got the 1/2 pipe all cut with the breather join all sorted. Went to soft solder it all up and got too much bloody heat in it and the easy flange dropped off :angry-banghead:
Anyway still gotta clean it up
The free standing Parrot
Cheers Bryan
You do not have the required permissions to view the files attached to this post.
- RuddyCrazy
- Mentor
- Posts: 2448
- Joined: Thu Oct 31, 2013 6:36 pm
- Location: Not far from Kanmantoo SA
- equipment: 4" copper bubbler with a setup for Neutral and a thumper for Whisky and my old 5 litre pot for doing maceration runs and MiniMe the baby pot still
Re: Bryan's Bubbler Build
![]() by rumdidlydum » Fri Feb 19, 2016 6:18 pm
by rumdidlydum » Fri Feb 19, 2016 6:18 pm
Nice work there brian :handgestures-thumbupleft:
Is it going to be a shiny finish or a work horse finish :teasing-tease:
Is it going to be a shiny finish or a work horse finish :teasing-tease:
- rumdidlydum
- Posts: 2619
- Joined: Sun Oct 27, 2013 7:20 pm
- Location: CQ
- equipment: The infamous Illuminated chicken leg boiler, Rum glass and other bits and bobs
Re: Bryan's Bubbler Build
![]() by RuddyCrazy » Fri Mar 18, 2016 6:13 pm
by RuddyCrazy » Fri Mar 18, 2016 6:13 pm
YAY hopefully tomorrow I will have the funds to get the 3" site glass's and clamps of Mac so build can get finished, got a TPW that is taking ages to get down to 990 so that can do for the stripping run and soon it will be time to name the beast. :laughing-rolling:
- RuddyCrazy
- Mentor
- Posts: 2448
- Joined: Thu Oct 31, 2013 6:36 pm
- Location: Not far from Kanmantoo SA
- equipment: 4" copper bubbler with a setup for Neutral and a thumper for Whisky and my old 5 litre pot for doing maceration runs and MiniMe the baby pot still
Re: Bryan's Bubbler Build
![]() by RuddyCrazy » Tue Mar 22, 2016 8:46 pm
by RuddyCrazy » Tue Mar 22, 2016 8:46 pm
Bit of an update guy's,
Got to talk with Sue after having trouble in the web store and the gear I need is now on it's way, a big thanks on the call and the advise on the site glass's too. Also picked up those 2 60 litre fermenters off Crusty last weekend. Paid for my new ute ( well a '95 rolux single cab diesel ute ) and the big job on Thursday is getting upto the bridge to get 2 beer kegs and a bottle of argon so I can get my tig welder back in action for the mashun build. Shame I never had the gas to do this build as it would of been much easier. My goal get some 25 litre say french oak barrels custom made, come up with a recipe of my own after researching what works. when one is filled get another barrel then rinse and repeat. 7 years will go buy then I'll have a nice drop to dwink in semi retirement
Well this build has taken awhile but it won't take as long as the Arajag..... :laughing-rolling: :laughing-rolling: :laughing-rolling:
- RuddyCrazy
- Mentor
- Posts: 2448
- Joined: Thu Oct 31, 2013 6:36 pm
- Location: Not far from Kanmantoo SA
- equipment: 4" copper bubbler with a setup for Neutral and a thumper for Whisky and my old 5 litre pot for doing maceration runs and MiniMe the baby pot still
Re: Bryan's Bubbler Build
![]() by RuddyCrazy » Thu Mar 24, 2016 4:26 pm
by RuddyCrazy » Thu Mar 24, 2016 4:26 pm
G'day Guy's,
Well things are moving forward, got package from the bubble wrap queen and she right on the delivery date as it turned up on Wednesday like she said. Anyway tried the site glass with my 3" tee's and found I had to file down my easy flanges as the diameter was too big and too thick to fit the 2 seals and the glass. Anyway filed one down and just put one cut down epdm seal tightened everything up and now got it full of water doing a leak test.
Went for trip upto the bridge with the idea of a thumper in mind and a keg or for making the mash tun, anyway Shannon had to go out and he did say as I haven't been there for ages he sent a heap of copper pipe out. I told him to keep ANYMORE copper to one side and I'll telll all the SA locals if they want a keg or copper to come and see you and he did agree. I did ask him mate I want about a metre of 6-8 " copper pipe to make a thumper, he walked straight to a rack and said well will this one do mate. Just over a metre of 6" copper pipe, I said ok mate how much cabbage are going to rip me for this and after weighing $40 where he said mate I wouldn't get much more at my scrap buyer. So off to elgas to get an argon bottle and sign my life away to rental and exorbitant prices for gas. So now got an argon bottle home and the pipe, time for me to research the best way to go for the thumper.
As I have made a 4-2 reducer coming from the keg now it will go from 2" to 6" so I am thinking my first attempt of a 50 litre keg boiler either cut it down to use for the tun or sell it for what the keg cost + a tad extra for the 4" fitting. The guys do have those old style 80 litre kegs and Shannon did say to come back another time as he has in mind a SS tank that may fit the bill for both my boiler and mash tun.
Got the easter break to have a play and my ute to pick up tomorrow so Saturday may have to grab 10 litres of vinegar as by hook or crook this still is going to get going.
Cheers Bryan
P.S. No photos guys as that xgody smart phone I got on fleabay fell out of the car last night and fell to bits, so now I have told the wankers to send my money back or a new tested phone or I'm going to the ACCC and get you banned from selling in Oz.
- RuddyCrazy
- Mentor
- Posts: 2448
- Joined: Thu Oct 31, 2013 6:36 pm
- Location: Not far from Kanmantoo SA
- equipment: 4" copper bubbler with a setup for Neutral and a thumper for Whisky and my old 5 litre pot for doing maceration runs and MiniMe the baby pot still
Re: Bryan's Bubbler Build
![]() by WTDist » Thu Mar 24, 2016 4:37 pm
by WTDist » Thu Mar 24, 2016 4:37 pm
Dang thats a good price for 6". Ive been on the lookout at the scrappy with no success of the late.
Will be watching. remember, downcomer caps work best on thumpers when they hold as much liquid as the bath depth itself.
see here for a good tip from meat
Will be watching. remember, downcomer caps work best on thumpers when they hold as much liquid as the bath depth itself.
see here for a good tip from meat
- WTDist
- Posts: 2
- Joined: Sun Oct 05, 2014 11:32 am
- Location: Brisbane
- equipment: Building a 4" bubbler with 8" glass thumper
Return to Plated Column Stills
Who is online
Users browsing this forum: No registered users and 41 guests