A primer on soldering

Posts in this forum should be a complete method, educational, with pics where applicable,posts made in this area that don't fit this criteria will be moved at mods discretion.

A primer on soldering

Postby Modernity » Sat Jan 28, 2012 3:13 pm

I have done a fair bit of soldering over the years (for a living). As well as working in a gold refinery I have spent a time smithing gold and silver. Looking around the forums and it seems that soldering tends to be the dark art that scares people.

So I thought to share one or two soldering concepts with everyone

The first one is heating. We all tend to start a job without enough heat on hand. :angry-banghead: This means that you tend to turn the heat way up to get the flame really hot. This goes against one of the principles of soldering a good joint. That is use as low a temp flame as possible. As soon as you boil your solder it is f@@ked for flowing where you want it to go and boiling courses the solder to get pin holes. Solders melt at between 650C - 800C and your flame is 1700C-3200C depending on what gear you are using.

I know you are saying "this guy is a F ' wit. If I had enough heat then it would be easy" Yes I am and no thats not often true. A lot of the time heat is wasted because there is no means to keep the heat on the job and stop it getting away.
The answer is build a micro climate or a kiln around the job. By having some ceramic wool and have a few fire bricks on hand you can solder big jobs with not a lot of heat. I set up a metal tray with a floor and a wall of old bricks. Then ceramic wool is used to wrap the area of job ether side of the joint. If you are heating 4" copper I would push some in the ends too.
All this helps keep the heat in the metal so you will be able to use a cooler flame. Sometimes you can build this kiln setup on a gas (BBQ) burner and add a little extra pre heat from underneath as well. A long BBQ burner is perfect for pre-heating along a length of 4" tube.

Next: what to heat first. The aim of the flame is to get the area to be soldered hot enough for the solder to run along the join. The fact is that solder runs towards the hottest and cleanest area first.
So when you are soldering a large pipe to a small fitting you heat the pipe 95% (the cold item) of the time and the fitting the other 5% (the hot item). Now the trick is to add the solder stick to the cold item (95%) and flow it to the hot item(5%). So as soon as the cold item is hot enough to melt the solder you start to heat both a get the solder to flow from the 95% to the 5% item. If you put the solder on the 5% item and try to get the solder to flow the other way there is a good chance that you will boil the solder before it runs to the 95% item.

An example of what I am say would be soldering the tubes in the end of condenser or a "D :laughing-rolling: :laughing-rolling: :laughing-rolling: :laughing-rolling: :laughing-rolling: " thing. The natural way to solder these is to stand the tubes on their ends and place the endplate on top and pour the heat into the end of the tubes. These things are a sure bitch. The tube needs the most heat but is hiding behind the end plate and the plate gets all the heat so the solder runs and boils all over the place making the job look crap. The other way to tackle this it turn the job up the other way. Place the end plate down and hold one tube at a time in its hole and solder it from the back. Solder loves to flow into a corner and will flow though to the front face as soon as there is enough heat.
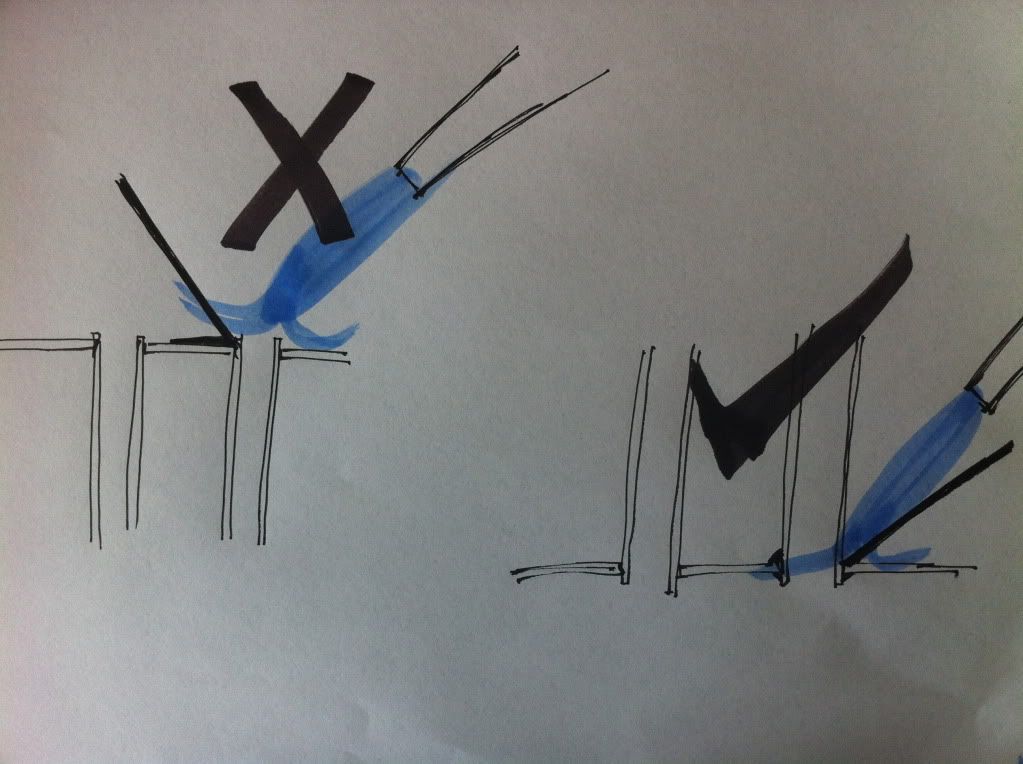
Image
The black line is the solder stick.
The upside to soldering with this method is you will use about 25% of the solder of the other method.
Last edited by Modernity on Sat Jan 28, 2012 5:14 pm, edited 1 time in total.
Modernity
 
Posts: 183
Joined: Sun Nov 27, 2011 2:34 pm
Location: Southern Highlands, NSW
equipment: I am currently refurbishing a 150 ltr mush tun.
Currently building a 150 ltr oil heated pot still, with 8" copper column.

Re: A primer on soldering

Postby Kimbo » Sat Jan 28, 2012 4:11 pm

Good Post Mod,
very informative, Thanks :handgestures-thumbupleft:
Kimbo
Lifetime Member
 
Posts: 5461
Images: 0
Joined: Fri Mar 18, 2011 6:33 pm
Location: Perf WA
equipment: 4" bubbler with a 6"inline thumper

Re: A primer on soldering

Postby dogbreath vodka » Sun Jan 29, 2012 9:29 am

Thanks for the post/thread.
Makes sense, and with capillary action the solder should also draw into the join if all the metal is hot enough.

Cheers
DBV
dogbreath vodka
 
Posts: 1396
Joined: Sun Jan 15, 2012 5:10 pm
Location: Somewhere over the rainbow
equipment: "Steampunk 2 - 6" Bubble cap
"Jimmy" the 4" Carter head

Re: A primer on soldering

Postby stubbydrainer » Sun Jan 29, 2012 2:30 pm

Good Post Mod.
I will try the picture thing when next I build a shotgun condenser, ( If it don't work , I'll draw a picture and show it what it's supposed to do :laughing-rolling: :laughing-rolling: :laughing-rolling: )
seriously though, I'll give it a go, cos them shotguns are a son of bitch thing to get right
stubbydrainer
 
Posts: 728
Joined: Sun Aug 28, 2011 9:42 pm
Location: Northern Rivers, NSW
equipment: 4" perf. plate bubbler,2 1/2" pot with a triple wall liebig,
Small 8L pot for experiments & Gin, 6Kw 80ltr electric boiler , P.I.D/PWM controller
1/2 share with SBB in a 3" boka,

Re: A primer on soldering

Postby SBB » Sun Jan 29, 2012 4:12 pm

Yep excellent post :handgestures-thumbupleft: :handgestures-thumbupleft:
SBB
Lifetime Member
 
Posts: 2450
Joined: Mon Mar 21, 2011 8:12 pm
Location: Northern NSW
equipment: (The Pelican) a 2 inch pot / stripper on 25L electric boiler interchangable with T500 reflux still...... 2 1/2 inch pot still on 50L keg (gas burner).....
3 inch Boka (half share with Draino),...... 4 inch 4 plate perforated plate Bubbler

Re: A primer on soldering

Postby stubbydrainer » Wed Jun 13, 2012 10:30 am

Yep, it works good :handgestures-thumbupleft:
Thanks mod, very informative post and a simple, yet successful way of doing it
I assembled a 2" x 5 barrel shotty using what I read and it gave me very successful results :D

cheers
stubbydrainer
 
Posts: 728
Joined: Sun Aug 28, 2011 9:42 pm
Location: Northern Rivers, NSW
equipment: 4" perf. plate bubbler,2 1/2" pot with a triple wall liebig,
Small 8L pot for experiments & Gin, 6Kw 80ltr electric boiler , P.I.D/PWM controller
1/2 share with SBB in a 3" boka,

Re: A primer on soldering

Postby Brendan » Wed Jun 13, 2012 1:48 pm

Nice post Mod :handgestures-thumbupleft:

Soldering definitely tends to scare people...especially on 4" pipe!
Brendan
 
Posts: 2154
Joined: Mon Nov 21, 2011 5:06 pm
Location: Hunter Valley, NSW
equipment: 4.99L Essential oil extractor

Re: A primer on soldering

Postby stubbydrainer » Sat Jun 16, 2012 8:52 pm

G'day Mod
I am thinking of getting some of that ceramic wool , do you have any info on where you would get it and is it expensive ?

Cheers
stubbydrainer
 
Posts: 728
Joined: Sun Aug 28, 2011 9:42 pm
Location: Northern Rivers, NSW
equipment: 4" perf. plate bubbler,2 1/2" pot with a triple wall liebig,
Small 8L pot for experiments & Gin, 6Kw 80ltr electric boiler , P.I.D/PWM controller
1/2 share with SBB in a 3" boka,

Re: A primer on soldering

Postby Fermi » Sat Jul 07, 2012 12:33 pm

Great post for those of us new to the art of soldering and brazing.
I'm trying my hand at brazing and soldering for my new still.

Couple of questions:
1. Are you talking about soldering or brazing? From what I've read up on so far, soldering is up to 450C and brazing is above 450C. Seems like an arbitrary line to draw, but is there really much difference other than the melting point of your filler material?
2. How do you tell if you've "boiled" your solder? I didn't even know that was possible (at any reasonably low temperature less than the surface of the sun).
3. Is ceramic wool the same/similar to the "rock wool" for house insulation? Wikipedia says there's several types of such wools but didn't specifically mention 'ceramic wool'.

More tips and exact how-to on working with copper and SS on these forums will be much appreciated. :pray:
I know there's a few other posts about it, but more like this OP would be great. Diagrams on heating angles even - GREAT :clap:
Fermi


Return to Tips From The Workbench


Who is online

Users browsing this forum: No registered users and 24 guests

x