A primer on soldering
I have done a fair bit of soldering over the years (for a living). As well as working in a gold refinery I have spent a time smithing gold and silver. Looking around the forums and it seems that soldering tends to be the dark art that scares people.
So I thought to share one or two soldering concepts with everyone
The first one is heating. We all tend to start a job without enough heat on hand. :angry-banghead: This means that you tend to turn the heat way up to get the flame really hot. This goes against one of the principles of soldering a good joint. That is use as low a temp flame as possible. As soon as you boil your solder it is f@@ked for flowing where you want it to go and boiling courses the solder to get pin holes. Solders melt at between 650C - 800C and your flame is 1700C-3200C depending on what gear you are using.
I know you are saying "this guy is a F ' wit. If I had enough heat then it would be easy" Yes I am and no thats not often true. A lot of the time heat is wasted because there is no means to keep the heat on the job and stop it getting away.
The answer is build a micro climate or a kiln around the job. By having some ceramic wool and have a few fire bricks on hand you can solder big jobs with not a lot of heat. I set up a metal tray with a floor and a wall of old bricks. Then ceramic wool is used to wrap the area of job ether side of the joint. If you are heating 4" copper I would push some in the ends too.
All this helps keep the heat in the metal so you will be able to use a cooler flame. Sometimes you can build this kiln setup on a gas (BBQ) burner and add a little extra pre heat from underneath as well. A long BBQ burner is perfect for pre-heating along a length of 4" tube.
Next: what to heat first. The aim of the flame is to get the area to be soldered hot enough for the solder to run along the join. The fact is that solder runs towards the hottest and cleanest area first.
So when you are soldering a large pipe to a small fitting you heat the pipe 95% (the cold item) of the time and the fitting the other 5% (the hot item). Now the trick is to add the solder stick to the cold item (95%) and flow it to the hot item(5%). So as soon as the cold item is hot enough to melt the solder you start to heat both a get the solder to flow from the 95% to the 5% item. If you put the solder on the 5% item and try to get the solder to flow the other way there is a good chance that you will boil the solder before it runs to the 95% item.
An example of what I am say would be soldering the tubes in the end of condenser or a "D :laughing-rolling: :laughing-rolling: :laughing-rolling: :laughing-rolling: :laughing-rolling: " thing. The natural way to solder these is to stand the tubes on their ends and place the endplate on top and pour the heat into the end of the tubes. These things are a sure bitch. The tube needs the most heat but is hiding behind the end plate and the plate gets all the heat so the solder runs and boils all over the place making the job look crap. The other way to tackle this it turn the job up the other way. Place the end plate down and hold one tube at a time in its hole and solder it from the back. Solder loves to flow into a corner and will flow though to the front face as soon as there is enough heat.
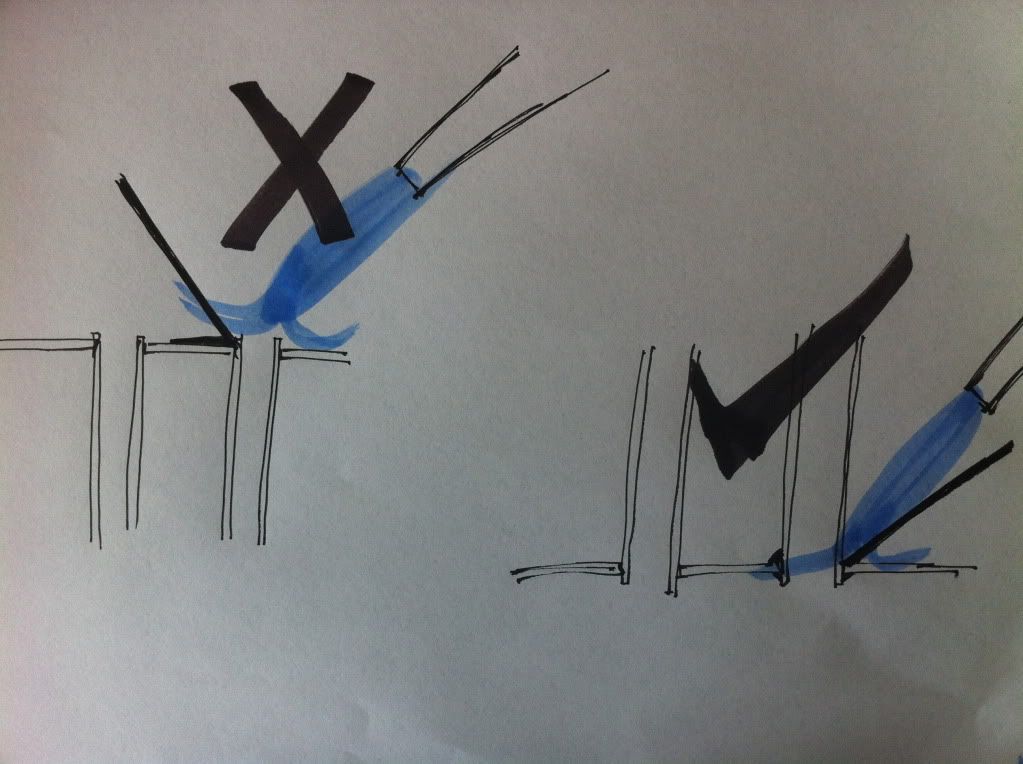
The black line is the solder stick.
The upside to soldering with this method is you will use about 25% of the solder of the other method.
So I thought to share one or two soldering concepts with everyone
The first one is heating. We all tend to start a job without enough heat on hand. :angry-banghead: This means that you tend to turn the heat way up to get the flame really hot. This goes against one of the principles of soldering a good joint. That is use as low a temp flame as possible. As soon as you boil your solder it is f@@ked for flowing where you want it to go and boiling courses the solder to get pin holes. Solders melt at between 650C - 800C and your flame is 1700C-3200C depending on what gear you are using.
I know you are saying "this guy is a F ' wit. If I had enough heat then it would be easy" Yes I am and no thats not often true. A lot of the time heat is wasted because there is no means to keep the heat on the job and stop it getting away.
The answer is build a micro climate or a kiln around the job. By having some ceramic wool and have a few fire bricks on hand you can solder big jobs with not a lot of heat. I set up a metal tray with a floor and a wall of old bricks. Then ceramic wool is used to wrap the area of job ether side of the joint. If you are heating 4" copper I would push some in the ends too.
All this helps keep the heat in the metal so you will be able to use a cooler flame. Sometimes you can build this kiln setup on a gas (BBQ) burner and add a little extra pre heat from underneath as well. A long BBQ burner is perfect for pre-heating along a length of 4" tube.
Next: what to heat first. The aim of the flame is to get the area to be soldered hot enough for the solder to run along the join. The fact is that solder runs towards the hottest and cleanest area first.
So when you are soldering a large pipe to a small fitting you heat the pipe 95% (the cold item) of the time and the fitting the other 5% (the hot item). Now the trick is to add the solder stick to the cold item (95%) and flow it to the hot item(5%). So as soon as the cold item is hot enough to melt the solder you start to heat both a get the solder to flow from the 95% to the 5% item. If you put the solder on the 5% item and try to get the solder to flow the other way there is a good chance that you will boil the solder before it runs to the 95% item.
An example of what I am say would be soldering the tubes in the end of condenser or a "D :laughing-rolling: :laughing-rolling: :laughing-rolling: :laughing-rolling: :laughing-rolling: " thing. The natural way to solder these is to stand the tubes on their ends and place the endplate on top and pour the heat into the end of the tubes. These things are a sure bitch. The tube needs the most heat but is hiding behind the end plate and the plate gets all the heat so the solder runs and boils all over the place making the job look crap. The other way to tackle this it turn the job up the other way. Place the end plate down and hold one tube at a time in its hole and solder it from the back. Solder loves to flow into a corner and will flow though to the front face as soon as there is enough heat.
The black line is the solder stick.
The upside to soldering with this method is you will use about 25% of the solder of the other method.