Potsill Insulation (Keg and Column)

Pot still design and discussion

Re: Potsill Insulation (Keg and Column)

Postby Frank » Fri Jun 22, 2012 6:03 pm

Ok
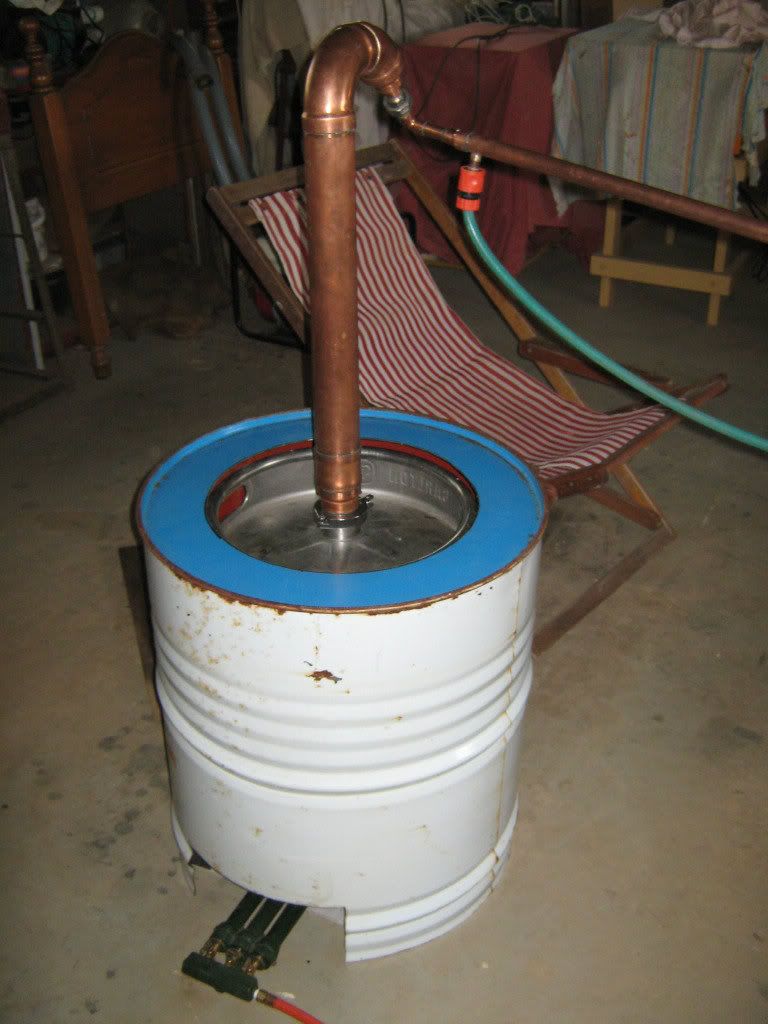
so I got my spare 44gal drum and the angle grinder and....
Image

As a comparison on 40 litre TPW strip runs, I found
Without insulating drum it took 60 minutes from start to foreshots; with drum on (as per picture) it took 35 minutes to foreshots.
Without insulating drum the strip was about 4.9l per hour with all three ring burners on (maximum); with drum it was about 5.2l per hour with only the large and small rings on and, at a guess, it ran at around 6.5l per hour with all three burners going (didn't do this for too long as I figured it might be stripping too quickly for a suitable lowwines collection...but NFI really :oops: ).

Anyway as a free solution to my need here its all good IMO :handgestures-thumbupleft:... NO chance of the drum catching fire PLUS it reduces the chance for ingress of flammable material into flame area (eg dust, assorted shed floor crap, small furry aminals, maybe even alcohol vapours) and, of course, it results in considerable LPG usage savings over time.
Frank
 

Re: Potsill Insulation (Keg and Column)

Postby Kimbo » Fri Jun 22, 2012 6:06 pm

well done Frank,
it goes to show how effective a bit of Inso can be ;-)
Kimbo
Lifetime Member
 
Posts: 5461
Images: 0
Joined: Fri Mar 18, 2011 6:33 pm
Location: Perf WA
equipment: 4" bubbler with a 6"inline thumper

Potsill Insulation (Keg and Column)

Postby Sam. » Fri Jun 22, 2012 7:06 pm

Very impressive stats on the heat up time difference! Have to be happy with that
Sam.
Lifetime Member
 
Posts: 10405
Joined: Sun Jul 17, 2011 7:19 pm
Location: South Oz Straya
equipment: Original FSD 5 plate 4 inch modular bubbler SSG with hand crafted plates and parrot by Mac.
18 Gal boiler.
2 x 2400W elements and power controller.
.

Re: Potsill Insulation (Keg and Column)

Postby crow » Sat Jun 23, 2012 12:14 am

I knew you were on a winner with your drum idea but almost doubling the efficiency :handgestures-thumbupleft: thats great and sounds a lot easier than tying on insul wool each time , be looking in to this myself :D
crow
 
Posts: 2363
Joined: Tue Mar 13, 2012 1:44 am
Location: Central Highlands Victoria
equipment: ultra pure reflux still and a 4" 4 plate MacStill built copper bubble cap column and a 500mm scoria packed rectifying module

Re: Potsill Insulation (Keg and Column)

Postby R-sole » Sat Jun 23, 2012 5:52 am

Good stuff Frank. Please post a picture that someone other than a teenager can see the details of.

Cheers
R-sole
 
Posts: 0
Joined: Mon Apr 18, 2011 4:15 am
Location: Northern NSW Australia
equipment: Keg based pot stiller. 3" vm for occasionally making product for macerations and redistillation.

Re: Potsill Insulation (Keg and Column)

Postby Frank » Sat Jun 23, 2012 6:26 pm

5Star wrote:Good stuff Frank. Please post a picture that someone other than a teenager can see the details of.

Cheers

:laughing-rolling: fair enough, old timer :teasing-neener:

Image

Yep, S&L, sure am.....
I did a spirit run today..heat up time on 40l lowwines was just under 40 minutes (again) with ambient temp and lowwine temp pretty chilly BTW
...and I ran on ONE ring on the burner to keep flow on/around 4l/hour. :dance:
Frank
 

Re: Potsill Insulation (Keg and Column)

Postby SBB » Sat Jun 23, 2012 7:07 pm

Thank god it wasnt any bigger :o , my dodgey soldering might have shown up.
PS good looking shroud Frank
SBB
Lifetime Member
 
Posts: 2450
Joined: Mon Mar 21, 2011 8:12 pm
Location: Northern NSW
equipment: (The Pelican) a 2 inch pot / stripper on 25L electric boiler interchangable with T500 reflux still...... 2 1/2 inch pot still on 50L keg (gas burner).....
3 inch Boka (half share with Draino),...... 4 inch 4 plate perforated plate Bubbler

Re: Potsill Insulation (Keg and Column)

Postby R-sole » Sun Jun 24, 2012 6:20 am

No air slots round the other side Frank?

That's all i keep thinking that the airflow is gunna be a problem. I know it was when i made my car rim burner and i had to lift the keg off the rim with spacers before i could get the burner to stay lit.
R-sole
 
Posts: 0
Joined: Mon Apr 18, 2011 4:15 am
Location: Northern NSW Australia
equipment: Keg based pot stiller. 3" vm for occasionally making product for macerations and redistillation.

Re: Potsill Insulation (Keg and Column)

Postby Frank » Sun Jun 24, 2012 11:47 am

No mate, no airflow considerations except as you can see in the picture. Note: I did leave about 5mm between the keg top and the barrel top so the rising heat didnt get too concentrated/much through the keg handles, but I'll probably try it without that gap next ;-) .

FYI, I do have the keg sitting on a base of some welded box metal (forming three sides) so it sits firmly about 10cm high... which gives it a clearance over the cast iron of the ring burner by (?) 2cm. This allows the flame 'sweet spot' to hit the keg base when on max throttle, it concentrates the heat on the keg base somewhat by not letting it 'out' below the keg on those sides AND lets me get the burner in and out very easily (for safety/ignition/etc)..... whilst (maybe) providing the required air as you say.

I figured this setup is (sort of) like the one McStill showed in this thread, but.....?
Frank
 

Re: Potsill Insulation (Keg and Column)

Postby adama » Sun Jun 24, 2012 4:28 pm

I use the same shroud idea but I split my drum lengthways in half so I would have to lift over the top.
This helps me get at the drain valve at the end of a run . . . I don't have to wait for it to cool down before draining it.

Regards
adama
 
Posts: 31
Joined: Sat Jun 16, 2012 12:07 pm
Location: VIC - we play the best footy.
equipment: 3" VM
Putting a decent size copper stripper together
28L s/s stovetop boiler come Gin machine

Re: Potsill Insulation (Keg and Column)

Postby Linno » Sun Jun 24, 2012 4:49 pm

hey Frank

is that ya favorite old shine watchin chair in the back..???. nice work with the insulator too mate, the improved time to get to temp will help all round.

Cheers
Linno
Linno
 
Posts: 314
Joined: Sun May 13, 2012 3:20 pm
Location: Perth SoR
equipment: FSD Mac 4 version 1 #001
4" single cap, 4 plate SS Bubbler,
400mm SS packed extension

Re: Potsill Insulation (Keg and Column)

Postby Frank » Sun Jun 24, 2012 5:45 pm

@Linno: :laughing-rolling: yep Linno it is my strip run shed chair...and I can pretend I'm at the beach :laughing-rolling: gotta love getting two strip runs from my 4.5Kg ( :shock: ) cylinder.....NB for a spirit run, I make sure the chair is MUCH more comfy ;-)
@Adama: mate you must like cutting tin drums more than I do, I reckon.... and personally, I'm ok leaving the thing to cool down until the next day etc; besides the dogs just LOVE the shed heater in winter :-D .....yours is a good idea though, for sure :handgestures-thumbupleft: ... how do you keep it together for a run (the drum, that is)?
Frank
 

Potsill Insulation (Keg and Column)

Postby BackyardBrewer » Mon Nov 12, 2012 6:38 pm

Would there be any benefits insulating my reflux column and boiler? I have some of those foil reflective windscreen thingies that I was going to chuck but should I be taping these to my column and boiler instead?
BackyardBrewer
Site Donor
 
Posts: 1824
Joined: Thu Mar 22, 2012 1:18 pm
Location: South Aussie
equipment: Solid Copper Love Machine (Plated column bubbler), hand made with love by a forum member
50L keg boiler with 2 x 2400w elements
PURE distilling Reflux still + a tonne of homebrew gear amassed over 10 years of brewing.

Re: Potsill Insulation (Keg and Column)

Postby Sam. » Mon Nov 12, 2012 6:48 pm

BackyardBrewer wrote:Would there be any benefits insulating my reflux column and boiler? I have some of those foil reflective windscreen thingies that I was going to chuck but should I be taping these to my column and boiler instead?


Yes :handgestures-thumbupleft:

It will give you some more efficiency from your boiler and also a more consistent product from your reflux column.
Sam.
Lifetime Member
 
Posts: 10405
Joined: Sun Jul 17, 2011 7:19 pm
Location: South Oz Straya
equipment: Original FSD 5 plate 4 inch modular bubbler SSG with hand crafted plates and parrot by Mac.
18 Gal boiler.
2 x 2400W elements and power controller.
.

Re: Potsill Insulation (Keg and Column)

Postby Lowndsey » Mon Nov 12, 2012 7:04 pm

Great another fuckin job for me to do :laughing-rolling: ...everytime I think my still is finished I find something else I just have to do to it. :angry-banghead: :laughing-rolling:
Lowndsey
 
Posts: 312
Joined: Wed Feb 22, 2012 7:17 pm
equipment: 2" Bokka

Re: Potsill Insulation (Keg and Column)

Postby Andy » Mon Nov 12, 2012 8:10 pm

would it be worth insulating an electric boiler as well?
Andy
 
Posts: 1466
Joined: Tue Aug 28, 2012 6:49 pm
Location: SOR, Perth
equipment: Copper Potstill on a 50L keg boiler with a 2200w element.
Doesn't get more simple then that

Re: Potsill Insulation (Keg and Column)

Postby Sam. » Mon Nov 12, 2012 8:49 pm

Andy wrote:would it be worth insulating an electric boiler as well?


Many have, again it will give you better efficiency and a quicker boil time :handgestures-thumbupleft:
Sam.
Lifetime Member
 
Posts: 10405
Joined: Sun Jul 17, 2011 7:19 pm
Location: South Oz Straya
equipment: Original FSD 5 plate 4 inch modular bubbler SSG with hand crafted plates and parrot by Mac.
18 Gal boiler.
2 x 2400W elements and power controller.
.

Re: Potsill Insulation (Keg and Column)

Postby Kimbo » Mon Nov 12, 2012 9:32 pm

Andy wrote:would it be worth insulating an electric boiler as well?

I did, it made a big difference ;-)
Kimbo
Lifetime Member
 
Posts: 5461
Images: 0
Joined: Fri Mar 18, 2011 6:33 pm
Location: Perf WA
equipment: 4" bubbler with a 6"inline thumper

Re: Potsill Insulation (Keg and Column)

Postby Linno » Mon Nov 12, 2012 9:41 pm

yeah it definitey helps. i got a case of the lazies last time i ran the still and never insulated the boiler like normal... took extra 40 minutes on the 100ltr boiler to get a start.. i am even gunna insulate my little 30ltr boiler now
Linno
 
Posts: 314
Joined: Sun May 13, 2012 3:20 pm
Location: Perth SoR
equipment: FSD Mac 4 version 1 #001
4" single cap, 4 plate SS Bubbler,
400mm SS packed extension

Potsill Insulation (Keg and Column)

Postby BackyardBrewer » Mon Nov 12, 2012 9:44 pm

Ok that's it, I'm taping the old windscreen reflector thingies onto the 30L electric boiler and reflux column for Friday's run - looks butt ugly but the experts have spoke and I has listened.
BackyardBrewer
Site Donor
 
Posts: 1824
Joined: Thu Mar 22, 2012 1:18 pm
Location: South Aussie
equipment: Solid Copper Love Machine (Plated column bubbler), hand made with love by a forum member
50L keg boiler with 2 x 2400w elements
PURE distilling Reflux still + a tonne of homebrew gear amassed over 10 years of brewing.

Previous

Return to Pot Stills


Who is online

Users browsing this forum: No registered users and 63 guests

x