
 5 Star Store
 Community Guidelines
 Newbies Corner
 Recipes
 AD search
Ok here's how I do my version of an easy flange, there are other ways but this is the most simple and effective I've ever made.
Part 1.
Step 1.
Wrap a length of 1/4 inch tube around a piece of 2inch pipe, do a few wraps and keep the tension on with your hands until you end up with a coil.
Then put the coil in a vise and cut a slot through the lot with a hacksaw.... gently does it.
Once you end up with a few rings, hard solder them to form a solid ring.
Step 2.
With the end of the pipe you want to flange, bell the end slightly on an anvil or on your vice, gently at first and about 6mm flared out. once the end is at about 45 degrees you can now flatten it to 90 degrees with short sharp taps, again just gentle, it will form but dont rush and theres no need to anneal the pipe first.
Step 3.
Place the ring over the pipe you intend to use for your column to keg join, flatten ring with short sharp taps with a hammer.
Cont.
How to.... easy, easy flange.
How to.... easy, easy flange.
![]() by MacStill » Sat Mar 26, 2011 3:37 pm
by MacStill » Sat Mar 26, 2011 3:37 pm
You do not have the required permissions to view the files attached to this post.
Last edited by Sam. on Tue Aug 15, 2017 8:15 pm, edited 1 time in total.
Reason: Inserted new pics due to photobucket fiasco - cheers Woodduck
Reason: Inserted new pics due to photobucket fiasco - cheers Woodduck
- MacStill
- Lifetime Member
- Posts: 16835
- Joined: Fri Mar 18, 2011 1:40 pm
- Location: Wide Bay QLD
- equipment: Anything I choose :P
Re: How to.... easy, easy flange.
![]() by MacStill » Sat Mar 26, 2011 3:44 pm
by MacStill » Sat Mar 26, 2011 3:44 pm
Step 3a.
What you end up with should look like this.
Step 4.
Solder the ring to column after you get it all plumbed up and clean up the joint with a chainsaw file.
Step 5.
Check for fit to keg and clamp. You might need to do up and undo the clamp a couple of times to get it all to bed in nicely.
Cont.
What you end up with should look like this.
Step 4.
Solder the ring to column after you get it all plumbed up and clean up the joint with a chainsaw file.
Step 5.
Check for fit to keg and clamp. You might need to do up and undo the clamp a couple of times to get it all to bed in nicely.
Cont.
You do not have the required permissions to view the files attached to this post.
Last edited by Sam. on Tue Aug 15, 2017 8:17 pm, edited 1 time in total.
Reason: Inserted new pics due to photobucket fiasco - cheers Woodduck
Reason: Inserted new pics due to photobucket fiasco - cheers Woodduck
- MacStill
- Lifetime Member
- Posts: 16835
- Joined: Fri Mar 18, 2011 1:40 pm
- Location: Wide Bay QLD
- equipment: Anything I choose :P
Re: How to.... easy, easy flange.
![]() by MacStill » Sat Mar 26, 2011 3:51 pm
by MacStill » Sat Mar 26, 2011 3:51 pm
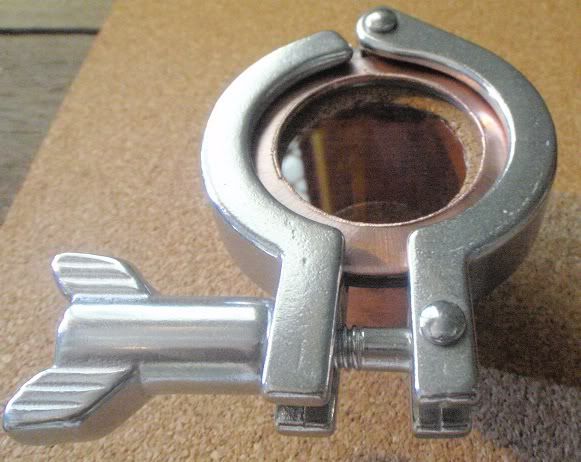
All done
You can also use these to make a sight glass.
Cheers.
You can also use these to make a sight glass.
Cheers.
You do not have the required permissions to view the files attached to this post.
Last edited by Sam. on Tue Aug 15, 2017 8:18 pm, edited 1 time in total.
Reason: Inserted new pics due to photobucket fiasco - cheers Woodduck
Reason: Inserted new pics due to photobucket fiasco - cheers Woodduck
- MacStill
- Lifetime Member
- Posts: 16835
- Joined: Fri Mar 18, 2011 1:40 pm
- Location: Wide Bay QLD
- equipment: Anything I choose :P
Re: How to.... easy, easy flange.
![]() by SBB » Sat Mar 26, 2011 4:27 pm
by SBB » Sat Mar 26, 2011 4:27 pm
Interesting post McStill...thanks.
SBB
SBB
- SBB
- Lifetime Member
- Posts: 2450
- Joined: Mon Mar 21, 2011 8:12 pm
- Location: Northern NSW
- equipment: (The Pelican) a 2 inch pot / stripper on 25L electric boiler interchangable with T500 reflux still...... 2 1/2 inch pot still on 50L keg (gas burner).....
3 inch Boka (half share with Draino),...... 4 inch 4 plate perforated plate Bubbler
Re: How to.... easy, easy flange.
![]() by TJM » Sun Jun 19, 2011 1:05 am
by TJM » Sun Jun 19, 2011 1:05 am
Hey this is great. Would this flange work ok with a sightglass and tri clamp?
- TJM
- Posts: 40
- Joined: Sun Jun 12, 2011 10:44 am
Re: How to.... easy, easy flange.
![]() by MacStill » Sun Jun 19, 2011 7:44 am
by MacStill » Sun Jun 19, 2011 7:44 am
TJM wrote:Hey this is great. Would this flange work ok with a sightglass and tri clamp?
Sure does ;)
..... and remember you first seen it here :mrgreen
Last edited by MacStill on Sun Jun 19, 2011 9:39 am, edited 1 time in total.
- MacStill
- Lifetime Member
- Posts: 16835
- Joined: Fri Mar 18, 2011 1:40 pm
- Location: Wide Bay QLD
- equipment: Anything I choose :P
Re: How to.... easy, easy flange.
![]() by MacStill » Sun Jun 19, 2011 8:20 am
by MacStill » Sun Jun 19, 2011 8:20 am
in the link I provided used as a sight glass 5Star :roll: :roll: :roll:
- MacStill
- Lifetime Member
- Posts: 16835
- Joined: Fri Mar 18, 2011 1:40 pm
- Location: Wide Bay QLD
- equipment: Anything I choose :P
Re: How to.... easy, easy flange.
![]() by R-sole » Sun Jun 19, 2011 9:31 am
by R-sole » Sun Jun 19, 2011 9:31 am
Your link don't work Captain :? :lol: :lol:
- R-sole
- Posts: 0
- Joined: Mon Apr 18, 2011 4:15 am
- Location: Northern NSW Australia
- equipment: Keg based pot stiller. 3" vm for occasionally making product for macerations and redistillation.
Re: How to.... easy, easy flange.
![]() by MacStill » Sun Jun 19, 2011 9:41 am
by MacStill » Sun Jun 19, 2011 9:41 am
Does now :lol: :oops: :oops:
Gotta fix the way links show up, dont like the way it's formatted at the moment
Gotta fix the way links show up, dont like the way it's formatted at the moment
- MacStill
- Lifetime Member
- Posts: 16835
- Joined: Fri Mar 18, 2011 1:40 pm
- Location: Wide Bay QLD
- equipment: Anything I choose :P
Re: How to.... easy, easy flange.
![]() by tipsy » Sun Jun 19, 2011 11:26 am
by tipsy » Sun Jun 19, 2011 11:26 am
McStill wrote:With the end of the pipe you want to flange, bell the end slightly on an anvil or on your vice, gently at first and about 6mm flared out. once the end is at about 45 degrees you can now flatten it to 90 degrees with short sharp taps, again just gentle, it will form but dont rush and theres no need to anneal the pipe first.
Hi McStill, I've had my 2" copper sitting around for ages (probably over 12 months)
Should I anneal it?
- tipsy
- Posts: 863
- Joined: Mon Jun 06, 2011 1:34 pm
- Location: South Gippsland, VIC.
- equipment: 4" Mac 4 with packed section and gin basket on a 50lt boiler with 2 2400w FSD elements.
Re: How to.... easy, easy flange.
![]() by MacStill » Sun Aug 28, 2011 7:44 am
by MacStill » Sun Aug 28, 2011 7:44 am
tipsy wrote:McStill wrote:With the end of the pipe you want to flange, bell the end slightly on an anvil or on your vice, gently at first and about 6mm flared out. once the end is at about 45 degrees you can now flatten it to 90 degrees with short sharp taps, again just gentle, it will form but dont rush and theres no need to anneal the pipe first.
Hi McStill, I've had my 2" copper sitting around for ages (probably over 12 months)
Should I anneal it?
See Step 2. above mate ;)
- MacStill
- Lifetime Member
- Posts: 16835
- Joined: Fri Mar 18, 2011 1:40 pm
- Location: Wide Bay QLD
- equipment: Anything I choose :P
Re: How to.... easy, easy flange.
![]() by crozdog » Mon Aug 29, 2011 12:07 pm
by crozdog » Mon Aug 29, 2011 12:07 pm
I just fount this thread - thanks just what I was looking for. I have a roll of 1/4' annealed i can use to make a bunch for my next build.
McStill, i'm curious about 2 things :
1. Am I right that this works for 4" too? or is the 4" flange a bit bigger?
2. how long does it take you to make one these in 2" & 4"?
I'm not l looking forward to the cost of buying 15 x 2' & 5 x 4" flanges... so hope it works for 4' too
cheers
McStill, i'm curious about 2 things :
1. Am I right that this works for 4" too? or is the 4" flange a bit bigger?
2. how long does it take you to make one these in 2" & 4"?
I'm not l looking forward to the cost of buying 15 x 2' & 5 x 4" flanges... so hope it works for 4' too
cheers
- crozdog
- Posts: 132
- Joined: Fri Jul 29, 2011 11:23 am
- equipment: 2" Bok
2" VM
2" pot
50l modified laundry copper for a boiler
Re: How to.... easy, easy flange.
![]() by MacStill » Mon Aug 29, 2011 12:24 pm
by MacStill » Mon Aug 29, 2011 12:24 pm
1. Am I right that this works for 4" too? or is the 4" flange a bit bigger?
2. how long does it take you to make one these in 2" & 4"?
It works fine on 4"
Only takes about 10 minutes max to make one in 4" and a little less for 2"
Making an easy flange also negates the need to solder/braze Stainless to copper.
;)
- MacStill
- Lifetime Member
- Posts: 16835
- Joined: Fri Mar 18, 2011 1:40 pm
- Location: Wide Bay QLD
- equipment: Anything I choose :P
Re: How to.... easy, easy flange.
![]() by SBB » Mon Aug 29, 2011 12:32 pm
by SBB » Mon Aug 29, 2011 12:32 pm
Croz they really are easy to make.....Im usually hopeless at forming metal into shapes.
I had my first 2 inch one made in about 25 min and it worked perfectly.
I had my first 2 inch one made in about 25 min and it worked perfectly.
- SBB
- Lifetime Member
- Posts: 2450
- Joined: Mon Mar 21, 2011 8:12 pm
- Location: Northern NSW
- equipment: (The Pelican) a 2 inch pot / stripper on 25L electric boiler interchangable with T500 reflux still...... 2 1/2 inch pot still on 50L keg (gas burner).....
3 inch Boka (half share with Draino),...... 4 inch 4 plate perforated plate Bubbler
Re: How to.... easy, easy flange.
![]() by MacStill » Mon Aug 29, 2011 12:36 pm
by MacStill » Mon Aug 29, 2011 12:36 pm
You can also skip step 2. if it's for a non structural joint, or if you use brazing rods on a structural joint.
Makes it even quicker and easier :mrgreen:
Makes it even quicker and easier :mrgreen:
- MacStill
- Lifetime Member
- Posts: 16835
- Joined: Fri Mar 18, 2011 1:40 pm
- Location: Wide Bay QLD
- equipment: Anything I choose :P
Re: How to.... easy, easy flange.
![]() by crozdog » Mon Aug 29, 2011 12:38 pm
by crozdog » Mon Aug 29, 2011 12:38 pm
McStill & SBB - thanks for the quick replies.
will give em a go!
will give em a go!
- crozdog
- Posts: 132
- Joined: Fri Jul 29, 2011 11:23 am
- equipment: 2" Bok
2" VM
2" pot
50l modified laundry copper for a boiler
Re: How to.... easy, easy flange.
![]() by stimson » Tue Sep 20, 2011 8:41 pm
by stimson » Tue Sep 20, 2011 8:41 pm
brilliant idea.... :clap:
:text-thankyoublue:
:text-thankyoublue:
- stimson
- Posts: 13
- Joined: Mon Sep 19, 2011 8:48 pm
- Location: SE QLD
- equipment: 2" bokabob
2" pot still
3" flute
4" flute
25L boiler
50L boiler
Re: How to.... easy, easy flange.
![]() by Skeeter » Sat Jan 14, 2012 8:46 am
by Skeeter » Sat Jan 14, 2012 8:46 am
Hey guys. Did these pics get messed up with the holiday fiasco? Or Something else? Either way think we can get them reposted? This seems to be exactly what I have been searching for, for weeks....
- Skeeter
- Posts: 1
- Joined: Wed Jan 11, 2012 2:30 pm
- equipment: None yet
Re: How to.... easy, easy flange.
![]() by MacStill » Sat Jan 14, 2012 9:02 am
by MacStill » Sat Jan 14, 2012 9:02 am
Will repost this arvo :handgestures-thumbupleft:
- MacStill
- Lifetime Member
- Posts: 16835
- Joined: Fri Mar 18, 2011 1:40 pm
- Location: Wide Bay QLD
- equipment: Anything I choose :P
Re: How to.... easy, easy flange.
![]() by dogbreath vodka » Sat Apr 07, 2012 4:34 pm
by dogbreath vodka » Sat Apr 07, 2012 4:34 pm
Just made my first easy easy flange in about .... 15 minutes start to finish... damn easy :D :D
Paint me " happy" :D :D
What do you use for the outer section of the sightglass to fit between the glass and the triclamp?
And what kind of cork is that?
Have been putting off making a flute because of the cost and the sight glass issues.
But with your method for them the cost will be low and the finish will be great.
DBV
Paint me " happy" :D :D
McStill wrote:
"Snip"
You can also use these to make a sight glass.
Cheers.
What do you use for the outer section of the sightglass to fit between the glass and the triclamp?
And what kind of cork is that?
Have been putting off making a flute because of the cost and the sight glass issues.
But with your method for them the cost will be low and the finish will be great.
DBV
- dogbreath vodka
- Posts: 1396
- Joined: Sun Jan 15, 2012 5:10 pm
- Location: Somewhere over the rainbow
- equipment: "Steampunk 2 - 6" Bubble cap
"Jimmy" the 4" Carter head
Return to Tips From The Workbench
Who is online
Users browsing this forum: No registered users and 15 guests