Adventures in Unmalted Grains - Rice Shochu

This area is for recipes that are not yet proven, use this area for experiments, recipe research and development of your own variations. Once a recipe is accepted as being good by the consensus it will be moved to the proven section.

Adventures in Unmalted Grains - Rice Shochu

Postby invisigoth » Sat Mar 16, 2013 7:00 pm

as the first in a series of experiments with unmalted grain i thought i'd start with rice shochu. shochu, which encompasses a variety of japanese spirits, are grossly categorised by their ingredients. for this first thread, i'm trying to make an all rice spirit. the starting point is sake. on the premise of garbage in, garbage out, i've chosen not the simplest method, but not the most elaborate either.

the basic steps are:
1. growing a fungus on steamed rice to convert starch to sugar
2. create a starter which both increases the amount of active yeast and lactic acid
3. ferment additional steamed rice with the addition of 1 and 2

i'll go into more details with later posts. this post focuses on preparation for step 1.

firstly:

Image
this is rice 8-}
i managed to get as a one time only deal, 10kg of polished sake rice, but rather than use it first, i decided to do a run with medium grain rice from the supermaket so as not to waste the good stuff on trial and error.
the rice needs to be washed first to remove the rice flour clinging to it that can make things a gluggy mess. i did this by putting it in a bowl, pouring water in, mixing it with my hands and tipping the water out. took about 5 times of repeating this to get rid of the rice flour. some people rinse it in a colander.

Image
after washing it should look like this. it's kinda translucent with a white stripe.
once it's been washed, it needs to be soaked. i found soaking it overnight seemed to work the best for the medium grain rice. make sure enough water is used so there is an excess after the grains have soaked up their fill.

Image
this is what it looks like after it's been soaked. you then need to drain it to get rid of the excess water.
the next step is the steaming, and it's fairly important. rice cookers tend to overcook the rice for the proposes of making sake. i'm not sure how much this effects the main rice for fermenting, but for this first step it matters. undercooked and the fungus wont get well enough into the grain, overcooked and it turns the rice into a liquefied mess.
i tried using various amounts of water and cooking cycles with a cooker that goes into the microwave, but it just wasn't right. in the end i bought a cheep steamer from target, but you could pick one up cheap from just about any appliance store.
i put the soaked rice into a plastic bowl and steamed it for an hour.

Image
this is how it's supposed to look. slightly translucent, and rubbery between the teeth.

next post i'll cover a bit about the fungus used and my attempt to grow it :shifty:
invisigoth
 
Posts: 269
Joined: Thu Sep 13, 2012 2:57 pm
equipment: bte cm reflux head
5l pure distilling pot still
t500 boiler +extra pure distilling lid
diy phase angle controller
diy output extension tube+parrot
3 plate modular macbubbler

Re: Adventures in Unmalted Grains - Rice Shochu

Postby dogbreath vodka » Sat Mar 16, 2013 8:18 pm

Glad to hear someone else is trying rice.
From what I have read it produces a really clean spirit with little in the way of heads and tails.

I am currently experimenting with rice and bread improver to make a vodka.
Basically adapting Uncle Remus Rice Vodka recipe, as in Oz finding amylase is too difficult.

Will see how it goes and post the results in a week or two

DBV
dogbreath vodka
 
Posts: 1396
Joined: Sun Jan 15, 2012 5:10 pm
Location: Somewhere over the rainbow
equipment: "Steampunk 2 - 6" Bubble cap
"Jimmy" the 4" Carter head

Re: Adventures in Unmalted Grains - Rice Shochu

Postby invisigoth » Sat Mar 16, 2013 8:44 pm

dogbreathe vodka wrote: as in Oz finding amylase is too difficult.


i was sure i'd come across it on a couple of hbs web sites here in oz.

as a brewer, i've always wanted to try making sake, but i always thought it would be too difficult to get all the ingredients. now i have the chance to do it, and take it to the next stage with the still. i'll be trying differnt grains as well. barley has also been used instead of rice with this process, but one thing at a time :))
invisigoth
 
Posts: 269
Joined: Thu Sep 13, 2012 2:57 pm
equipment: bte cm reflux head
5l pure distilling pot still
t500 boiler +extra pure distilling lid
diy phase angle controller
diy output extension tube+parrot
3 plate modular macbubbler

Re: Adventures in Unmalted Grains - Rice Shochu

Postby invisigoth » Sat Mar 16, 2013 8:51 pm

on with the next part:
our guest for this evening is a little guy by the name of aspergillus oryzae otherwise known as koji. this is the mould most often used for making sake. for making shochu, it's not the first choice, however aspergillus kowachii and aspergillus awamori are not readily available to the home brewer. i sourced my koji-kin (that's the spores) from a place called vision brewing based in western australia. apparently in the us it's possible to buy rice that's already got the koji grown on it (i think dried in packets) from asian grocery stores. i haven't explored this possibility here in oz.

so, to make your rice culture (kome-koji) you need to sprinkle the spores onto the steamed rice (after it's cooled ) and incubate. for the recipe i steamed 370g of rice for my starter and 1.42kg for the main ferment. i steamed and made my kome-koji for the starter and main as separate batches. i used 1 teaspoon of koji-kin for the starter and 3 for the main batch,

my first try at this hasn't been the best it could be, and i have a few ideas that i will try later, but here's what i did:

i used a 5l bucket stacked on another 5l bucket on top of my heat mat. the top bucket was sterilised and the rice while still steaming hot was placed into this. the instructions that come from vision brewing say to keep the moisture in by having a lid on the incubator and covering the rice with either damp cheese cloth or cotton. i used cotton, and put it in the steamer when i was steaming the rice to sterilise it cause as empty glass put it "you beer guys worry too much" :teasing-neener:

i punched a hole in the lid with a scriber and slipped in the thermometer that came with my bubbler, since my electronic one i had planned to use was giving stupid readings. for the 1.4kg batch i used an 11l bucket on top of a notebook computer box with an aquarium electronic thermometer buried in the middle of the rice. i had to fiddle a bit because the heat mat works well when it has a bucket with 20+ litres of wort on it, but way too many herbs when a small bucket with a little steamed rice. :scared-eek:

now the temperature according to vision should be 30c, however, reading around, that's at the bottom of the temp scale for the wee beastie, and it produces different enzymes at different temperatures. at 30c it's proteases. to magic temperature to produce the alpha-amylase that we want is 35c. apparently temp its grown at can also affect the fragrance of the finished sake. don't know if there is a flavour change associated with that. over 40c and you kill it.

one thing vision don't mention is that aspergillus oryzae is an aerobic fungus so you need to make sure it has sufficient oxygen. on both batches i had the lid on loose, which may not have helped much. on the larger batch i had filter wool around the hole the wire for the thermometer probe to keep nasties out.

so... every 12 hours you have to mix up the rice during incubation.

Image

this is what my batches looked like. whilst there is clearly growth i think the grains are supposed to be completely coved, but it took 52 hours to get to this stage and it should be a 40 hour incubation more or less. the rice did seem very dry, so maybe i wasn't retaining enough moisture. if there was more growth, a sure sign that i's drying out is that it goes into survival mode and starts to produce spores, but not at low temp. once the kome-koji is done, you can either use it immediately. to use it later, put it in the freezer, or dry it at a cool temperature.

before i commit to the starter i think i might have another go with some more rice and try an idea. of course a humidity controlled, temperature controlled incubator in a lab would be nice... :drool:
invisigoth
 
Posts: 269
Joined: Thu Sep 13, 2012 2:57 pm
equipment: bte cm reflux head
5l pure distilling pot still
t500 boiler +extra pure distilling lid
diy phase angle controller
diy output extension tube+parrot
3 plate modular macbubbler

Re: Adventures in Unmalted Grains - Rice Shochu

Postby bt1 » Sun Mar 17, 2013 7:49 am

Nice work bloke...

keen for the next few posts...

bt1
bt1
 
Posts: 2448
Joined: Sun Apr 22, 2012 11:56 am
Location: Adelaide
equipment: 2 x Glass Bubblers, 5 plate 89mm & 6 plate 110mm
4" 6 plate copper bubbler, 500mm copper packed section
Several pots, custom boiler
14 keg rotating brew setup, fermentation & dispenser fridges.

Re: Adventures in Unmalted Grains - Rice Shochu

Postby unsub » Sun Mar 17, 2013 7:56 am

Interesting read. Incidentally, the process of infecting the rice with the koji is referred to as malting so not too different from an all grain mash. From my brief research into making sake I have read that it's like doing all grain mash in that you only need the malted rice to convert starch in the un-malted rice and don't actually need to malt the bulk of it.

My interest into sake ended when I tasted it :puke-huge: To me it smells like turbo wash tails and tastes like it smells.

I have read it makes a great vodka but I think I'll stick to the wheat bran sugar washes until I get the all grain stuff sorted.

cheers

unsub
unsub
 
Posts: 245
Joined: Thu Apr 19, 2012 10:05 am
equipment: 4" 5 Plate Column

Re: Adventures in Unmalted Grains - Rice Shochu

Postby invisigoth » Sun Mar 17, 2013 8:57 am

unsub wrote:Interesting read. Incidentally, the process of infecting the rice with the koji is referred to as malting so not too different from an all grain mash. From my brief research into making sake I have read that it's like doing all grain mash in that you only need the malted rice to convert starch in the un-malted rice and don't actually need to malt the bulk of it.


actually it is different. for a start, whilst kome-koji is often translated as rice malt, it isn't malt, nor will it ever be malt. real rice malt involves germination. to extract the sugars requires mashing just like any other malted grain. in order to remove the fats and proteins that produce less than fantastic flavours, the rice is polished, thus removing the biological capability for the seed to germinate.the flavour produced is also totally different. :angry-banghead:
invisigoth
 
Posts: 269
Joined: Thu Sep 13, 2012 2:57 pm
equipment: bte cm reflux head
5l pure distilling pot still
t500 boiler +extra pure distilling lid
diy phase angle controller
diy output extension tube+parrot
3 plate modular macbubbler

Re: Adventures in Unmalted Grains - Rice Shochu

Postby Kimbo » Sun Mar 17, 2013 12:23 pm

Great tutorial Gothy :handgestures-thumbupleft:
Looking forward the the rest of it mate ;-)
Kimbo
Lifetime Member
 
Posts: 5461
Images: 0
Joined: Fri Mar 18, 2011 6:33 pm
Location: Perf WA
equipment: 4" bubbler with a 6"inline thumper

Re: Adventures in Unmalted Grains - Rice Shochu

Postby invisigoth » Fri Mar 29, 2013 12:10 am

ok, so i wasn't very happy with the kome-koji that i'd done, so i decided to have another crack at it, and learnt a few things along the way. one thing i didn't mention that should have, is that the incubation should be in the dark. it doesn't like light. :law-policered:

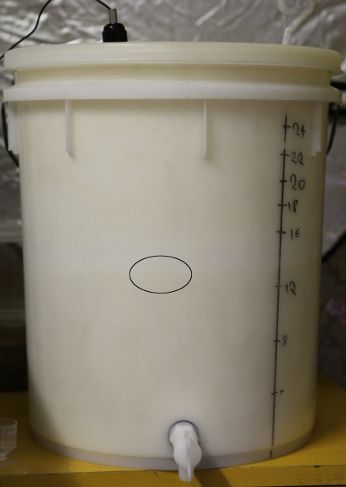
first i picked up a few things. went to the nearest asian shopping district, hunted around some of the grocery and variety stores and picked up some trays and a lid for a bamboo steamer that i figured would fit inside my 11l plastic bucket, some stainless steel sieves, and a couple of stainless steel wire trays.

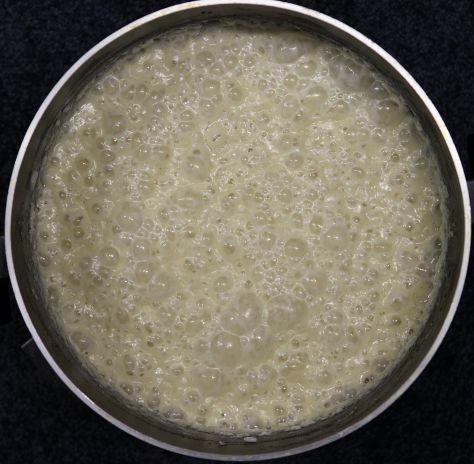
the wire tray happened to fit in the bucket and wedge against the taper of the walls about half way down. i steamed the rice, only this time i put the rice in the stainless sieves. i figured that i might get a better steaming this way. didn't work, the rice was a bit too damp. then i put the steamed rice into the tray, put some previously boiled water in the bottom of the bucket to keep it humid, and put the lid from the bamboo steamer on top to create a moist micro climate. well... the wire tray swivelled down and the rice got a dunking. :crying-blue: . i figured that the rice should be ok with a bit of extra water. this turned out to be wrong.

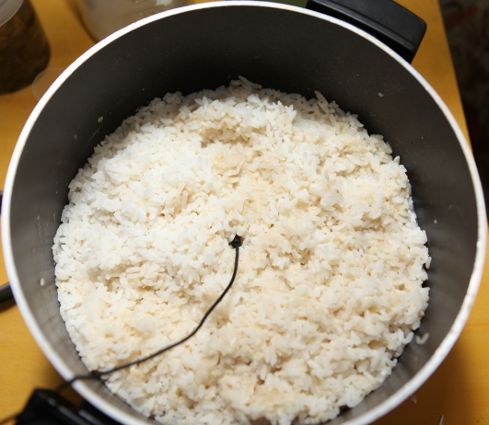
i cut a disk of fly-screen to fit the bamboo steamer trays,shoved the trays and lid into boiling water to sanitise them, then put them into the bucket. could only fit 2 trays and the lid inside the bucket. i put the dunked rice into the top tray, the bottom tray sitting in the water. slipped a temp probe up into the bottom tray out of the water, popped on the lid, put the bucket on my heating mat, and connected my heating mat to my controller for the boiler. with the controller i was able to take the sting out of the heating mat and get the temp about right. i seeded the rice, and as the incubation went on, the koji was growing ok, but the rice turned to mush as the koji did it's thing breaking it down. i was satisfied that i managed to get proper grown throughout all the grains, but it was more like mash potato in the end.

so, on to idea #2! using the temp controller seemed to work with the heat mat, so i stuck with that, and the bamboo steamer seemed to work, so i kept that. the first go described above was the kome-koji for the starter. for the main ferment i needed to do 2 batches each about 710g of rice. a bamboo tray is big enough for 500g, but not 710. i steamed the rice in the container rather than the sieve the way i had been doing before, and used the stainless sieve to get the bottom bamboo tray in the bucket higher up so that the water wouldn't be touching the rice. the rice seems too dry the way i steam it, although it matches all the descriptions i've read about how the rice should be. so.. i sprayed the rice with a bit of water while mixing it with sterile gloved hands until it seemed moist but still free flowing. i proceeded as before. i managed to get complete growth, but 2 things came out from this. firstly, the top and bottom tray didn't incubate at the same temperatures, and secondly, even though it was still seeming free flowing after i had wet the rice, it was too much and again it was mushy by the end. not as bad, but still not the way it should be. i did get good depth of growth so it wasn't a total loss. :doh:

ok, so on to idea #3 . this didn't end up going very far. i tried using a styrofoam box designed to transport reagents in that has sections designed to take bottles filled with gel that you freeze along its sides. i thought maybe heating these bottles instead and inserting them in their slots would radiate heat around a 5l bucket. they are great for freezing, but don't retain heat very well. fail!

so 4th and final idea i wish i had thought of before. we have an electric fryer with a thermostat. experiments with water proved that it can happily maintain low temps, and has a capacity of about 4.5l.

Image

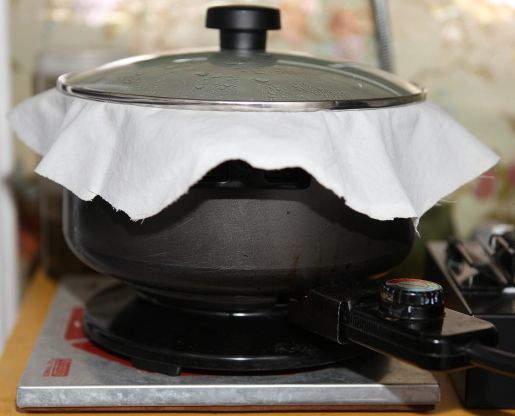
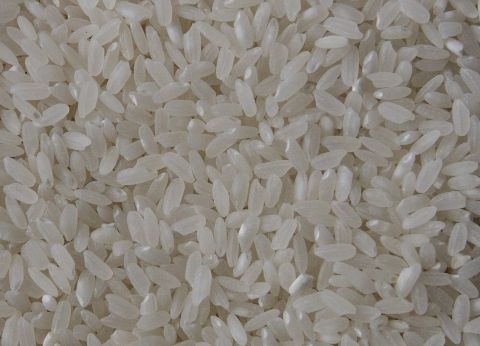
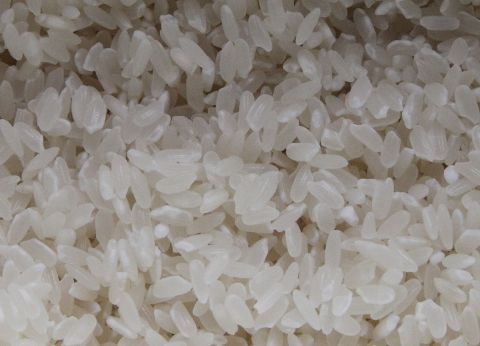
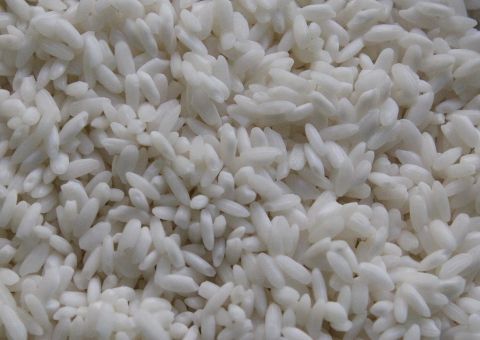
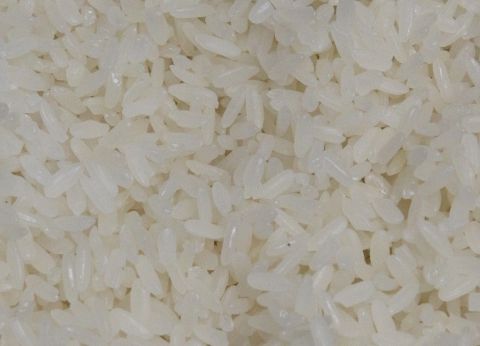
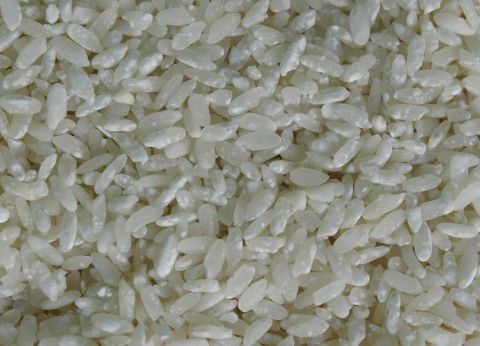
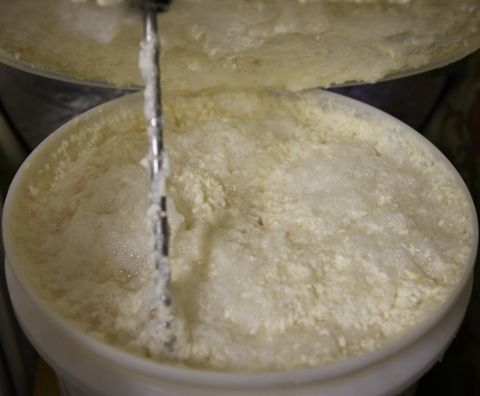
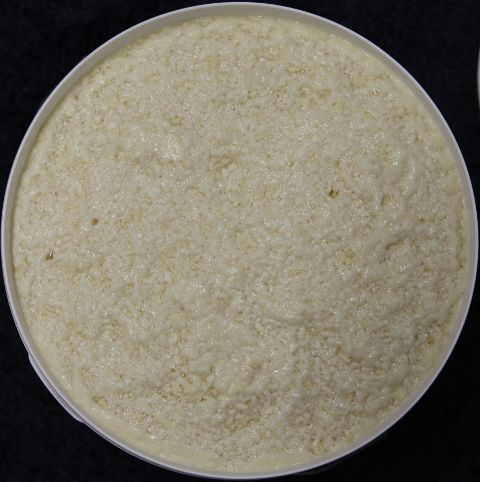
i put in the second batch of steamed rice, let it cool with a piece of cotton that had been steamed between the lid and the pot to stop condensation dripping onto the rice. when cooled, i again moistened the rice , but this time very lightly, just enough to take the sense of dryness. before this if you mixed the rice you could hear the grains kinda clicking together. i only used enough spray to deaden that clicking. i slowly adjusted the thermostat till it maintained 34-35c for a few hours. even though the element is on the bottom, the thickness of the pot meant that there was even heat through all the rice. again standard practice, mix the rice every 12 hours. after 48 hours it was done, and it looked like this:

Image

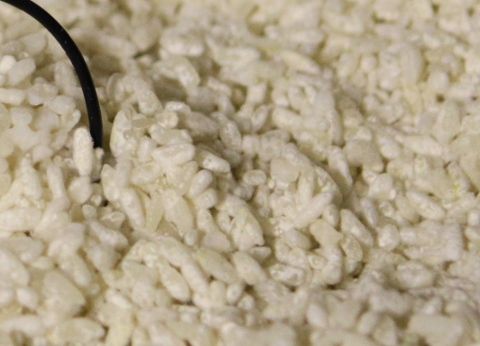
this is how it *should* be! :music-deathmetal:
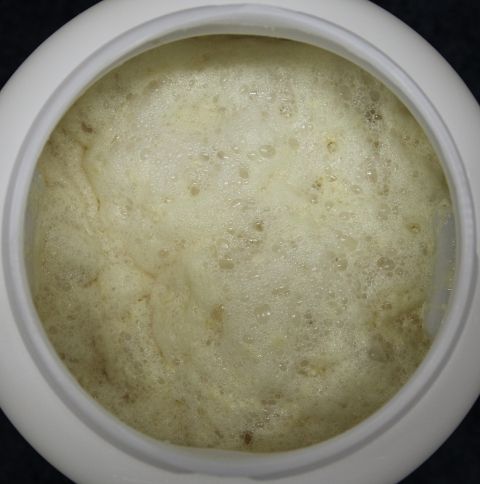
i tasted a few random grains, and all were sweet and the texture had changed, just the way it's supposed to. my earlier attempts in my earlier post had growth, but not enough and didn't taste sweet at all. they will go in with the main ferment and i'll used the batches from this post. :D

about a week after easter i'll continue with posting details of the starter.
invisigoth
 
Posts: 269
Joined: Thu Sep 13, 2012 2:57 pm
equipment: bte cm reflux head
5l pure distilling pot still
t500 boiler +extra pure distilling lid
diy phase angle controller
diy output extension tube+parrot
3 plate modular macbubbler

Re: Adventures in Unmalted Grains - Rice Shochu

Postby MacStill » Fri Mar 29, 2013 12:29 am

Do you cook curry too ? :think:
MacStill
Lifetime Member
 
Posts: 16835
Joined: Fri Mar 18, 2011 1:40 pm
Location: Wide Bay QLD
equipment: Anything I choose :P

Re: Adventures in Unmalted Grains - Rice Shochu

Postby invisigoth » Fri Mar 29, 2013 11:03 am

MacStill wrote:Do you cook curry too ? :think:


i use a crock pot for that :teasing-neener:
invisigoth
 
Posts: 269
Joined: Thu Sep 13, 2012 2:57 pm
equipment: bte cm reflux head
5l pure distilling pot still
t500 boiler +extra pure distilling lid
diy phase angle controller
diy output extension tube+parrot
3 plate modular macbubbler

Re: Adventures in Unmalted Grains - Rice Shochu

Postby invisigoth » Sun Apr 07, 2013 1:49 pm

hello moto! :))

now for the starter, called moto. whilst there is some citric acid produced as part of the yeast metabolism, the primary source of acidification at the start of the main fermentation is from lactic acid. making sake is a bit of an exploration into microbiology, because it's a combination of both single celled fungi (s.cerevisiae), multi cell fungi (a.oryzae) and bacteria (s. thermophilus, l.bularicus).

previously you should have steamed 370g or rice and used that to make your starter kome-koji.
steam another 370g of rice and allow to cool.
add both lots of rice to 370ml of water at 60c.
add 2 teaspoons of natural yougurt.
allow to cool to 40c incubate at 40c for 24 hours.
after 24 hours allow to cool to about the higher end of your yeasts comfort zone and pitch. if using a dry brewing yeast that should be about 10g.

here's what it looks like at 0 hours:

Image

after 24 hours it looks like this:

Image

it kinda has the same consistency as a thick porridge and you can see a little bubbling. supposedly there should be a strong cheesy smell, but i never noticed it, just a little sour like yoghurt. nothing really off.
at the end of day 4 (assuming you call the start day 1 and not day 0), it looks like this:

Image

it should be noted that for the purposes of taking photos the lid was removed, but only when taking photos.
for the purposes of the exercise you could use just about any yeast, although it's recommended to use ones that prefer colder temps. i chose to use a strain specifically selected for sake brewing. wyeast claims on the packet "for wine, mead,cider distilling & sake" but i think that's a bit of false advertising. the sweet mead yeast says the same thing, but given that it specifically leaves residual sugar, you wouldn't wanna use that for distilling!

when i brewed some rice malt extract with this yeast to get some stock for later use, it was a very lazy yeast. clearly it's a lot more vigorous when given the substrate it was selected for. :-D
well that's it for now. i have the main ferment coming up.
invisigoth
 
Posts: 269
Joined: Thu Sep 13, 2012 2:57 pm
equipment: bte cm reflux head
5l pure distilling pot still
t500 boiler +extra pure distilling lid
diy phase angle controller
diy output extension tube+parrot
3 plate modular macbubbler

Re: Adventures in Unmalted Grains - Rice Shochu

Postby invisigoth » Mon Apr 08, 2013 9:00 pm

ok, so here's a tip for the young players out there (oh gawd i'm channelling rex hunt.. 8-} ). remember when i said i thought sake #9 is a lazy yeast? yeh well.. i was wrong!

i took my rice out of the freezer, and put all of the kome-koji rice to one side. i put the ordinary boiled rice into my fermenter, boiled the correct amount of water and poured it on to the rice. when the temp was down a bit from the frozen rice, i then added the kome-koji that had i wasn't happy with. i figured it had enough growth to at least break down itself. in the mean time the good stuff was thawing out. once the temp was down to about 60 i added the rest. i mixed it as best as i could, it was pretty stiff. the temp was still too high to pitch, so i left it overnight with the lid on. next morning there was an unpleasant smell, sulphity. when i lifted the lid it was clear that's where it was coming from. i didn't think it had enough to to get a major infection, but it had me worried. it was also looser and looked a little like the moto after the first 24 hours. i seem to recall reading an account of something similar where the smell disappeared within the next 24 hours, so i figured i'd pitch anyway. the level was up to the 22 l mark. i figured that should be safe... it's a pretty mellow yeast after all... right? :wtf:

after a few hours the airlock was doing it's thing. after 10 the level was up to 25l. worried about that smell i decided to give it a stir. normally i don't like to mess with things once it's locked down, but...
it was bubbling away quite vigorously, looked a lot like the photo of the moto after day 4, and it had the consistency of porridge. more importantly there was no horrible smell, mostly just the smell of rice with a hint of the koji. clearly the yeast was in it's happy place. i'm fairly sure it is the yeast i added and not wild yeast or something else chewing on it. btw, turns out it's under the lager family of yeast strains. :-B

well... i had a peek a few hours later. the lid was domed up, there was a hiss coming from the air lock grommet and somewhere else, and foam with rice pressed against the lid... looked like it was about to blow. i pulled the airlock out to relieve some of the pressure..... you know what happens next yeh? :oops:
yep... a face full of rice as it shoots out of the airlock hole. :crying-blue:

managed to sterilise a 10l bucket and jug, and scoop out about 6 l into the bucket. in a few days it should have settled down and i can pour that back into the main fermenter. :shifty:
invisigoth
 
Posts: 269
Joined: Thu Sep 13, 2012 2:57 pm
equipment: bte cm reflux head
5l pure distilling pot still
t500 boiler +extra pure distilling lid
diy phase angle controller
diy output extension tube+parrot
3 plate modular macbubbler

Re: Adventures in Unmalted Grains - Rice Shochu

Postby MacStill » Mon Apr 08, 2013 9:09 pm

I'm too busy reading to say much, please keep moving forward :handgestures-thumbupleft:
MacStill
Lifetime Member
 
Posts: 16835
Joined: Fri Mar 18, 2011 1:40 pm
Location: Wide Bay QLD
equipment: Anything I choose :P

Re: Adventures in Unmalted Grains - Rice Shochu

Postby bt1 » Tue Apr 09, 2013 8:02 am

kk so when can we get the taste tests underway

reading with much interest but I really want is to know what it tastes like.

bt1
bt1
 
Posts: 2448
Joined: Sun Apr 22, 2012 11:56 am
Location: Adelaide
equipment: 2 x Glass Bubblers, 5 plate 89mm & 6 plate 110mm
4" 6 plate copper bubbler, 500mm copper packed section
Several pots, custom boiler
14 keg rotating brew setup, fermentation & dispenser fridges.

Re: Adventures in Unmalted Grains - Rice Shochu

Postby invisigoth » Tue Apr 09, 2013 9:07 am

bt1 wrote:kk so when can we get the taste tests underway

reading with much interest but I really want is to know what it tastes like.


:laughing-rolling:

nothing good ever came quickly :teasing-tease:

in case you hadn't noticed, this method isn't for the impatient. it's a 20 day ferment once you've pitched your moto ;-)
invisigoth
 
Posts: 269
Joined: Thu Sep 13, 2012 2:57 pm
equipment: bte cm reflux head
5l pure distilling pot still
t500 boiler +extra pure distilling lid
diy phase angle controller
diy output extension tube+parrot
3 plate modular macbubbler

Re: Adventures in Unmalted Grains - Rice Shochu

Postby baldoss » Tue Apr 09, 2013 10:15 am

Cool stuff mate, fascinating read :handgestures-thumbupleft:
baldoss
 
Posts: 158
Joined: Thu Feb 07, 2013 11:53 am
Location: Sydney, New South Wales
equipment: 2" copper pot still with liebig condenser on 50L ss keg boiler (gas)

Re: Adventures in Unmalted Grains - Rice Shochu

Postby invisigoth » Wed Apr 10, 2013 10:49 pm

a better moto

the previous way of making the moto is half way between the traditional and modern way of making it. i had a thought that the lactic acid continued to be produced by the yoghurt bacteria, however that's not necessarily the case (hence the 40c incubation). the modern way to make the moto is to add lactic acid. for sake, lactic acid is preferred over citric acid to acidify it, and this practice also carries over into making shochu. it's still a 4 day ferment. when i do the next batch of shochu with the polished sake rice, this is the method i'll use. rather than 50/50 rice/kome-koji, it uses the same 20-25% of total that the main fermentation uses.

so i'll use:
115g dry wt rice steamed and made into kome-koji
340g dry wt rice steamed
590ml water
3.8ml 88% lactic acid
invisigoth
 
Posts: 269
Joined: Thu Sep 13, 2012 2:57 pm
equipment: bte cm reflux head
5l pure distilling pot still
t500 boiler +extra pure distilling lid
diy phase angle controller
diy output extension tube+parrot
3 plate modular macbubbler

Re: Adventures in Unmalted Grains - Rice Shochu

Postby invisigoth » Tue Apr 16, 2013 9:57 pm

ok, so some ingredients for the main ferment:
1.42 kg dry weight of rice steamed and made into kome-koji
4.5kg dry weight of rice steamed
7.74l water

however, since i wasn't happy with my first attempt at making the kome-koji both for the moto and the main fermentation i did another good batch. not wanting to waste the first attempt, and figuring that it had enough growth to at least break itself down, i threw that in as well and added additional water, so:

another 1.79kg of failed kome-koji, and a total amount of water added of 10.08l.

add the moto and stir it in.
stir once a day for 20 days.

so after the post of the first 13 hours after pitching my starter, and having removed 6l to a 10l bucket, everything settled down. after stirring it after the first day , it seemed ok, pretty vigorous bubbling through the airlock, and the foam down to 20l after stirring back in. the next day it seemed ok, it was getting more and more liquid, so the rice was breaking down nicely. 4 hours after stirring it in, it was a repeat of the my earlier misadventure, with foam pushing the lid up, and the airlock not doing much, as pictured below:
Image

as you can see, the circled area highlights where the foam starts from. here's what it looked like under the bonnet:

Image

it was a similar deal with the bucket:

Image

all i could do was just poke the foam down so give it some wiggle room and keep an eye on it. i'm not entirely enamoured with the idea of opening up the fermenter multiple times during the fermentation, but that's part of the methodology for this fermentation. :doh:

that idea didn't work, so in the end i sanitised another 25l fermenter, transferred the contents of the bucket to that, scooped some more out of the first fermenter to that so that both fermenters were at the 12l mark. job done. :handgestures-thumbupleft:

7 days after pitching (day 8) i transferred both lots into a shiny new 30l fermenter. there is still grains of rice, but they all looked eroded. it's mostly liquid, like soup. there was perhaps a bit more aeration than i would have liked, but there was no mistaking the alcohol fumes. it was clearly already quite potent. a few hours after it foamed up and threatened to hit the lid, so i gently pushed the foam down and it settled down after that. next day stirred it gently as per the "stir once every 24 hours", and the foam was under control.

here's the cap on day 9:
Image
invisigoth
 
Posts: 269
Joined: Thu Sep 13, 2012 2:57 pm
equipment: bte cm reflux head
5l pure distilling pot still
t500 boiler +extra pure distilling lid
diy phase angle controller
diy output extension tube+parrot
3 plate modular macbubbler

Re: Adventures in Unmalted Grains - Rice Shochu

Postby baldoss » Wed Apr 17, 2013 2:28 pm

Looking.... good? :think:
baldoss
 
Posts: 158
Joined: Thu Feb 07, 2013 11:53 am
Location: Sydney, New South Wales
equipment: 2" copper pot still with liebig condenser on 50L ss keg boiler (gas)

Next

Return to Recipe Development


Who is online

Users browsing this forum: No registered users and 142 guests

x